The Alarm Limits allows you to configure the alarm limits settings on the specified multiplexer channel.
Off - default value, disable all limits for this channel.
Low/High - When selected, a limit occurs when the specified number of After N successive data points in the scans on this channel are above the High level or below the Low level. After selecting this limit type, enter a floating point level in the Low and High field.
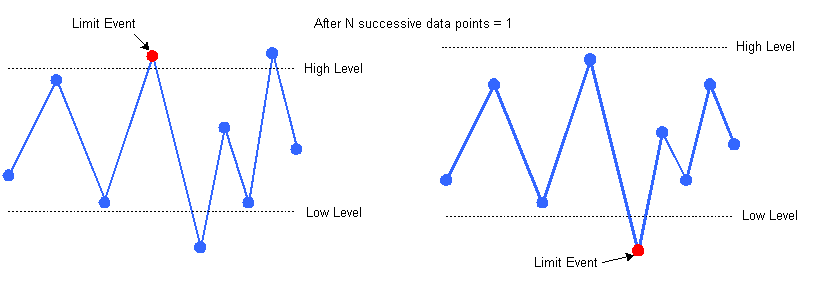
Example 1: Alarm type = Low/High, After N successive data points = 1 (default value). When the After N successive data points is set to 1, the limit occurs on the first scanned data point on this channel that is above the high level or below the low level. The figure below left shows a limit occurring on the first scanned data point above the high level. In this example, the limit is shown occurring on the fourth scanned data point (fourth scan on this channel). The figure below right shows a limit occurring on the first scanned data point below the low level. In this example, the limit is shown occurring on the fifth scanned data point (fifth scan on this channel).
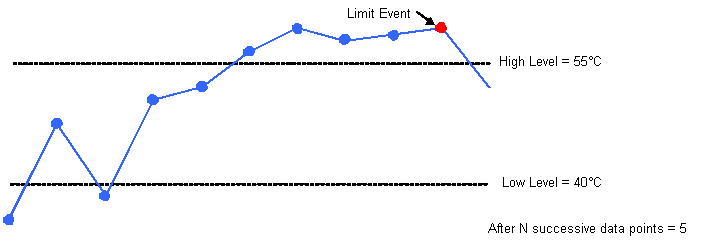
Example 2: Alarm type = Low/High, After N successive data points = 5. In this example, with the After N successive data points is set to 5, the limit can occur on the fifth data point in the scan, in sequence, that is above the high level or below the low level. The figure below shows a limit occurring on the fifth sequentially scanned data point above the high level of 55°C. In this example, the limit is shown occurring on the tenth scanned data point (tenth scan on this channel).
High Only - When selected, a limit occurs when the specified number of After N successive data points in the scans on this channel are above the High level (see examples below). After selecting this limit type, enter a floating point level in the High field.
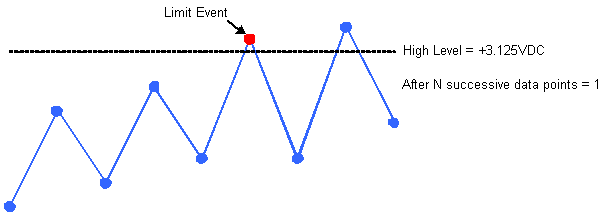
Example 1: Alarm type = High Only, After N successive data points = 1 (default value). When the After N successive data points is set to 1, the limit occurs on the first data point in the scan above the High level. The figure below shows an above the High level event occurring on the first scanned data point above the High level of +3.125 VDC.
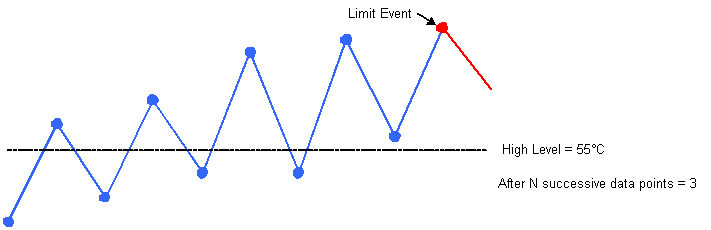
Example 2: Alarm type = High Only, After N successive data points = 3. In this example, with the After N successive data points is set to 3, the limit occurs on the third data point in the scan, in sequence, that is above the High level. The figure below shows an above the High level event occurring on the third sequentially scanned data point above the High level of 55°C. In this example, the limit is shown occurring on the tenth scanned data point (tenth scan on this channel). Notice that other preceding data points are above the High level but the limit does not occur until 3 data points in sequence are above the High level.
Low Only - When selected, a limit occurs when the specified number of After N successive data points in the scans on this channel are below the Low level (see examples below). After selecting this limit type, enter a floating point level in the Low field.
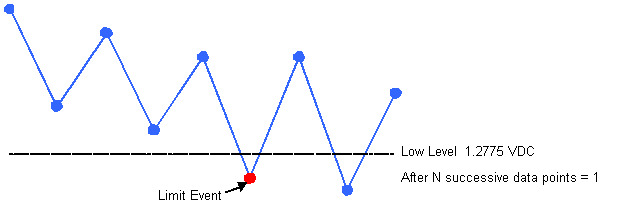
Example 1: Alarm type = Low Only, After N successive data points = 1 (default value). When the After N successive data points is set to 1, the limit occurs on the first data point on this channel below the Low Level. The figure below shows a limit occurring on the first scanned data point below the Low Level of +1.2775 VDC. In this example, the limit is shown occurring on the sixth scanned data point (sixth scan on this channel).
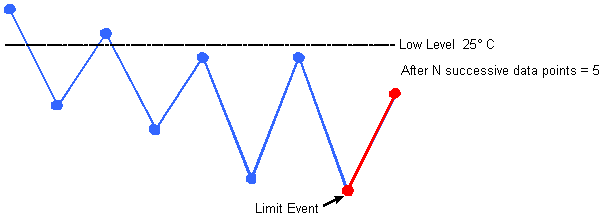
Example: Alarm Type = Low Only, After N successive data points = 5. In this example, with the After N successive data points is set to 5, the limit occurs on the fifth data point in the scan, in sequence, that is below the specified low level. The figure below shows a limit occurring on the fifth sequentially scanned data point below the low level of 25°C. In this example, the limit is shown occurring on the eighth scanned data point (eighth scan on this channel).
Within range - When selected, a limit occurs when the specified number of After N successive data points in the scans on this channel are within the high and low levels. After selecting this limit type, enter a floating point level in the Low and High field.
Example 1: Alarm type = Within range, After N successive data points = 1 (default value). When the After N successive data points is set to 1, the limit occurs on the first scanned data point on this channel that is within the high and low levels. The figure below shows a limit occurring on the first scanned data point within the high and low levels. In this example, the limit is shown occurring on the seventh scanned data point (seventh scan on this channel).

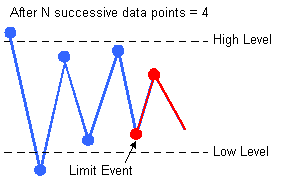
Example 2: Alarm type = Within range, After N successive data points = 4. In this example, with the After N successive data points is set to 4, the limit can occur on the fourth data point on this channel, in sequence, that is within the high and low levels. The figure below shows a limit occurring on the fourth scanned data point, in sequence, within the high and low levels. In this example, the limit is shown occurring on the sixth scanned data point (sixth scan on this channel).
Stabilize - When selected, a limit occurs when the specified number of After N successive data points in the scans on this channel have stabilized to within a specified delta band. After selecting this limit type, enter a floating point value in the Δ Band field and a number of data points in the After N successive data points field (2 to 1000). The delta value is a relative, not absolute, value. For example, if you specify a delta of 2 VDC, this could apply to any 2 VDC delta band, such as, 8 to 10 VDC, 1.5 to 3.5 VDC, -5.1 to -7.1 VDC, and so on.
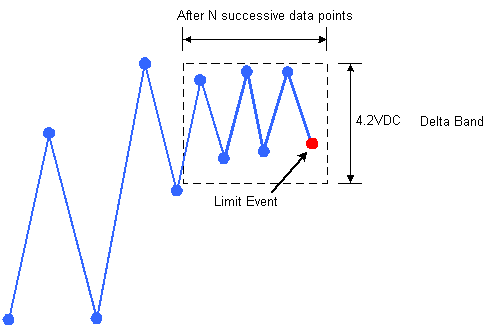
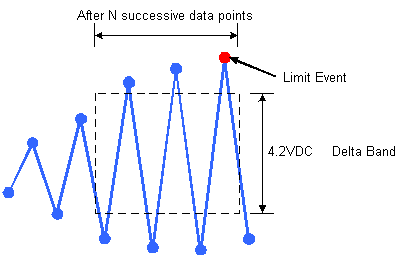
Example: The figure below shows a specified delta band of 4.2 VDC and the After N successive data points set to 6. In this case, the alarm event occurs on the sixth data point in a row that has stabilized within the specified delta band. In this example, the limit is shown occurring on the eleventh scanned data point (eleventh scan on this channel).
Destabilize - When selected, a limit occurs when the specified number of After N successive data points in the scans on this channel have destabilized and are outside of a specified delta band. After selecting this limit type, enter a floating point value in the Δ Band field and a number of data points in the After N successive data points field (2 to 1000). The delta value is a relative, not absolute, value. For example, if you specify a delta of 2 VDC, this could apply to any 2 VDC delta band, such as, 8 to 10 VDC, 1.5 to 3.5 VDC, -5.1 to -7.1 VDC, and so on.
Example: The figure below shows a specified delta band of 4.2 VDC and the After N successive data points are 6,. In this case, the alarm event occurs on the sixth data point in a row outside the specified delta band. In this example, the limit is shown occurring on the tenth scanned data point (tenth scan on this channel).
Off - default value, disable all limits for this channel
Equal (pattern match) - When selected, a limit will occur when the digital pattern appearing on the input to this channel matches the entered pattern.
Not Equal (pattern does not match) - When selected, a limit will occur when the digital pattern appearing on the input to this channel does not equal the entered pattern.
Enter the value of the low limit. Applicable for (Low Only test, Low/High test, or Within range test).
Enter the value of the high limit. Applicable for High Only test, Low/High test, or Within range test.
Enter the value of the delta band. Applicable for Stabilize test, or Destabilize test.
Enter a value for N if you want to assert the limit for one of the above alarm types after the scan on this channel has stabilized for N successive data points (N successive scans).
Allows you to select an instrument alarm line that will become active when the selected limit occurs.
Instrument hardware alarms (Alarm 1 to Alarm 4) are supported when:
The alarm type is set to High Only, Low Only, or Low/High.
The number of After N successive data points is set to one.
The software alarm (SW Alarm) supports all alarm types.
You can select the alarm from the list of Alarm 1, Alarm 2, Alarm 3, Alarm 4, or SW Alarm.
Allows you to set the On Limit Failure properties in the On Alarm dialog box. Click ... in the On Alarm column to open the On Alarm dialog box.
Note: An alarm type must be selected in the Alarm Limits column before you can access this dialog box.
Click this button to set the On Limit Failure settings for this channel to the default, with all options unselected on this dialog box.
Use these settings to specify the action(s) taken when an alarm event occurs.
Stop Scan - When selected, the scan will stop when an alarm event occurs on this channel.
Audible Sound (Beep) - When selected, the sound associated with your computer's Beep Program Event will sound whenever an alarm event occurs on this channel.
Open - (Requires a 34903A or 34904A module.) When selected, whenever an alarm event occurs, the channel you select in the Channel box will be opened. After selecting Open, use the down arrow next to Channel to select the channel to open.
Close - (Requires a 34903A, 34904A, 34905A, or 34906A module.)* When selected, whenever an alarm event occurs, the channel you select in the Channel box will be closed. After selecting Close, use the down arrow next to Channel to select the channel to close.
*Channels can only be closed on 34905A and 34906A modules (OPEN does not apply). To open a channel on one of these modules, you must close another channel in the same bank.
Send Bit Pattern - (Requires a 34907A Multi-Function Module, 34952A Multi-Function Module or DAQM907A Multi-Function Module). When selected, whenever an alarm event occurs, the binary bit pattern you enter into the box below will be sent to the digital I/O port you select in To Digital Port.
Send Email Message - Sends an e-mail to the specified recipient upon each alarm triggered (every events per test result trigger an e-mail). To specify an e-mail recipient, go to the main Global Settings menu in BenchVue and select "Settings".
Execute Batch File - Executes a custom batch file upon each alarm triggered (every events per test result execute a batch file). After enabling this mode, click ... and browse to the file location where you have stored custom batch files that you have created.
Note: To configure an alarm on a 34907A, 34952A or a DAQM907A Totalize channel, select High Only in the Alarm Type column and enter the count for the selected alarm. To configure an alarm on a 34907A or DAQM907A Digital Read 8-Bit channel, select Equal (pattern match) or Not Equal (pattern does not match) in the Alarm Type column and enter the binary pattern to test against in the High column.