 button or the
  button.
In the Data Logger mode, the computer's clock controls measurement start/stop/interval, and readings are stored in a data log on the computer.
Note: For more efficient file management, file partitioning is used for data logs that generate large data files. The file size limit varies by bench application and is based on the number of data points, traces, and captures. If the data file size exceeds the file size limit for the bench application, BenchVue saves that file, closes it, and then opens a new file.
The default file name under Data manager File Name consists of the DAQ model number followed by "Data Log" and a numeric index. For example, 34972A Data Log 31.
To change the default name, click on the existing file name under File Name to edit the prefix name. You also have the option to include or exclude the date, current time, and numeric index by checking or unchecking the Append date, Append time and Append Number checkboxes accordingly. The date is in the form yyyy-mm-dd and the time is in the form hh-mm-ss (24-hour time format). For example, <model> Data Log 2013-09-20 11-40-26 1 – September 20, 2013 at 11:40:26 with a numeric index of 1.
To enable the instrument to log data to the external drive, select Log to USB (DAQ970A and DAQ973A only).
You can set the row limit for CSV. The minimum row you are allowed to set is 1.024 k and maximum limit is 1.049 M. If the box is unchecked, the row limit is subjected to the external drive disk space (DAQ970A and DAQ973A only).
To include additional text as part of your data log report, you are allowed to enter to 160 characters in the Comment Text box.
Note: By default, data logs are stored in the "My Documents" folder on your computer and are organized by instrument type. For example – C:\Users\<user_name>\Documents\Keysight\BenchVue\DAQ\Data Logs\.
Immediately with Start Button - Start data logging when you click the button or the button.
At Specific Time - Start data logging at a specific time and date. Enter the desired date in the form yyyy (year), mm (month), and dd (day). Enter the desired time in the form hh (hours), mm (minutes), and ss (seconds).
On Alarm - Start data logging when the alarm condition is met on the specified alarm.
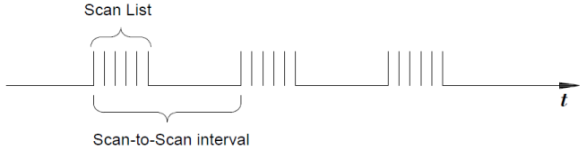
Sets the time interval between the start of one scan and the start of the next scan (inter-scan delay).
Min Value - The shortest interval based on the instrument's current settings.
Custom - Sets the interval in specified amount of time. Enter the desired interval in the form dd (days), hh (hours), mm (minutes), ss (seconds), and ms (milliseconds).
On External Trigger - Trigger on a negative-going (falling) edge or a positive-going (rising) edge of an external signal on the instrument's Ext Trig connector.
Manual Trigger - Manually trigger the scan interval time by pressing the  button.
Immediately with Stop Button - Terminate data logging when you click the  button or the
  button.
After Elapsed Time - Terminate data logging after the specified amount of time has elapsed. Enter the desired duration in the form dd (days), hh (hours), mm (minutes), and ss (seconds).
After N Scans - Terminate data logging after a specific number of scans have occurred.
Immediately with Data Logger Start Button - Start digitizing when you click the button or the button.
Immediately with Digitizer Start Button - Start digitizing when you click the  button.
At Specific Time - Start digitizing at a specific time and date. Enter the desired date in the form yyyy (year), mm (month), and dd (day). Enter the desired time in the form hh (hours), mm (minutes), and ss (seconds).
This function is only available in the DAQ970A/DAQ973A Data Acquisition System.
Clear Offsets - Reset offset value to 0 ohm or 0 mV.
Get Unstrained Reference - Display offset value in the Offset column.