Quick Guide to Setup KDI Fabric
This is an end-to-end guide to set up KDI Fabric and connect it to KDI Gateway.
KDI Fabric is a local network where a central KDI Root manages connected KDI Leaf nodes.
-
The KDI Root is the central hub, overseeing your entire KDI Fabric.
-
KDI Leaf nodes are devices equipped with KDI Leaf software and connected to the KDI Root.
-
KDIG (KDI Gateway) is a cloud server that can manage multiple KDI fabrics and enables access to Keysight cloud services. If required, you can connect your local fabric to KDIG.
KDI Setup Workflow
Setting up the KDI Fabric involves installing and configuring both KDI Root and KDI Leaf nodes.
Setting up KDI Root
-
Install KDI Root on a dedicated server.
-
Configure KDI Root to connect to the KDI Gateway. Configuring KDI Root is required only for advanced authorization control or cloud connectivity that enables access to Keysight cloud services and management of multiple fabrics. For cloud connectivity, configure the KDI Gateway connection. For advanced fine-grained authorization control, configure an OpenFGA-compatible database. You don't need to change the default configuration of a KDI Root to set up a local KDI Fabric.
-
Launch KDI Management UI and create an initial user. Later, log in with this user to manage users and connections within the KDI Fabric.
Setting up KDI Leaf
-
It involves installing KDI Leaf on each device that becomes a fabric member.
-
Configure them to connect to the KDI Root managing the fabric.
Accepting KDI Leaf into the KDI Fabric
-
Log in to the KDI Management UI and accept the provisional request from the KDI Leaf to join the KDI Fabric.
Install KDI Root
Install KDI Root on a dedicated server.
-
Download the KDI Root installer for Windows or Linux from www.keysight.com.
-
Navigate to the designated download location for the KDI Root installer
-
Right-click on the installer file and select Run Elevated to run it with administrative privileges.
-
Click Next on the Welcome Setup screen to proceed with the installation.
-
Review the License Agreement screen and select Agree.
-
The Setup screen to Configure Database appears.
 Basic Installation (Recommended)
Choose this option to continue with the KDI default authorization model, which uses SQLite database with default configuration.
Advanced Setup
Choose this option for complex solutions that require more powerful databases like MySQL or PostgreSQL. In such cases, you may have an existing database or install a new one and configure it to integrate with the KDI authorization model.
Prerequisites
-
Ensure you have installed a DBMS that OpenFGA supports, such as MySQL or PostgreSQL.
-
Refer to Installing PostgreSQL on Windows for more details.
-
-
Ensure that you have created a database for OpenFGA.
Configure the KDIS Database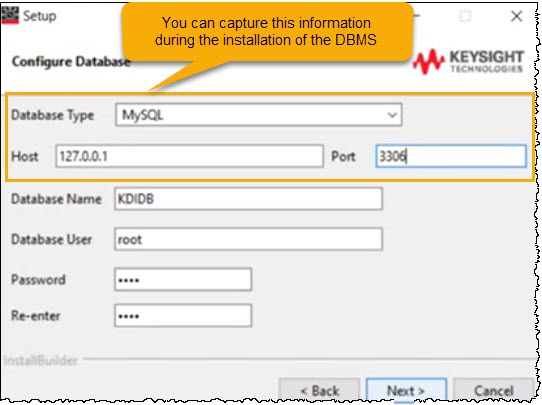
-
Database Type: Select the type of DBMS to be used for OpenFGA such as PostgreSQL or MySQL
-
Host: Specify the system hosting the DBMS for OpenFGA.
-
If the DBMS is installed on the KDI Root, enter either the IP Address "127.0.0.1" or hostname "localhost".
-
Otherwise, enter the IP Address of the system hosting the DBMS.
-
-
Port: Specify the port at which the DBMS is listening. This information is generated during the DBMS installation.
-
Database Name: Specify the database name to be used for OpenFGA
-
Password: Password to access the database. This information is generated during the DBMS installation.
-
-
-
Click Next to continue.
-
Select components to install.
Select both KDIS and Management UI to set up KDI Root.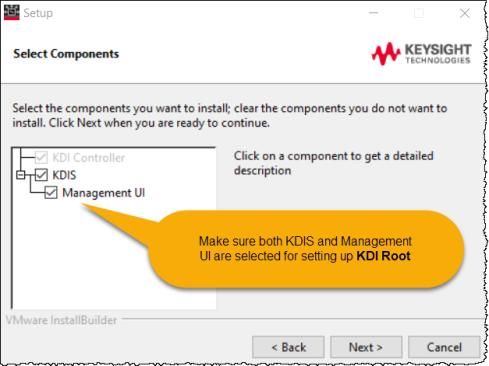
-
Click Next on the Ready to Install screen.
The default installation location is C:\Program Files\Keysight\Distributed Infrastructure.
Click Finish.
(Optional) Configure KDI Root to Connect to KDI Gateway
Configuring KDI Root is required only for advanced authorization control or cloud connectivity that enables access to Keysight cloud services and management of multiple fabrics. For cloud connectivity, configure the KDI Gateway connection. For advanced fine-grained authorization control, configure an OpenFGA-compatible database. You don't need to change the default configuration of a KDI Root to set up a local KDI Fabric.
Configure kdi.yaml located under the %ProgramData%\Keysight\Distributed Infrastructure folder as follows, then Restart KDI Services:
kdi.yaml
...
cloud:
  lab_name: "DemoLab"
  global_client_id: democlient
  global_client_secret: democlient
  gateway_connections:
    - gateway_url: ws.demo-kdi-gateway-cloudshare.pwc.qa.cos.pwtestops.com
...
You can obtain this information from the Keysight Support Team.
It is a container that includes:
-
gateway_url: The URL of the KDIG instance that the KDI Root intends to connect to.
Example: demo-kdi-gateway-cloudshare.pwc.snd.cos.pwtestops.com -
client_id: The Client ID, registered with KDIG, confers access rights to the KDIG instance.
Client ID is an optional text requiring a minimum of 6 characters. It can be pre-approved or not as follows:-
Pre-Approved Credentials: You can contact the IoT team on Slack at #proj-pathwave-cloud to acquire pre-approved credentials. Alternatively, if you have administrative access to the desired KDIG instance, you can add credentials using the authn_client_add API. It instantly connects the KDI Root to the gateway.
-
Un-Approved Credentials: Alternatively, you can input any client_id and secret of your choice during the configuration process. In such cases, a provisional request gets created using the provided credentials. However, if you do not specify client_id and secret, the request is generated with arbitrary credentials. The KDIG administrator must approve the request to authorize the connection.
-
-
client_secret: The secret associated with the Client ID registered with KDIG to authorize the KDI Root node.
The value is based on the presence and status of the Client ID.-
If the Client ID is pre-approved, the Client Secret must also be pre-approved and not null/blank.
-
If the Client ID is not provided, the Client Secret is not required.
-
If the Client ID is an arbitrary text, the Client Secret can also be an arbitrary text of your choice, but it must meet a minimum length of 6 characters.
-
-
description: The additional information about the KDIG connection.
Refer to KDI.YAML for more details.

|
|
Launch KDI Management UI
Once you have successfully installed KDI Root, KDI Management UI is accessible at 7701 using either the KDI Root's IP Address or Hostname.
URL Examples:
-
https://<hostname>:7701
example: https://127.0.0.1:7701 -
https://<IP Address>:7701
example: https://localhost:7701
To access KDI Management UI via secure HTTPS connections, you need to configure the trusted certificate by either using a default self-signed certificate or creating a locally trusted certificate.
Default Self-Signed Certificate
-
Enter the URL to access KDI Management UI on a web browser
https://<KDIC Root server's IP Address>:7701
https://<KDIC Root server's Hostname>:7701
KDI Management UI creates a self-signed certificate for HTTPS if you don't have a locally trusted certificate configured. With the self-signed certificate, you will see a
 warning in the web browser requiring you to accept the certificate on the first connection from each client machine.
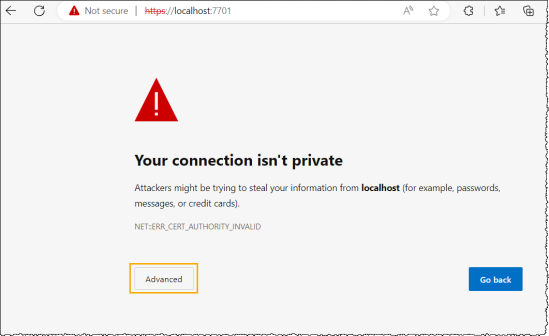
-
Click the Advanced button on the page. To trust the certificate, click Continue to localhost (unsafe) .... at the bottom of the page to open KDI Management UI.

The
 symbol still appears in the address bar to the left of the web address, but the connection is secure with the self-signed certificate. Additionally, you can install a locally trusted certificate to eliminate the warning.
Create Initial User
This section guides you through creating an initial user in the KDI Management UI who will act as an administrator.
-
Open a Web Browser and type the URL to access the KDI Management UI.
KDI Management UI is accessible at 7701 using either the IP Address or Hostname. eg. https://localhost:7701/The Welcome screen appears...

- Click Create Initial User Account
The Create Initial User Account screen appears...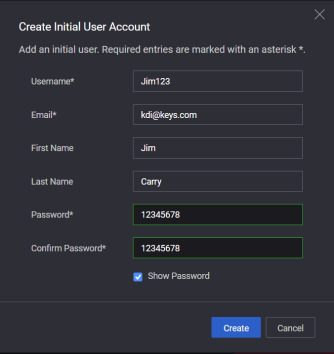
- Enter the Username and Password to create an administrator and click Create.
The Login screen appears... - Enter the administrator's Username and Password and click Log In.
Log In to KDI Management UI
Make sure you have created an Initial User.
- Open a Web Browser and type the URL to access the KDI Management UI.
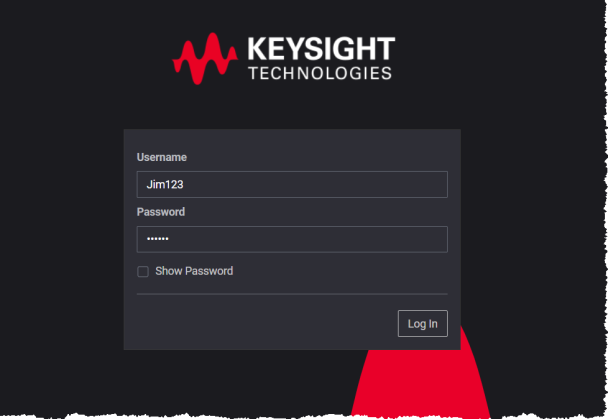
- Enter the administrator's Username and Password and click Log In.
Install KDI Leaf
KDI Leaves are devices equipped with KDI Leaf software and connected to the KDI Root.
-
If you already have Keysight IO Libraries Suite 2023 or its subsequent versions installed, KDI Leaf is automatically integrated and available for use. However, if you do not have the IO Libraries Suite, download the KDI Leaf installer for Windows or Linux from www.keysight.com.
-
Navigate to the designated download location for the KDI Root installer.
-
Right-click on the installer file and select Run Elevated to run it with administrative privileges.
-
Click Next on the Welcome Setup screen to proceed with the installation.
-
Review the License Agreement screen and select Agree.
-
Click Next to continue.
-
Click Next on the Ready to Install screen.
The default installation location is C:\Program Files\Keysight\Distributed Infrastructure. -
Click Finish.
Configure KDI Leaf
-
Open theKDI.YAML file located under %Program Data%\Keysight\Distributed Infrastructure.
-
Under the upstream_manager section, update the host with the IP Address of the KDI Root.
By default, the following section is commented out with a "#". Uncomment it by removing "#" from the beginning of the line and input the IP Address of the KDI Root node.
Example: If the IP Address of KDI Root is 192.0.0.101 then update the KDI.YAML on the KDI Leaf nodes as follows:
Restart KDI Services
- Restart Services
-
-
Open the Windows search box and type services.
-
The Services App will appear in the Windows menu. Click on it to open the Services App.
-
In the Services window, locate and select the Keysight Distributed Infrastructure service.
-
Right-click on the service and choose Restart from the context menu.
When you restart the Keysight Distributed Infrastructure service, kids will start automatically.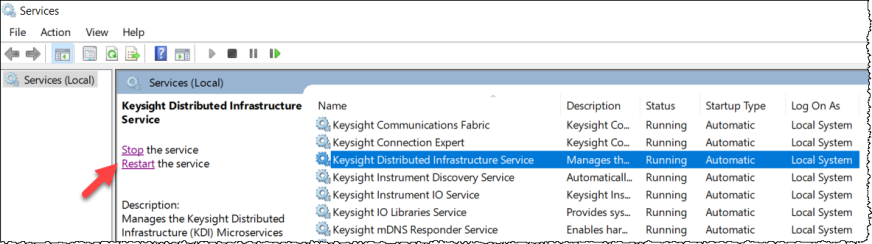
-
Accept the KDI Leaf into the KDI Fabric
| Note | To select a row, click on the row itself or activate the associated check box. The selected row appears in blue highlighting. |