|
|
BenchVue Power Supply Application Help |
Welcome
This help system contains information on the PathWave BenchVue Power Supply Application. This application provides easy access to instrument control, data collection, and data analysis for the power supplies on your workbench.
The specific features and functionality available in this application will vary depending on the instrument and model number. Some of the parameters and functionality described here might not be available for a particular instrument. The application will show only those parameters and parameter ranges available for your specific instrument.
Software Licensing (Premium Installer)
Keysight's flexible licensing options allow you to select the license type and license terms that best fit your software needs. To use the Power Supply application, you will be required to purchase a software license. For more information on purchasing and installing a software license, see Software Licensing Options.
To request a free trial license, go to the Information and Technical Support menu ("?" icon in upper right corner of the application) and select "License Management". From the license management screen, click "Get Trial or Buy License" and then click "Request a free trial license".
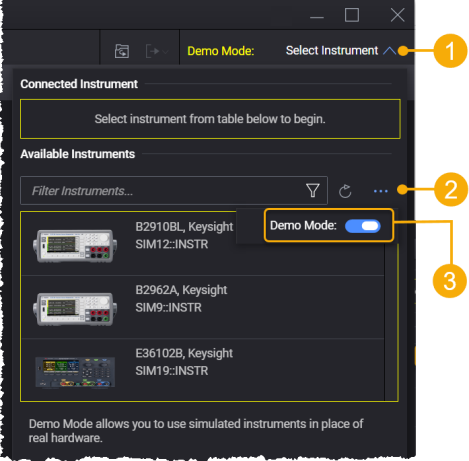
Demo Mode
You can use the Power Supply application without a software license in Demo Mode, which enables you to preview the application's features without connecting to an actual instrument.
To enable the Demo Mode, perform the following steps.
- Click the "Select Instrument" drop-down.
- Click the
 button under Available Instruments.
 - Click the "Demo Mode" switch.
Create Automated Tests Using BenchVue Test Flow
You can use the BenchVue Test Flow to quickly create and analyze automated tests – without any programming. With the intuitive drag-and-drop interface, Test Flow allows you to combine multiple instruments into an automated test for better characterization of your device-under-test. The specific controls and properties supported by Test Flow will vary depending on the instrument type and model number.
To enable or disable the Test Flow, click the BenchVue Test Flow switch. The BenchVue Test Flow will launch in a separate window.
To create a Sequence using Test Flow, use your mouse to drag the desired blocks (outlined with orange rectangles) from the Pathwave application and drop them into the Sequence Workspace.
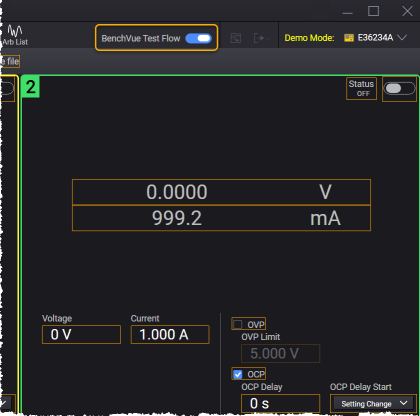
For more information on how to use the Test Flow, refer to the Help located on the BenchVue Test Flow as shown below.

Graphical Overview of Power Supply Application
This overview introduces you to the features of the Power Supply application. Although the specific configuration properties vary by power supply model number, the primary elements of the application will be the same.
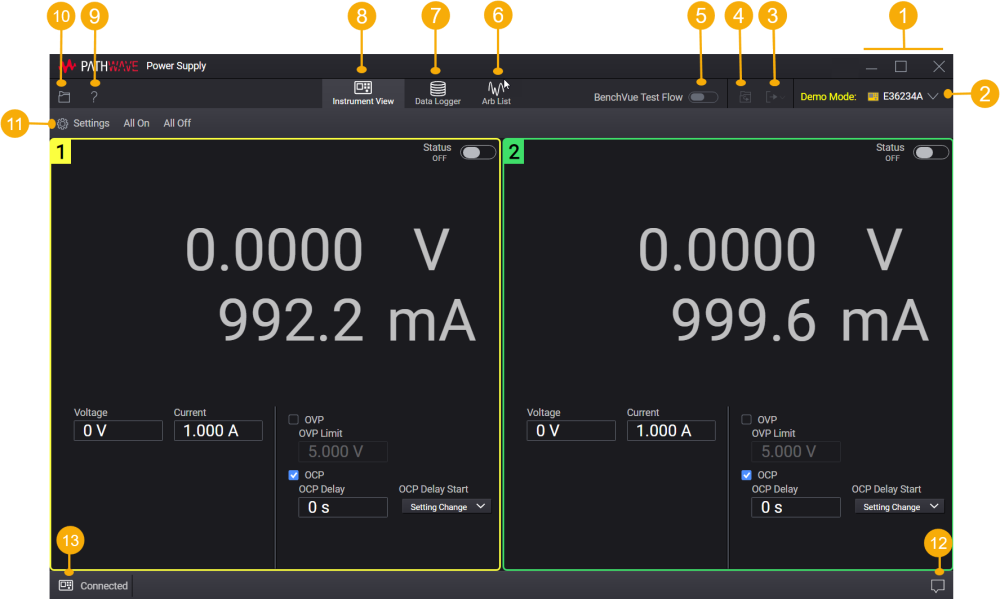
| 1 | Minimize, maximize, or close Power Supply application window. |
| 2 | Open the Instrument list to see available instruments and select the instrument to connect. See Connect to Instrument. |
| 3 | The Export Options lets you export data from the list of available options. |
| 4 | View a list of previously saved data log files and display the chart from the captured data. See Load offline datalog. |
| 5 | Enable or disable the Test Flow feature. |
| 6 | The Arb List lets you configure and generate arbitrary waveform for single or multiple outputs. Arb List is shown only if the instrument supports it. |
| 7 | The Data Logger lets you log and display measurement data over time. |
| 8 | The Instrument View displays instrument readings and lets you configure basic instrument settings. |
| 9 | Open the Information and Technical Support Menu to view the Help system and technical support information. |
| 10 | Save instrument state to a file or load a previously-stored instrument state from a file. See Save Instrument State and Load Instrument State. |
| 11 | Click Settings to configure advanced settings for instruments and data logging. |
| 12 | The Notifications window displays the messages generated by the Power Supply application. |
| 13 | Pause IO communication between the Power Supply application and the instrument. |
See Also
- Supported Instruments and Interfaces
- System and Installation Requirements
- Connect to Instruments
- Information and Technical Support
Help Version 2024.1 |14 August 2024