
This procedure will delete all test data, reports, and equipment information from the PC. Any data that you would like to keep, such as reports, should be backed up before performing these steps.
Please see the Readme.txt for information on the compatibility of this package with previous versions of TME.
Versions prior to E.01.00 of TME must be uninstalled before the installation of this product will proceed.
Versions of TME prior to E.01.00 do not appear on the Programs and Features list and do not have an uninstall utility. Although it will not completely remove TME from your system, the following steps will permit the new version of TME to be installed:
|
|
This procedure will delete all test data, reports, and equipment information from the PC. Any data that you would like to keep, such as reports, should be backed up before performing these steps. |
Double-click Programs and Features on the Control Panel.
Select HP TestExec SL and press the Remove button.
From Windows Explorer, delete the TME directory (usually C:\Program Files\Agilent TME).
The TME test management environment platform is no longer packaged and installed with TME applications. TME must be installed separately from the applications. Once TME is installed on the target PC, the applications can then be installed.
Please see the application help system and Readme for information on installing the applications.
Please see the Readme.txt for minimum system requirements.
The Keysight Test Management Environment software and its calibration applications can be downloaded from the web. See the following site for details on latest releases of TME and the calibration applications: http://www.cal.software.keysight.com
Follow these steps to install the N78xxA test software:
Close all applications.
Download application .ZIP file to the PC desktop.
Open the .ZIP file and extract the Setup.exe file to the PC desktop.
Begin the installation process by:
Follow the instructions on the screen to install the N78xxA application.
|
|
After the N78xxA has been installed on the PC, always launch the application in normal mode. Do not launch in administrator mode. |
There are two ways to install TME:
Network Installations — Equipment and test data information is stored in a central location (the TME Server). This data is shared among a set of TME Clients. Multiple test stations can then have access to this central information.
Local Installations — Everything is installed on one PC.
Windows users—no matter what group or permission level they in exist in—are typically running in a standard operating mode. Certain applications will require the user to operate at an elevated privilege, such as Setup.exe which installs a product onto the system. At these times the user can select the program to be Run as Administrator (as shown in the installation instructions above). This will allow the running program to be executed at an elevated privilege level. However, this elevated privilege level will also give the user access to file and registry locations not typically allowed by the normal user. The Run as Administrator function is typically found by right-mouse clicking on the application to be launched.
|
|
|
On a local installation, all TME data is stored on the PC. Order information, test results, and equipment data will not be shared with other users.
To perform a local installation, simply select Local from the installation dialog.
When the installation is complete, a shortcut is created on your desktop and a program group is added to your Start menu labeled 'Keysight Test Management Environment'.
Follow these steps to install the N7800A test software:
Close all applications.
Download application .ZIP file to the PC desktop.
Open the .ZIP file and extract the Setup.exe file to the PC desktop.
Begin the installation process by:
Follow the instructions on the screen to install the Test Management Environment application.
|
|
After TME N7800A has been installed on the PC, always launch the application in normal mode. Do not launch in administrator mode. |
In a network installation, order information is stored centrally and can be accessed by any TME client in the network. This allows you to combine data from tests that were run on multiple stations into a single report. Equipment data and order information are also accessible from any station.
It is recommended that you select a computer for the network installation that is backed up regularly to ensure you don’t lose data that is stored in the central location.
To set up a new TME network, select Network install when prompted. For the installation directory, be sure to enter a path that is accessible from all the test stations that you want to include in the network: for instance, a shared folder on this PC or a location on a file server.
To change from a Local installation to a Network installation will require you to completely uninstall the current configuration of TME, its applications, and components.
|
|
It is recommended that the server installation be installed from the computer where the server installation files will be located. This simplifies management of the server installations. The server does not need to be a dedicated PC. It itself can be a client on the network for running TME tests. |
Install TME as a Server installation on a PC (setup menu choice).
Share the installation folder \Program Files\Agilent
TME Server. 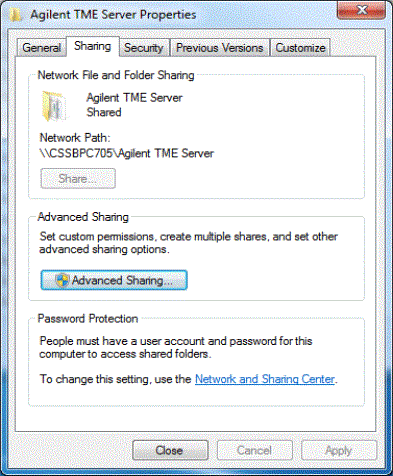
Make sure permissions are set to full control. 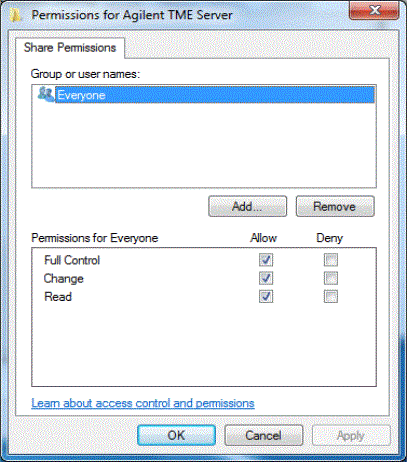
Set the security on the installation folder: \Program
Files\Agilent TME Server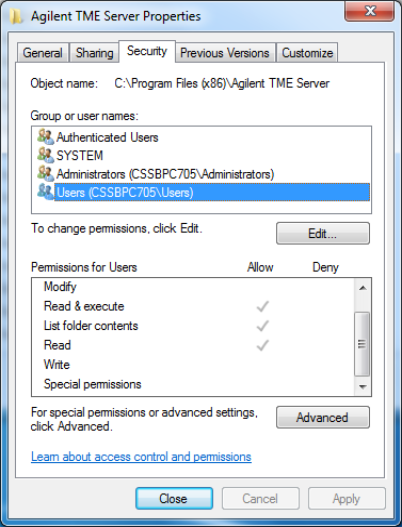
Make sure you select Advanced,
then edit the users, and ensure they are set to full control.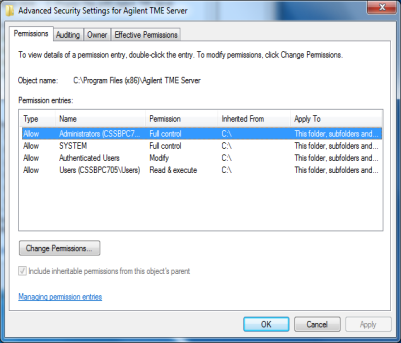
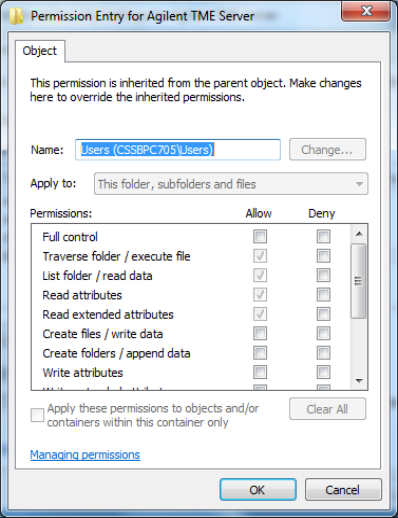
Make sure that you checked the Replace permission entries on
all child objects... box. This ensures that the subfolders are properly
set as well.
This example provides access to all users. However, this process can
be done using the explicit users or any group created that contains
the desired users who should have access. It does not need to be open
to all users.
Your administrator should understand and be involved in this configuration
to ensure it supports your required network policies.
Install any applications desired on the server.
Install TME on a Client:
On the client PC, map a network drive letter to the TME Server's shared installation folder (S:\Program Files\Agilent TME Server, for example)
Using Windows Explorer (file manager) open the folder S:\Install\TME
Execute (double click) the file TMEClientSetup.exe
Once TME has been installed, an Icon will appear on the desktop; start TME normally.
A dialog box will appear showing all applications ready to be installed from the server. Select the ones you want to use on this client and click Ok.
After starting TME for the first time, create a test station and map your ETE as you have done on the previous local installation.
Once the installation is complete, you are ready to begin adding clients to the network. Each client runs the TMEClientSetup_{version}.exe file located in the Install\TME subdirectory of the shared network folder. For instance:
\\Agilent TME Server\Install\TME\TMEClientSetup_{version}.exe
|
|
The client setup must be run from this location. It should not be moved or renamed. The same PC that is acting as the Network Server can also be run as a Client. |
When the client installation is complete, a shortcut is created on your desktop and a program group is added to your Start menu labeled 'Keysight Test Management Environment'.
|
|
|
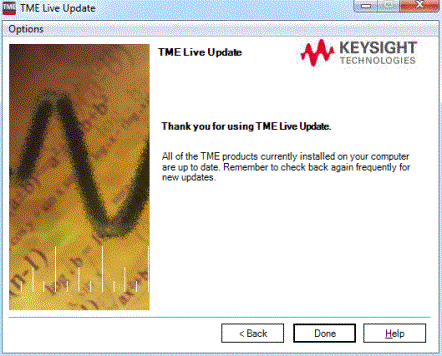
TME Live Update provides the ability to check for updated versions of TME and all the calibration applications you have installed on your system from Keysight’s website. There are two ways to run TME Live Update:
Select Check online for product updates from the Help menu.
From the Keysight Test Management Environment program group, select TME Live Update.

TME Live Update first provides a snapshot of what is currently installed on your system. Select Next to see the updates available for TME and the calibration applications you have installed on your system.
Only applications that have updates available will be present. Select the desired software packages and select Update. The packages will be downloaded to an installation directory to be installed at a later time.
The Preferences choice within the Options menu in TME Live Update helps you configure the update utility with your preferences.
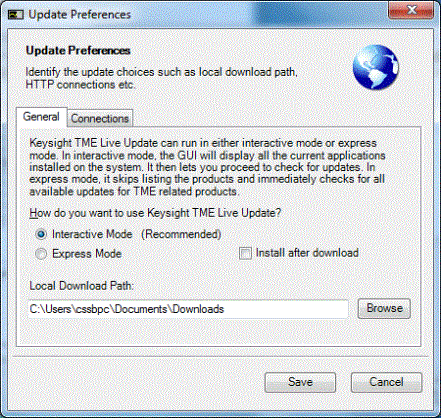
Select Interactive Mode from the General tab to see the installations currently installed before being shown which updates are available. This is the default choice. Select Express Mode to bypass the current installed versions to only see which updates are available when entering TME Live Update.
|
|
In the Express Mode you can select the Back button to see the installed applications, if desired. |
Select Install after download to automatically install the updates after the downloads have been completed.
Select a different Local Download Path to change where the installation packages will be downloaded.
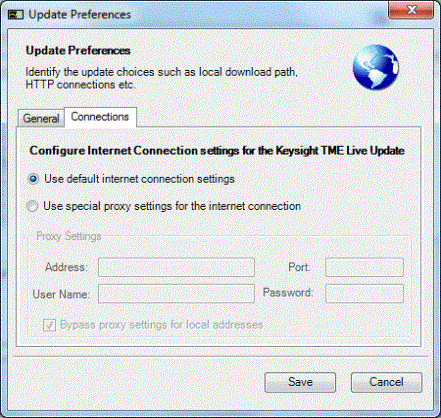
TME Live Update uses default Internet connection settings to access the Keysight website. You can change the settings by selecting Use special proxy settings for the Internet connections from the Connections tab.
|
|
If you uninstall TME completely or uninstall any TME application, you will lose the data associated with those applications. Create any reports needed and save them as PDF files before you perform any uninstallation of that product. |
To uninstall previous versions of TME, please see Installing over Previous Versions.To uninstall TME or any TME application, select that package from Programs and Features on the Control Panel.
To uninstall a TME client, follow the steps below:
All TME applications must be uninstalled from the client machine before TME can be uninstalled.
Select the application from Programs and Features on the Control Panel and click Remove.
Select TME client from Programs and Features on the Control Panel and click Remove.
To uninstall a TME server:
Follow the directions above to uninstall all TME clients.
Once all TME clients have been uninstalled, uninstall the TME server from the PC where the server installation was performed.
Select TME server from Programs and Features on the Control Panel and click Remove.
To uninstall a TME local installation, follow the steps below:
All TME applications must be uninstalled before TME can be uninstalled.
Select the application from Programs and Features on the Control Panel and click Remove.
Select TME from Programs and Features on the Control Panel and click Remove.
Online Assistance: www.keysight.com/find/assist

