
- All test equipment requires a 30 minute warmup period to ensure accurate performance.
- In the following adjustment setup, cables are designated as solid lines and direct connections are designated as dashed lines.
This calibration adjusts the gain of the AM circuitry to provide a 6.02 dB drop at 50% depth for a -1 volt input signal. The AM Input path comprises the 2X amplifiers on the reference board, the AM multiplexers, the AM DACs, associated op amps and the log converter on the output board.
The calibration is accomplished by setting the power to ”middle” vernier, setting the frequency to 800 MHz in low band (<=4 Ghz), 5.5 GHz in high band, and connecting a negative one volt signal to the input. AM is enabled and the AM DACs are adjusted for an exact 6.02 dB drop. The resulting value is transformed to a gain cal constant and stored as a calibration array.
|
Test Equipment |
Recommended Model |
Alternate Model |
|
Power Meter |
N1914B |
N1914A1 E4418A |
|
Power Sensor |
N8482A |
E9304A |
|
Function Generator |
33622A |
33611A |
|
Digital Multimeter |
3458A Opt 002 |
34470A |
|
|
|
|
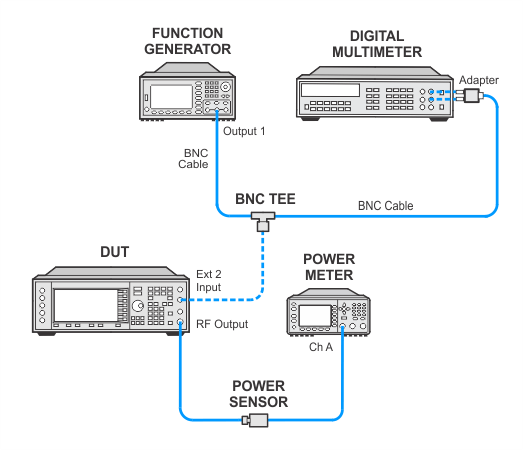
Power Meter and Power Sensor Calibration
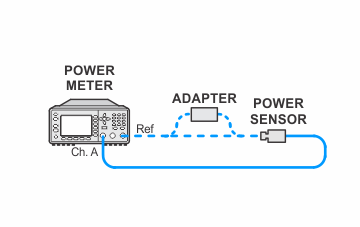
EXT1 Setup

EXT2 Setup
If this adjustment fails, perform the following steps in order:
Check the equipment setup (see above). If the setup is incorrect, make the necessary corrections and rerun the adjustment.
If this adjustment fails with the equipment set up properly, refer to the troubleshooting section of the signal generator's service guide. If you do not have a printed copy of the service guide (Option OBW), one is available either on the CD-ROM that came with your signal generator shipment or on the Keysight Website.
If you cannot correct the problem using the troubleshooting procedures in the Service Guide, obtain service from Keysight Technologies. Refer to Contacting Keysight Technologies.
