Press Meas/View > Spectrum Monitor to select the Spectrum Monitor window. Press Window Max to maximize the window.
Press Trigger > Trigger to Spectrum Monitor > Continuous to start measurements. Press Trigger > Source > Internal.
Press Attn > Input Attenuator > 10 dB, then press Setup > Reference Level > 5dBm to specify maximum input level of the measurement signal that is input from the RF IN port.
Press Start/Center (Stop/Span), Carrier To > Frequency Band > 250MHz – 7GHz, and press Return > Span > 2kHz, then Carrier To > Carrier -> Center.
Press Avg/BW > RBW > 6.1Hz.
Press Scale > Auto Scale.
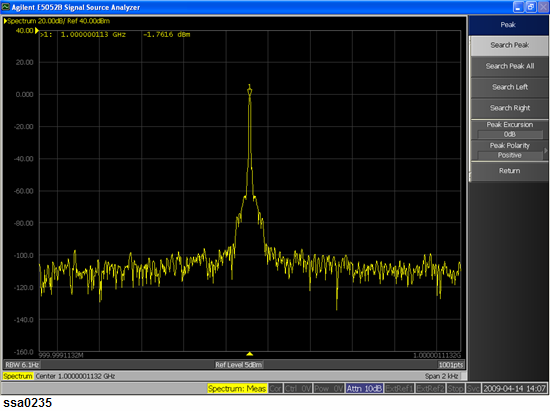
Press Marker Search > Peak > Search Peak.
The marker value is displayed in the upper part of the trace screen.
Press Start/Center > Carrier To > Carrier x2 -> Centre. The center frequency of the sweep range is set at the second harmonic.
Press Marker Search > Peak > Search Peak.
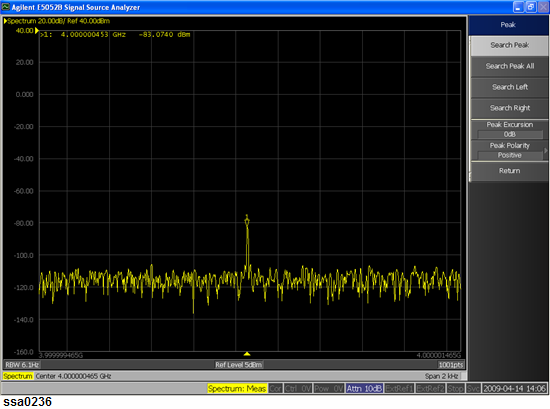
Press Start/Center > Carrier To > Harmonic # > 4, then press Carrier x # -> Center. The center frequency of the sweep range is set at the fourth harmonic.
Press Marker Search > Peak > Search Peak.
For more information about Spectrum Monitor Measurement, see Spectrum Monitor Measurement.