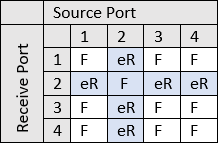
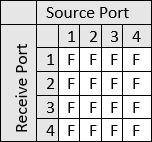
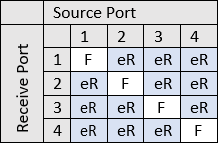
S-Parameter error correction is described by the number of ports contributing to the measurement: 1,2,3 or 4 port corrections are common. They can be represented in a visual shorthand like the matrix below.
Source ports occupy each column. Receiver ports occupy each row.
Note: These examples shows the case of 4 port VNAs. E505xA has only 2 ports.
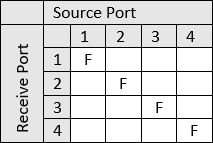
Example 1: this table shows four independent 1 port calibrations. (F1) All reflection measurements S11, S22, S33, S44 will all be Full 1 Port corrected.
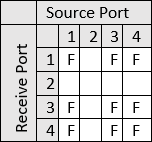
Example 2: this table shows two independent 2 port calibrations. The parameters that occupy the blank cells (S13, S14, S23, S24, S31, S32, S41, S42) are uncorrected.
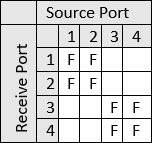
Example 3: Full 3P correction for ports 1, 3 and 4. Any port 2 parameters will be uncorrected.

Example 4: Full 4P correction. All S-Parameters across the first four ports are corrected.

Calibrating all ports of the network analyzer allows measurement flexibility but it may not be appropriate for all test conditions. Port Subsetting can be used to devolve a multi-port to fewer ports as needed. This is useful in the following situations:
when a calibration includes ports that are not connected to the DUT.
When it is safer or more accurate to only acquire data in one direction which can be the case with high power amplifiers and when there is substantial loss at the DUT output port.
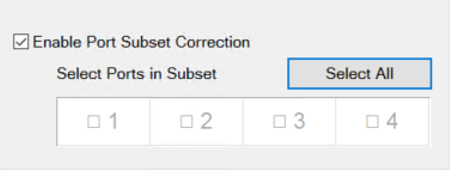
By default, Port Subsetting is disabled and all ports are selected as denoted by the “X” in the port indicators. Enabling port subsetting with all ports included is the same as turning port subsetting OFF. Below we show some examples of subsetting a full 4P correction.
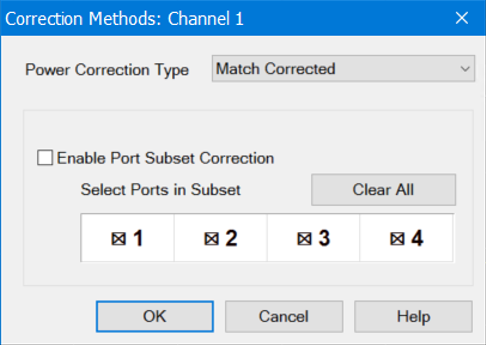
The following examples assume there is an active 4 Port calibration.
An active 4 Port calibration:
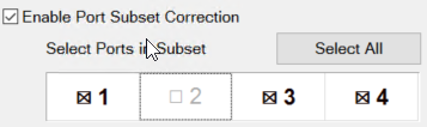
Example 5: To subset the calibration to ports 1,3 and 4, de-select port 2 and Enable port subsetting.
This yields a correction grid like Example 3 above, except the shaded cells are no longer empty.
The multiport correction is devolved from 4 ports to 3. But what happens when measurements involving port 2 are created?
Because the calset already contains error terms for port 2, the best result for port 2 measurements is as follows:
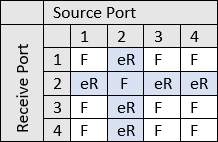
Enhanced Response (eR) correction to transmission terms (S21, S32, S42, S12, S32, S42)
1 Port correction (F1) to S22.
These corrections give a much better result than leaving the parameter uncorrected while not requiring any extra acquisition time. This is sometimes referred to as “Best Effort”.
This is a convenient way to reduce a multiport correction to a set of single port corrections.
This example yields the following correction grid.
Example 6: Our original 4 port correction has been devolved to a set of one port and enhanced response corrections. Again, because we have the error terms this grid produces the best measurement results without sweeping multiple source ports. (Best effort).
Note: With SCPI you have more control over the grid.
SENS:CORR:METHod:PORT:SUBSet:FULL:VALue
This command sets the ports that are included in the subsetting.
SENS:CORR:METHod:PORT:SUBSet:RESP:VALue
This command sets which ports are included the “best effort” treatment.
Note: The ports lists for these two commands must be mutually exclusive.
This set of commands yields the following grid.
SENS:CORR:METHod:PORT:SUBSet:FULL:VAL 1,3,4
SENS:CORR:METHod:PORT:SUBSet:RESP:VAL 0
This set of commands yields the following grid.
The same result occurs when you subset to ports 1,3,4 from the dialog.
SENS:CORR:METHod:PORT:SUBSet:FULL:VAL 1,3,4
SENS:CORR:METHod:PORT:SUBSet:RESP:VAL 2