Scenario 2 - GPIB-Only Instruments Connect Directly to Controller
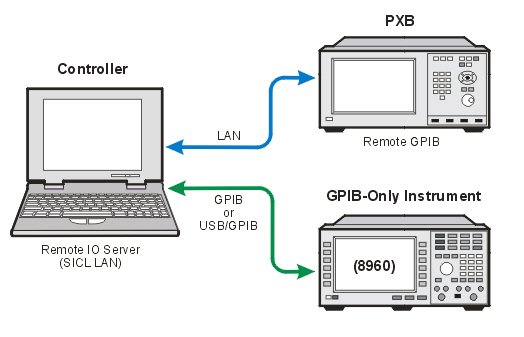
In this scenario, the controller connects to the PXB using LAN, the controller connects to the GPIB-only instrument using GPIB or USB/GPIB, and the PXB connects to the GPIB-only instrument using a “Remote GPIB” interface, as shown in the following illustration:
*Requires Agilent IO Libraries installed on controller but Agilent VISA doesn’t have to be the primary VISA.
2.1 Controller Configuration
With the system configured as shown above, perform the following steps on the controller:
2.1.1 Install Agilent IO Libraries 15.5 Suite
- Download from Agilent website (http://www.home.agilent.com/agilent/product.jspx?nid=-34466.907863.00&lc=eng&cc=US).
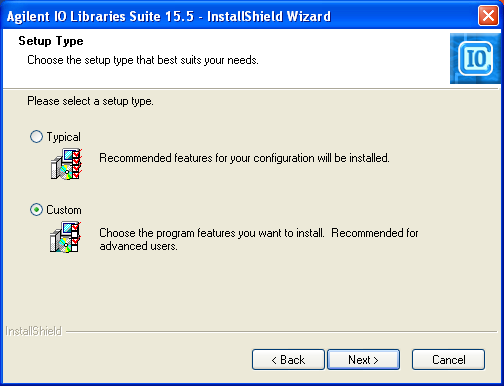
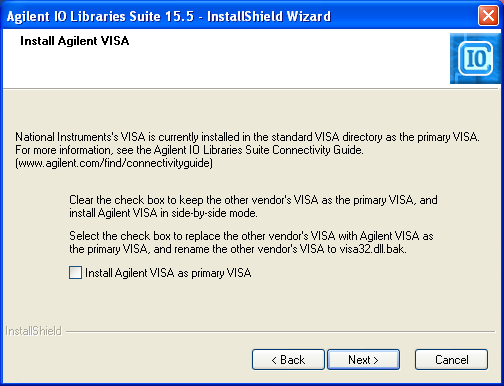
- Run the installer. If the user wants NI-VISA to be the primary VISA (if NI-VISA is already installed), make sure to select “Custom” in the “Setup Type” dialog, and make sure that “Install Agilent VISA as primary VISA” is not checked in the next “Install Agilent VISA” dialog.
- The rest of the install can proceed with default settings.
2.1.2 Capture Instrument Settings in Agilent Connection Expert
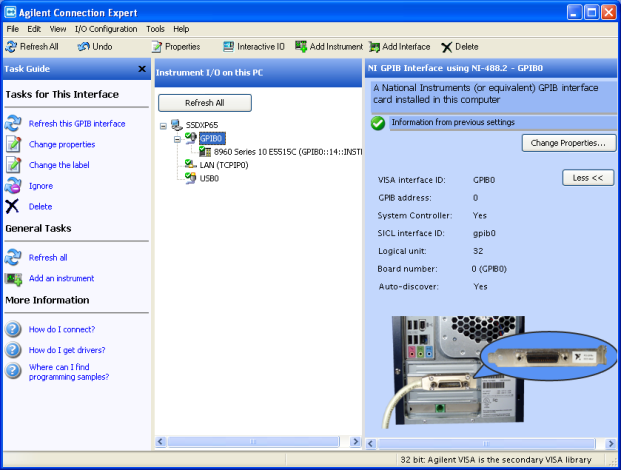
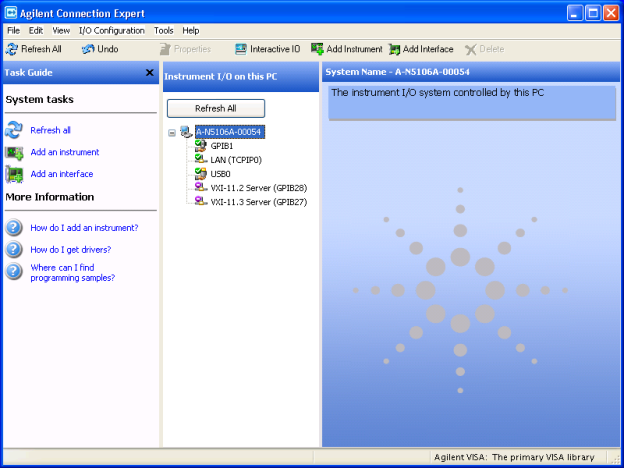
- Open the Agilent Connection Expert (Start -> Programs -> Agilent IO Libraries Suite -> Agilent Connection Expert). The Agilent Connection Expert GUI should look something like below, with the instruments on the local GPIB interface (most likely GPIB0).
- Write down the controller hostname shown at the top of the tree. In this example it’s “SSDXP65”.
- Note the “GPIB0” interface properties. Write down the SICL interface ID (here it’s gpib0). If using a USB/GPIB interface, the interface name in the GUI would most likely be “USB/GPIB (GPIB0)”. The “0” is the GPIB port number, and can be different depending on how many GPIB interfaces are installed on the controller. If a GPIB interface card was installed in the controller, then the USB/GPIB interface added, the USB/GPIB name would most likely be “USB/GPIB (GPIB1), and the SICL interface ID gpib1. The important information is the SICL interface ID for the GPIB interface the instrument are connected to.
- Close the Agilent Connection Expert (File -> Exit).
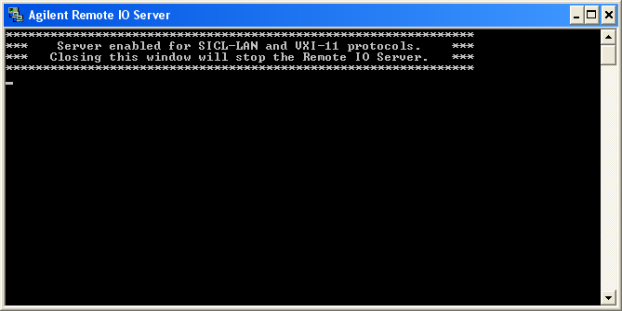
2.1.3 Start the Agilent Remote IO Server
Start the Agilent Remote IO Server (Start -> Programs -> Agilent IO Libraries Suite -> Utilities -> Remote IO Server). A DOS window opens. You can minimize this window, but do not close it. The Remote IO Server can be started automatically at boot up through the Agilent Connection Expert (Tools -> Remote IO Server -> Configure: select “Auto-start remote IO server on machine startup”, press OK to close). If started automatically, there isn’t a DOS window opened.
2.2 PXB Instrument Configuration
Perform the following steps on the PXB instrument:
2.2.1 Set up Remote GPIB Interface in Agilent Connection Expert
- Open the Agilent Connection Expert (Start -> Programs -> Agilent IO Libraries Suite -> Agilent Connection Expert).
- Add a remote GPIB interface by right clicking on “A-N5106A-00054” (this will be the computer name of the PXB that Agilent Connection Expert is installed on), then selecting “Add Interface”.
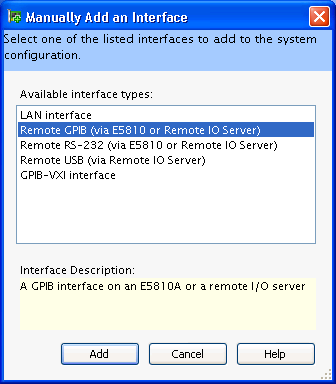
- In the GUI opened (as shown below), select “Remote GPIB (via E5820 or Remote IO Server)”, and then press the “Add” button.
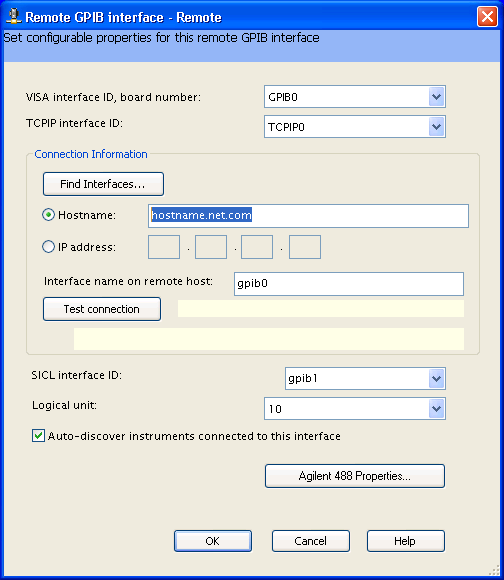
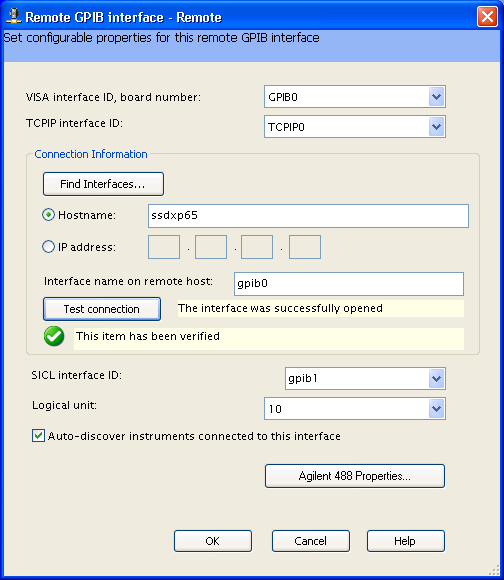
- In the “Hostname” field, enter the controller hostname or select IP address and enter the controller IP address.
- In the “Interface name on remote host” field, change the name to the host SICL interface ID. For this example, it is gpib0. Once these fields are updated, press the “Test connection” button.
- Below is the “Remote GPIB interface – Remote” GUI updated with hostname and SICL name, and connection tested.
- Close this window by pressing the “OK” button.
- Close the Agilent Connection Expert (File -> Exit).