This topic explains the filter setup dialog box for the Filter (GSM) and Filter (EDGE) parameters. While both filters use the same selections and settings, the two filters are separate and independent of each other.
Use the following links to navigate to and view the various figures and available settings:
|
|
|
|
|||||
|
|
|
|
|
||||
|
|
|
|
|||||
|
|
|
|
|||||
|
|
|
|
|
||||
|
|
|
|
|
||||
|
|
|
|
|
||||
|
|
|
|
|
||||
|
|
|
|
|||||
|
|
|
|
|||||
|
|
|
|
|
||||
|
|
|
|
|
||||
|
|
|
||||||
|
|
|
|
|
||||
Selections and Tables
Default setting for the Filter (GSM) parameter.
Selects a Gaussian filter and enables the Filter BbT setting.
Range: 0.100–1.000
Default: 0.300
Coupling: grayed out until Gaussian is the filter selection
Enter a value to set the BbT.
Default setting for the Filter (EDGE) parameter.
Selects a Laurant’s decomposition of a Gaussian filter with a 0.300 fixed BbT
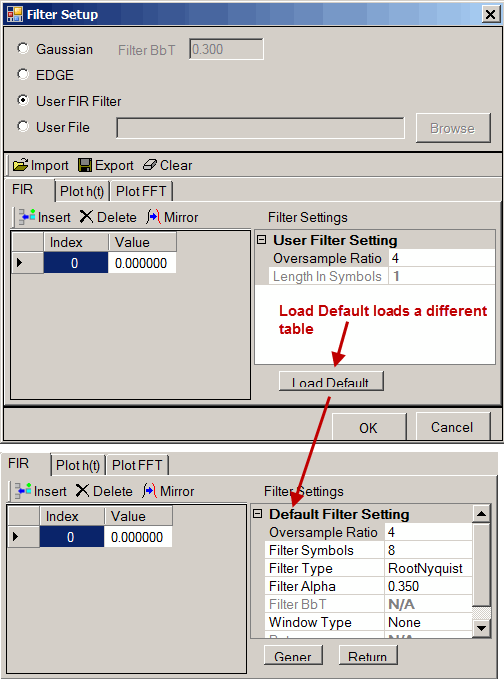
Select this choice to expand the Filter Setup dialog box that provides tabs and additional buttons to configure a user FIR filter.
GSM SCPI Command — select PATTern from the command choices then use the GSM Pattern command to configure the filter pattern by setting the oversample ratio and filter coefficients
EDGE SCPI Command — select PATTern from the command choices then use the EDGE Pattern command to configure the filter pattern by setting the oversample ratio and filter coefficients
Select this choice to load a predefined and saved FIR filter file. When selected, the Browse button becomes active.
GSM SCPI Command — select "<user FIR>" from the command choices
EDGE SCPI Command — select "<user FIR>" from the command choices
Coupling: This button is enabled with the filter selection.
Click this button to open the dialog box to navigate to and select a previously configured and saved FIR filter file.
Coupling: This button becomes visible with the selection.
Use this button to load a previously defined and saved FIR filter configuration–launches the dialog box for navigation to a FIR filter file.
Coupling: This button becomes visible with the selection.
Use this button to save a defined FIR filter configuration–launches the dialog box for navigation to the desired location.
Coupling: This button becomes visible with the selection.
This button clears the indexes and values leaving only Index 0 set to a value of zero.
The tabs become visible with the User FIR Filter selection.
Provides the buttons and settings to configure the User FIR Filter:
|
This button inserts a new index (coefficient) prior to the highlighted index. The value of the new index is copied from the highlighted index. After inserting a new index, change its value by highlighting it and entering a new value.
The maximum number of indexes is 128 (Oversample Ratio x Length in Symbols). |
|
|
This button deletes the highlighted index. |
|
|
This button adds indexes (coefficients) by mirroring the current indexes. |
|
|
This button:
|
|
|
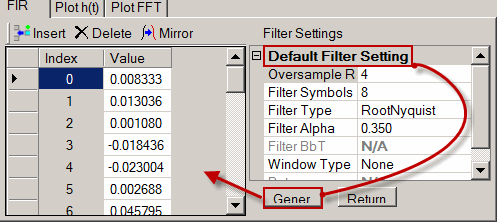
This button appears after clicking the button and generates the filter coefficients using the settings from the table–coefficient indexes and values appear in the and columns of the tab. After the coefficient generation, the table changes back to the table. |
|
|
This button appears after clicking the button. It returns to the table without generating the coefficients. |
The tables appear in the Filter Settings field.
|
|
|
|
This cell provides the oversample ratio (OSR) value (number of filter coefficients per symbol) applied to the FIR filter design. It uses two modes of operation:
|
|
|
This cell only displays the number of symbols with a maximum of 32. Its value is derived from the Oversample Ratio value and the number of coefficients (index). This cell also displays the value set in the Default Filter Setting table. |
|
|
|
|
|
Click the Load Default button to view this table |
|
|
This cell enables you to set the oversample ratio (OSR) value (number of filter coefficients per symbol) to be applied to the user FIR filter design. After generating the filter, the Oversample Ratio displays in the cell of the User Filter Setting Table. |
|
|
Set the number of filter symbols. This cell selects the number of symbols for the current FIR filter. The FIR table editor allows a maximum filter length of 128 coefficients (OSR x Filter Symbols). After generating the filter, the Filter Symbols value displays in the cell of the User Filter Setting Table. |
|
|
Click the cell and use the drop down arrow to display and select a filter. |
|
|
Available with the RootNyquist and Nyquist filter selections. With other filter selections, this setting is grayed out and displays . |
|
|
Available with the Gaussian filter selection. With other filter selections, this setting is grayed out and displays . |
|
|
This cell accesses a menu for applying a windowing function to the selected filter. The default is to use no windowing (), which optimizes the passband response (EVM). Several windowing selections are provided in this menu which can be applied to smooth the filter’s transition to zero. Windowing improves out of band performance (ACP) but simultaneously degrades EVM. With the Kaiser selection, the cell is enabled for setting the windowing Beta. |
|
|
This cell activates when you select the windowing function. The default Beta factor provides a good solution for optimizing out-of-band performance (ACP), without seriously compromising passband performance (EVM). Changing the Beta factor adjusts the trade-off between ACP and EVM:
|
Use this tab to view the  plot of the User FIR filter impulse response in time:
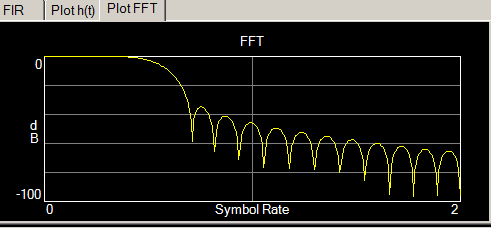
Use this tab to view the plot of the filter frequency response (calculated using a fast Fourier transform).
Tab.gif)