IV Curve Measurement Window
File and Option window
Adding a Channel
Configuring Settings
This topic describes how to quickly get started using the IV Curve Measurement application.
Run the application by clicking on its icon ![]() .
.
The IV Curve Measurement function provides two measurement functions and two data display functions; sweep, source & sampling, table data view, and graph view for the enabled channels.
The Main Window
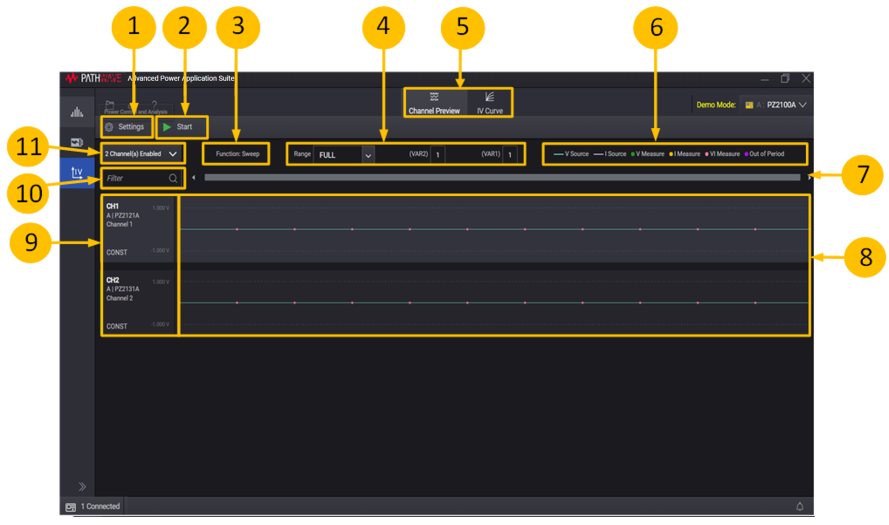
1. Access common, channel and advanced settings of the selected channel
2. Start measurement on the enabled channels.
3. Label indicating current Function selected in common settings (can be accessed through (1)).
4. Set viewing range of the waveform preview in (8).
5. Display selection - lets you display either the Channel Preview or the IV Curve.
6. Legend for waveform preview in (8).
7. Horizontal scroll bar to move starting point of waveform preview in (8). As the scroll bar is moved, the numbers in (4) will update accordingly.
8. Waveform preview display area.
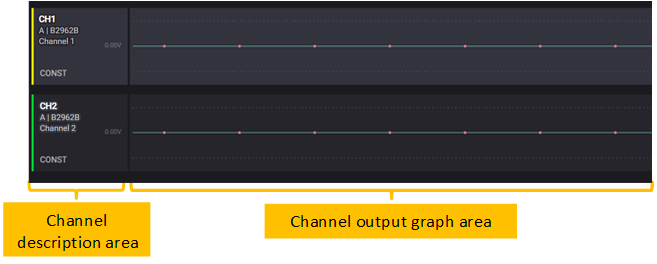
9. Current channel description area. Contains user set channel name, instrument model, channel id (returned from SCPI command) and channel source function..
10. Search box to filter waveform preview. Type Channel Name, Instrument label, model number, channel ID or source function (anything shown in (8) to show/hide interested waveform preview).
11. Dropdown to enable or disable channels
File and Option Window
When the IV Curve Measurement feature is selected, the following selections are made available in the File and Option menu.
 (File) Menu
New - Disconnect all connected instruments and reset all settings to the initial condition.
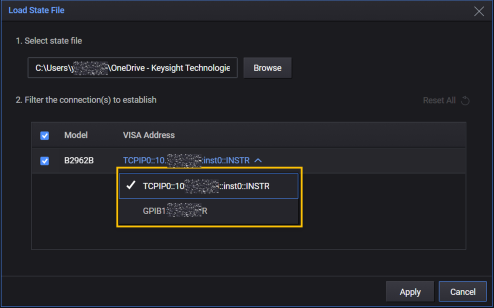
Open - Load (open) a previously-saved .qivd data file. To successfully load a saved file, the model number must match the instrument running at the time of the save operation. You can also select a different Visa address for the same model number instrument when loading a saved file. Select the desired VISA address from the drop-down list as shown below.
Save - Save current settings to the last access file. By default, if there is no last access file, the file save dialog will be shown.
Save As - Save the .qivd data file. The save file dialog is shown, where user can select the file name and save on the save dialog.
Copy Settings - This selection is only available when more than one channel is added. Lets you copy channel and advanced channel settings from source channel to target channel(s).
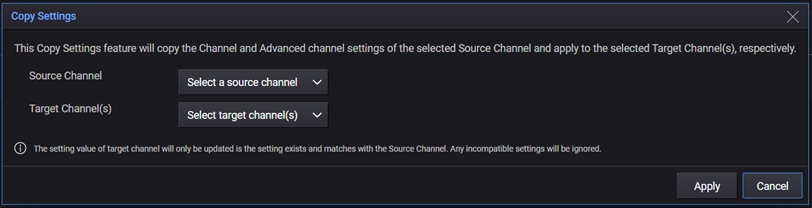
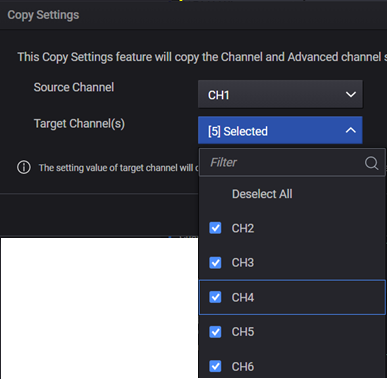
Select a source channel and target channels; in the example below the Ch1 settings will copy to Ch2,3,4,5 and 6, Click apply to start copy settings. The copy will only succeed for channel settings that are compatible.
 (Option) Window
| Reset Instrument
|
Performs an instrument reset that resets the volatile memory to the initial setting. Cancels any measurement or output trigger actions presently in process and resets the Waiting for arm and trigger bits in the Status Operation Condition register. |
| Enable Continuous Trigger Output after Sweeping/Sampling | Enable continuous trigger output for all enabled channels before instrument start measure. |
| Reset Channels after Measure |
Enable to do the following after measurement:
1. If the selected Mode in channel settings is Voltage, set the source voltage to 0V and Current compliance value to default of 100µA for all enabled channels 2. If the selected Mode in channel settings is Current, set the source current to 0A, source voltage to 0V, current compliance value to default value of 100µA and voltage compliance value to 0.01V for all enabled channels. |
| Disable Source Output after Measure | Disable the source output after measurement. |
Adding a Channel
To control and measure with multiple channels, click the Channel Enabled dropdown (# 11 in the IV Curve Measurement window above) that shows the number of enabled channels. The dropdown will display all channels of the connected instrument.
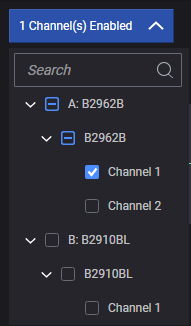
Repeat the "Set Sweep Setting" or "Set Source & Sampling" operations to set the settings for the added channel. If multiple channels are configured, change the selected channel by double-clicking on the channel output graph area or channel description area.
Multiframe feature
Multiframe feature is available depending on the connection types.
- PZ2100A supports multiframe with GPIB connection only.
- B2900 series supports multiframe with GPIB and LAN connections only.
Examples of the multiframe conditions for PZ2100A and B2900 series by the connection types are shown below.
For multiple PZ2100A connection case:
| PZ2100A (1) | PZ2100A (2) | Condition |
|---|---|---|
| GPIB | GPIB | Any channels from both PZ2100A (1) and (2) can be added. |
| GPIB | USB | If PZ2100A (1) has enabled channels, no channel from PZ2100A (2) can be added, and vice versa. |
| GPIB | LAN | |
| USB | USB | |
| USB | LAN | |
| LAN | LAN |
For multiple B2900 series connection case:
| B2900 series (1) | B2900 series (2) | Condition |
|---|---|---|
| GPIB | GPIB | Any channels from both B2900 series (1) and (2) can be added. |
| GPIB | USB | If B2900 series (1) has enabled channels, no channel from B2900 series (2) can be added, and vice versa. |
| GPIB | LAN | |
| USB | USB | |
| USB | LAN | |
| LAN | LAN |
For combination of PZ2100A and B2900 series connection case:
| B2900 series | PZ2100A | Condition |
|---|---|---|
| GPIB | GPIB | Any channels from both B2900 series and PZ2100A can be added. |
| GPIB | USB | If B2900 series has enabled channels, no channel from PZ2100A can be added, and vice versa. |
| GPIB | LAN | |
| USB | USB | |
| USB | LAN | |
| LAN | LAN | If B2900 series has enabled channels, no channel from PZ2100A can be added, and vice versa. This is because PZ2100A does not support LXI triggering. |
Configuring Settings
Common Settings
The Common Settings panel lets you set the Function to be used, i.e. Sweep or Source & Sampling.
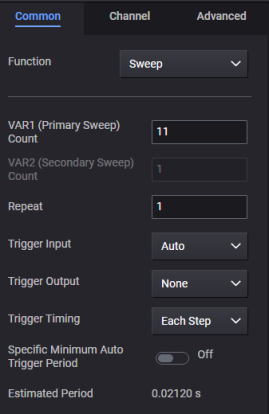
The Sweep function performs Linear/Log/List sweep output and measurement at each step.
The Source & Sampling performs Constant/Step/Pulse output and asynchronous measurement.
To learn the details of the Sweep/Sampling function, click the following links.
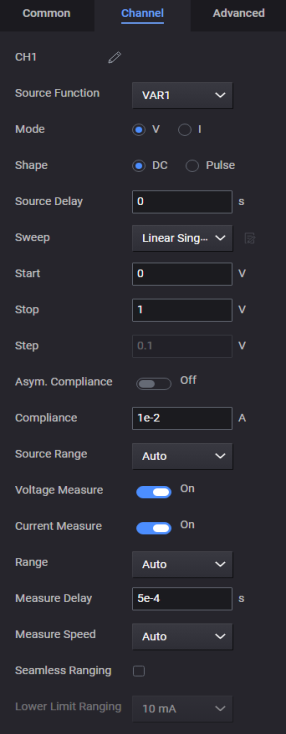
Channel Settings
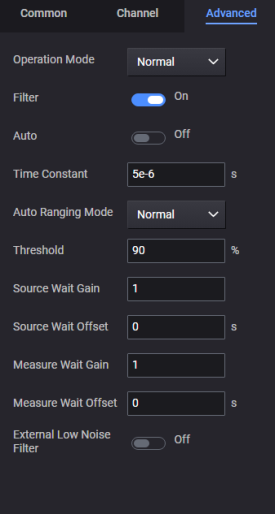
To set the Sweep Settings or Source & Sampling Settings, first select the Settings button and navigate to the following two tabs:
Channel Setting : Basic sweep or source & sampling settings for the selected channel
Advanced Channel Setting : Advanced sweep or source & sampling settings for the selected channel
For details of the parameters, refer to Setup Sweep or Setup Source & Sampling.
|
|
Click the Start button to start the measurement. The view will be redirected to Graph View (indicated by highlighted IV Curve button)
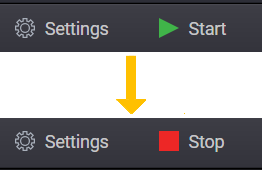
During the measurement, the Start button is changed to a Stop button. To abort the measurement, click the Stop button.
During the measurement, the Setting button is disabled, and user cannot edit graph properties.