Before these adjustments are performed, the IF Flatness adjustment must already be successfully completed.
|
|
Before these adjustments are performed, the IF Flatness adjustment must already be successfully completed. |
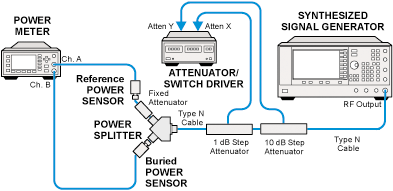
This adjustment determines the reference gain of the analyzer at 50 MHz and then measures the variation in gain when frequency and preamp state are varied from the reference settings. The attenuator and input amplitude remain in their reference states. The frequencies are divided into bands, to match the frequency breaks in the RF section.
To measure Reference Gain, the analyzer is set to the reference frequency, reference attenuation, and preamp state. A signal at the reference frequency and set to the reference input amplitude (as measured by the buried power sensor) is applied to the analyzer input. The power measured by the ADC is then read from the analyzer and the difference between this power and the input amplitude is the reference gain. All other amplitudes are referenced from this gain.
To measure RF Flatness, the source is set to the test frequency and the gain is measured the same way as when measuring the reference gain. The difference in gain at a given frequency from the reference gain is the RF Flatness correction.
To measure Attenuator Flatness, at each frequency where RF Flatness is measured, the attenuator is set to several different attenuator settings. At each attenuator setting, the gain is measured the same way as when measuring the reference gain. The difference in gain from the current attenuator setting and the reference attenuator setting (the setting used to measure RF Flatness and Reference Gain) is calculated and this is the attenuator flatness correction.
The analyzer is turned ON, and allowed to warm-up for 2 hours before performing this adjustment.
This adjustment selects the DAC setting that gives the best frequency accuracy when using the analyzers internal reference. Since the same tune DAC used for external reference is used for locking to an external frequency reference, the algorithm simply requests to lock to the external 10 MHz provided by the 10 MHz frequency standard and reads the DAC setting to which has been set by the firmware locking algorithm.
The time to wait between setting the analyzer to external reference and first DAC reading, the number of samples to take, and the time to wait between samples are variables in this procedure.
The data samples are averaged and the average DAC value is stored for this adjustment. The average value is compared to limits. The highest and lowest DAC values are checked to ensure that the firmware was properly locking.
The analyzer is then set to internal reference and the DAC is set to the value just stored.
This adjustment sets the IF attenuator that is positioned just before the 3rd mixer on the RF/LO assembly. This sets a rough gain that will determine the dynamic range performance. This attenuator will adjust for manufacturing variations in the components and the raw board can cause variations in RF gain.
|
Test Equipment |
Model Number |
|
Synthesized Signal Generator |
E8267D |
|
Frequency Standard |
5071A |
|
Power Meter |
E4419B |
|
Power Sensor (2 required) |
E9304A |
|
Power Splitter |
11667A |
|
Attenuator, 1 dB Step |
8494H |
|
Attenuator, 10 dB Step |
8496H |
|
Attenuator/Switch Driver |
11713A |
|
Cable, Type-N (2 required) |
11500C |
|
Cable, BNC (2 required) |
10503A |
|
Adapter, Type-N (m) to Type-N (m) |
1250-1475 |
|
Attenuator, 6 dB Fixed |
8491A Option 006 |