The Power Flatness adjustment must be performed prior to this adjustment.
|
|
The Power Flatness adjustment must be performed prior to this adjustment. |
This adjustment finds the correction factors for the attenuator steps 15 through 130 dB by using a spectrum analyzer. The spectrum analyzer makes a reference power measurement with the DUT set to +0 dBm and the step attenuator set to 10 dB. The reference power level measurement, Nominal Reference Attenuation, and the 10 dB correction factor are used to calculate the attenuator steps correction factors. For attenuation level >= 55 dB, the internal pre-amp of the spectrum analyzer, if available, is turned on. Cross calibration is taken at attenuation 50 dB with spectrum analyzer pre-amp On and Off. If a spectrum analyzer spurious signal is detected, the measurement frequency is shifted to avoid the spurious signal.
|
Test Equipment |
Recommended Models |
Alternate Models |
|
Spectrum Analyzer |
N9030B Opt 5xx1 |
N9030A Opt 5xx1 |
|
|
|
|
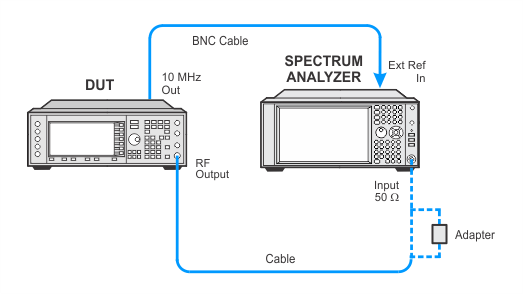
Setup for Attenuator Calibration

If this adjustment fails, perform the following steps in order:
Check the equipment setup (see above). If the setup is incorrect, make the necessary corrections and rerun the adjustment.
If this adjustment fails with the equipment set up properly, refer to the troubleshooting section of the signal generator's service guide. If you do not have a printed copy of the service guide (Option OBW), one is available either on the CD-ROM that came with your signal generator shipment or on the Keysight Website.
If you cannot correct the problem using the troubleshooting procedures in the Service Guide, obtain service from Keysight Technologies. Refer to Contacting Keysight Technologies.
