
The Attenuator adjustment must be performed after this adjustment.
|
|
The Attenuator adjustment must be performed after this adjustment. |
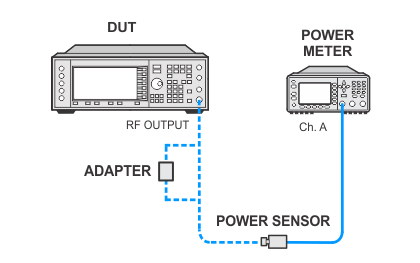
The power flatness adjustment is accomplished with the step attenuator set to 0 dB and the ALC set to the middle of its range. A power meter is used to measure the absolute RF output power. Correction factors are calculated and downloaded to maintain accurate power levels over the full frequency range of the DUT. Power level flatness adjustments are made in both analog (I/Q bypass) and digital modes of operation. There are separate correction factor arrays for each of these modes.
The internal attenuator in the ESG can be either an electronic or mechanical attenuator. The electronic attenuator consists of 7 distinct attenuator sections (10A, 5A, 40A, 20A, 40B, 10B, and 5B). The mechanical attenuator consists of 5 distinct attenuator sections (60, 20, 40, 10, and 5). These sections are internally connected in the proper combination to give attenuation values from 0 dB to 130 dB, in 5 dB steps.
This power flatness calibration first adjusts power flatness (0 dB) and step attenuator adjustments (5 to 10 dB). The remaining step attenuator adjustments (15 to 130 dB) are done in attenuator calibration. For the 0 dB setting, it adjusts power level accuracy for both bypass and digital I/Q modes of operation. For 5 to 130 dB step attenuator settings, it determines a correction factor required to compensate for variances in the actual step attenuator performance. Absolute power measurements are made with a power meter and power sensor that are traceable to the National Institute of Standards and Technology (NIST). The power meter is used over the 0 dB to 10 dB attenuator range. The remaining step attenuator range is covered with a spectrum analyzer (PSA) in the attenuator calibration.
|
Test Equipment |
Recommended Models |
Alternate Models |
|
Power Meter |
N1914B |
N1914A1 E4418A |
|
Power Sensor |
N8482A |
E9304A |
|
|
|
|
Power Meter and Power Sensor Calibration
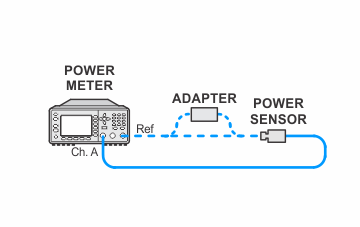
Setup for Power Meter Flatness Calibration
If this adjustment fails, perform the following steps in order:
Check the equipment setup (see above). If the setup is incorrect, make the necessary corrections and rerun the adjustment.
If this adjustment fails with the equipment set up properly, refer to the troubleshooting section of the signal generator's service guide. If you do not have a printed copy of the service guide (Option OBW), one is available either on the CD-ROM that came with your signal generator shipment or on the Keysight Website.
If you cannot correct the problem using the troubleshooting procedures in the Service Guide, obtain service from Keysight Technologies. Refer to Contacting Keysight Technologies.
