Connect a PC to the FieldFox |
|
IMPORTANT - Use the Direct Connect method (in this topic) to transfer files using DataLink software when a LAN cable is connected directly between the PC and FieldFox.
|
The procedure described in this topic requires that Keysight IO Libraries be installed on the PC. To purchase the Keysight I/O libraries, or download a free upgrade, go to www.keysight.com and search for IO Libraries. Scroll to find Software, Firmware & Drivers.
Connect both the FieldFox and the PC to a Network with a DHCP Server.
Directly connect the FieldFox to the PC using a LAN or crossover cable. Neither are connected to a network but only to each other.
Both the FieldFox and PC must have independent connections to a network and have dynamically assigned (DHCP) IP Addresses. If your server does not support DHCP, then assign a Static IP address as shown in the procedure, "
Note: Use a 100Base-T connection to connect the FieldFox to a PC. A slower 10Base-T connection may cause problems.
On the FieldFox
Press System 7 then System Configuration then LAN
Confirm (or change) Obtain IP is DHCP. This allows the server to assign an IP address dynamically.
Connect the FieldFox to the Internet using a LAN cable.
Note: To make the LAN settings persist after power up, toggle Apply Settings to Now then back to Power Up. You should see a message indicating that the LANconfig file was saved.
Shutdown, then restart the FieldFox.
Press System 7 then System Configuration then LAN
Record the Current IP Address.
If 127.0.0.1 appears, this address indicates that an IP Address has not been assigned dynamically. Use the Direct Connection method or read data using a USB flash drive or miniSD card.
On the PC – Keysight IO Libraries
This procedure shows Keysight IO Libraries Suite 15. Other versions will be slightly different.
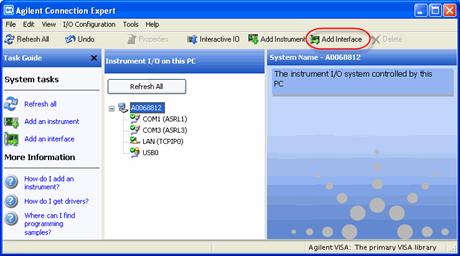
In the lower right corner of the PC display, double-click the Keysight IO Libraries Icon. If it is not present, click Start, then All Programs, point to Keysight IO Libraries, then click Keysight Connection Expert.
Close the Welcome Screen
In the above dialog, click Add Interface.
In the above dialog, select Remote GPIB (via E5810 or Remote IO Server) then click Add
In the above dialog:
Click IP address, then type the IP address of the FieldFox. Learn how to view the FieldFox IP address.
Change Logical unit to 9.
Click Test connection to verify that the FieldFox can be found.
When the ‘Success’ message is displayed, click OK.
Close ALL dialogs or the LAN settings will NOT be made.
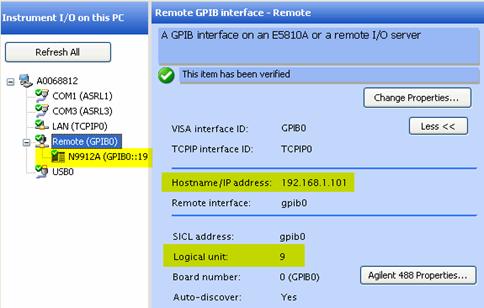
The ACE dialog will look like the above image.
Each time you connect the FieldFox to your PC, if your server dynamically assigns a new IP address, you will have to change the IP address in ACE. To do this:
In the ACE left pane, right-click Remote (GPIB0)
Click Change Properties, then edit the IP address.
Use this method to directly connect the FieldFox to a PC. This method requires that a static IP Address be assigned to both the FieldFox and the PC, and the IP Address be changed in Keysight IO libraries.
Note: Do NOT connect a LAN cable until instructed to do so.
When a LAN cable is connected between the FieldFox and the PC, both LEDs on the FieldFox LAN connector should be active. IF the LEDs are NOT active, use a LAN crossover cable. This may be necessary when using an older PC. In most cases, a crossover cable is NOT necessary.
On the FieldFox
Press System 7 then System Configuration then LAN
Set Obtain IP Address to Static
Set Static IP Address to 192.168.0.1
Set Static Subnet Mask to 255.255.248.0
Press Done
Connect a standard LAN cable directly from the FieldFox to the PC. The PC can NOT be connected to wireless LAN.
Toggle Apply Settings to Now then back to Power Up. You should see a message indicating that the LANconfig file was saved.
On the PC
Press Start, then Control Panel, then Network Connections
Right-click Local Area Connections
Select Properties
On the General tab, select Internet Protocol (TCP/IP)
Click Properties
Click Use the following IP Address, then enter 192.168.0.2
Enter Subnet Mask: 255.255.248.0
Click OK to close all dialogs
In Keysight IO Libraries
Follow the procedure On the PC – Keysight IO Libraries except...
Enter the IP Address: 192.168.0.1
Change the Logical Unit to 9
Test the connection