Configure PC to Analyzer over LAN
This procedure shows how to configure a PC to an analyzer over LAN.
Both the PC and analyzer must be connected to the internet.
Overview
The following is an overview of the detailed steps in this topic:
Connect LAN cable between the analyzer and site LAN
hub or router.
Obtain
the Hostname or IP address of the analyzer:
PNA
- (Also enable VISA/SICL)
ENA
FieldFox
E4980A
E4990A
E4991B
Setup
LAN on PC using Connection Expert
For
PNAs with older firmware, install PNAProxy.exe
2. Obtain Hostname
or IP address
You can connect to all of the analyzers using either the Hostname (also
known as computer name) or the IP address. The following instructions
show how to learn the hostname of each analyzer. Make a note of the hostname
as it will be needed later in the process.
...On the PNA
Click File,
then Minimize Application.
On the PNA desktop, right-click My
Computer Icon, then click Properties.
Click the Computer
Name tab at the top of the dialog box.
Note the Full computer
name.
Click OK.
Enable VISA or SICL communication over LAN:
On the PNA, click System,
point to Configure, then click
SICL/GPIB.
Check SICL Enabled.
To automatically enable SICL when the PNA is booted, check Automatically
enable on Startup.
Click OK.
...On the ENA
Press System,
then Misc Setup, then Network Setup, then Network
Identification.
Click the Computer
Name tab, then under Computer
Description.
Note the computer
name.
Click OK.
Turn on SICL-LAN Server
Press System,
then Misc Setup, then Network Setup, then SICL-LAN
server.
Restart firmware.
Two Windows Security Alert (Keysight Remote I/O Port
Manager and Keysight Remote I/O Server) will appear. Unblock both.
...On the FieldFox
Press System,
then System Configuration,
then LAN.
Line "Obtain IP"
should be "DHCP" If not:
Scroll cursor down to "Obtain IP" line.
Press Edit.
Press Obtain
IP to toggle from "Static" to "DHCP".
Press Done Edit.
Note the Hostname
on the FieldFox display on the line above.
Select Done.
...On the E4980A
Press the System
hardkey, then press the SYSTEM
CONFIG softkey.
Select the IP
CONFIG field using the cursor keys and then press the AUTO softkey.
...On the E4990A
Press the System
hardkey, then press Misc Setup,
then Network Setup, then LAN Dialog.
...On the E4991B
Press the System
hardkey, then press Misc Setup,
then Network Setup, then LAN Dialog.
3. Setup LAN on the PC
using Keysight Connection Expert
These instructions show screen shots from Keysight IO Libraries version
16.1. Other versions may be slightly different.
Right click on Keysight
IO Libraries icon  in lower right hand corner of
PC display and select Keysight Connection Expert.
in lower right hand corner of
PC display and select Keysight Connection Expert.
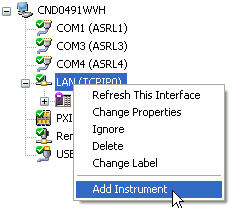
In the Instrument
I/O on this PC window, right click LAN
(TCPIPO) and select Add Instrument
as shown in this image:
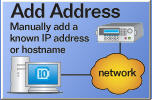
In the Add
LAN Instrument dialog, click Add
Address
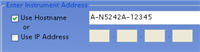
Check Use Hostname
and enter the Hostname that you wrote down earlier from analyzer.
You can also enter the IP address.
Click Test Connection
or Identify Instrument to
verify the connection is made. If verification is returned, click
OK. Otherwise, check the connection
or Hostname / IP address and try again.
Optionally, right click on the analyzer that you just
connected to and select Add VISA
Alias. Type a name for the analyzer (such as "FieldFox")
in VISA alias text box. Click OK.
Start the N1500A software, click Preferences,
then Select Instrument,
then Re-scan to find the new
connection. Select it, then click OK
to complete the connection. Learn more
about Hardware Scan.
4. For the following PNA models with older firmware
All PNA 836xA/B/C models and N5230A/C models with
firmware versions below A.09.42.18.
All PNA-X, N522x, N523x models with firmware versions
below A.09.50.12.
The following steps show how to locate and install the program "pnaproxy.exe" on your
PC. The file is located on the PNA at C:\Program Files\Keysight\
Network Analyzer \Automation
Either map a drive from
the PC to the PNA or copy the file to the PC using a flash drive or
other media.
Note: If mapping
a drive to the PNA, to avoid potential security permission complications,
it is easiest to add yourself as an administrator on the PNA using the
same name and password as that used on your PC. Firewall or Anti-virus
software running on the PC can sometimes interfere. Disable them if possible.
On the PC, double-click
pnaproxy.exe and follow the
prompts to Install PNA Proxy.
If the installation offers
a choice of Modify, Repair, or Remove, then select Remove.
Then double-click on pnaproxy.exe
again.
If prompted for the Computer
name of the PNA, click Next>.
Last modified:
6-Sep-2013 |
Added ENA Sicl over Lan |