Dialog Transparency


Beginning with PNA release A.010.0, most PNA dialogs can be made to appear with various amounts of transparency.  This allows you to view the PNA traces through the dialog as you make dialog settings.

How to set Transparency Level

There are FOUR ways to make the transparency level setting:

1. Right-click in any non-control area of a dialog that allows transparency to see the following selections:

2. In tabbed dialogs, cycle through the above transparency settings by pressing multiple times.

3. Launch the Transparency dialog (below) from the Preferences dialog.

4. Launch the Transparency dialog by doing the following:

Using front-panel
hardkey
[softkey] buttons

Using Menus

  1. Press Display

  2. then [More]

  3. then [Dialog Transparency]

  1. Click Response

  2. then Display

  3. then Dialog Transparency

This setting is not programmable
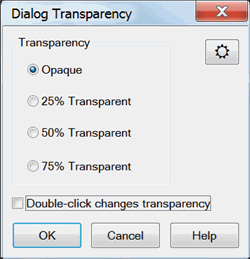
 

Dialog Transparency dialog box help  

Note: This single Transparency setting applies to ALL supported PNA dialogs.

  • Opaque (NOT Transparent) - Default setting

  • 25% Transparency

  • 50% Transparency

  • 75% Transparency

Double-click changes transparency - When checked, cycle through the above transparency settings by double-clicking in any non-control area of a dialog that allows transparency.

Notes

  • The transparency setting is stored as a PNA Preference.

  • The setting survives a PNA Shutdown and Preset

  • It is NOT saved and recalled with instrument state.


Last Modified:

25-Feb-2014

New topic (10.0)