The Sweep, RF Path, Modulate, or Measure tab functions can now be selected.
Select the Sweep
tab.
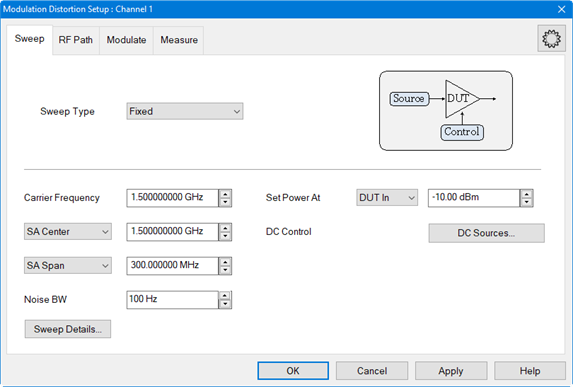
Click on the Sweep Type pull down menu then select Power.
Set the Carrier Frequency by either using the up/down arrows or by double-clicking in the data entry field and entering the frequency using the displayed keypad. This is dependent upon the frequency of the DUT.
Set the SA Center by either using the up/down arrows or by double-clicking in the data entry field and entering the frequency using the displayed keypad. This sets the Spectrum Analyzer display center.
Set the SA Span by
either using the up/down arrows or by double-clicking in the data
entry field and entering the frequency using the displayed keypad.
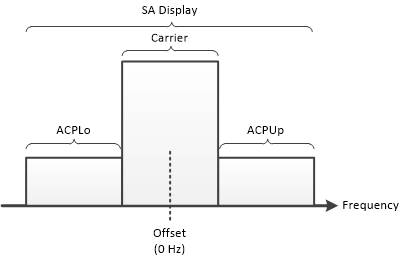
This sets the Spectrum Analyzer (SA) display span. The following graphic
shows the SA display set to the same center frequency as the Carrier
and covering a span that includes the integrated bandwidth settings
of ACPLo + Carrier + ACPUp.
Set the Noise BW by either using the up/down arrows or by double-clicking in the data entry field and entering the value using the displayed keypad. Noise BW is equal to the Resolution BW divided by the Vector Average factor.
Click on the Sweep Details... button to set the following:
Force RF Power OFF at the End of Sweep - System Preference - If enabled, RF power is turned off at the end of a sweep.
Delay Before Start of Sweep - Same as Sweep Delay in a standard channel.
Delay Before Distortion Measurement - Adds delay after the linear S-parameter sweep and before the distortion measurement to allow the RF source to settle.
Enable S-Param Sweep - Enables S-parameters to be measured at the low linear power level. If disabled (default), curve fitting (smoothing) is used instead of the S-parameter sweep. Curve fitting can be adjusted by varying the window aperture using the Equalization Aperture setting in the Measurement Details dialog.
S-Param Source - Selects source and signal used to measure S-parameters.
External Vector - Chirp - Selects a chirp signal from the external signal generator for measuring S-parameters.
S-Param Power - Sets the power level used at the DUT input to measure the DUT gain when operating in its linear region. The linear gain is used to calculate distortion.
S-Param Freq Step - Frequency step size setting used when measuring S-parameters.
S-Param IFBW - Bandwidth setting when measuring S-parameters.
Re-use Previous S-Parameter Measurements If Available - If disabled, S-parameters will be measured at the low linear power level. If enabled and compatible measurements exist from a previous sweep, those measurements will be used and a Linear S-parameter sweep will not be performed. If enabled and compatible measurements are not available, then a Linear S-parameter sweep will be performed.
