VNA firmware updates are available to you at no cost in a self-extracting Install Shield file. The update includes the VNA application, Online help, and Service Utilities.
To manually check the version of firmware on the VNA, click System > Help > About NA....
Tip: Use Move App to Back to cause the VNA application to move behind this application on the screen.
The following options are available for you to update your VNA application:
Auto-Check and Firmware Update If your VNA is connected to the Internet, these utilities will automatically check for, download, and install, the new firmware and associated files when the VNA application is started. You will be prompted before this occurs.
Website Access If your VNA is NOT connected to the Internet, but you have a PC that is, you can download the VNA firmware and associated files to a storage medium.
Note: After a firmware update...
|
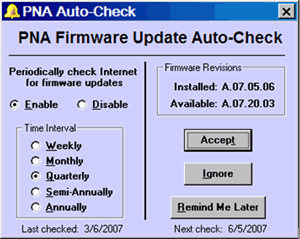
With Internet access to your VNA, Auto-Check automatically and regularly checks the Internet for new VNA firmware revisions. If a new revision is found, a notification message prompts you to run the Firmware Update utility, which then performs the actual download.
Without Internet access to your VNA, Auto-Check provides a reminder prompt at the selected intervals.
Auto-Check is run only when the VNA application is started. Once the VNA application is running, it will not check for updates again until it is restarted.
When Auto-Check runs, it checks the following conditions:
Is there an active connection to the Internet?
Is the Auto-Check utility enabled?
Is it time to check for new firmware?
Does new firmware exist?
If all of these conditions are true, Auto-Check shows the following dialog box.
If all of these conditions are NOT true, or to change these settings at any time, press System, then Service, then Update Firmware. From within the utility, click AutoCheck. These preferences are stored in the VNA registry. Future firmware updates will not change these settings.

VNA Auto-Check dialog box help |
Enable When the VNA application is started, Auto-Check will search the VNA website for firmware updates at the selected time interval. Disable When the VNA application is started, Auto-Check will NOT search the VNA website for firmware updates. Time Interval Select the time interval Auto-Check is to search for firmware updates. Accept Starts update process. Ignore No further action is taken until the selected time interval has elapsed. Remind Me Later: This window is displayed again after 1-20 days depending upon the time interval selected. |
Note: You must have administrative privileges on the analyzer to run this utility. See Set Up Analyzer Users.
How to start Firmware UpdateConnect the VNA to the Internet. A LAN connection is recommended because a firmware download can take many hours using a modem. |
|
Using Hardkey/SoftTab/Softkey |
Using a mouse |
|
|
|
|
No programming commands are available for this feature |
|

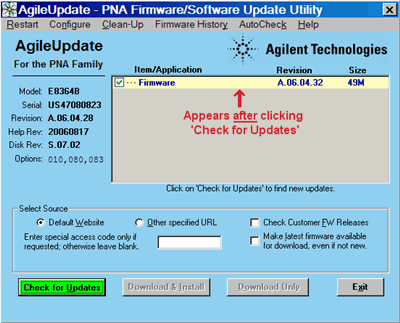
Note: Your privacy is important to Keysight. The update utility does NOT send ANY information from the VNA to the server. It only downloads from the server to the VNA. Restart Click to restart from the beginning. Configure Click to launch the Configure dialog box. Clean-up Click to delete all but the two most recent install shield packages from the VNA hard drive. Firmware History Available after clicking Check for Updates. Auto-Check Launches the Auto-Check dialog box. Item / Application Lists the items available for download at the firmware website.
Note: The firmware includes the help file. Therefore, only the firmware checkbox will be selected if a new version for both the firmware and the help file are available. Select Source Default Website The Keysight site that contains update FW. Other Specified URL Click if you were instructed to get firmware from a different website. Check Customer FW Releases Check this box to also check Customer Releases in addition to Production Releases. This setting provides you with the very latest VNA firmware. Customer Releases are fully supported but have not yet been tested in all production models. Customer Releases take precedence over Production Releases. This setting is remembered and applied the next time update utility is run. Special Access Code... Type in the code if you were given one from Keysight Technical Support. Otherwise, leave blank. Make Latest Firmware Available... Select this checkbox if you want to download the latest firmware, even if it is not new. Check for Updates Click to look for firmware updates at the Keysight website. If there are newer versions, the files will be listed. Download and Install When updates are found, this selection becomes available. Some files may be pre-checked. Be sure the corresponding boxes are checked for the files you want to download. Then click to download and install the update. Download Only Click to download the files to the analyzer hard disk and install the files at a later time. At that time, click Install from File.
|

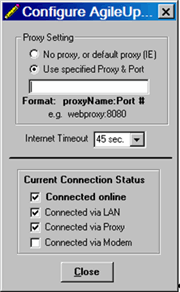
Note: If the update utility will not connect, try to access ANY Internet website. Contact your local IT department if necessary. Proxy Setting No Proxy or Default Proxy Click if you use a LAN connection. The update utility will automatically use the proxy specified in Internet Explorer. Use specified Proxy / Port Click to enter the proxy name and port. The format is: proxyName:portNumber. (The proxy port number is typically 8088). Internet timeout If you are using an automatic dial-up Internet connection you may need to increase the timeout. Current Connection Status Shows the current status of the VNA connection to the Internet. Note: These settings are NOT saved; they must be re-entered each time the update utility is run. |
Download the latest firmware from http://www.keysight.com/find/na
Terminate the VNA application by pressing System > Main > Exit.
Transfer the file from your PC to your VNA using LAN or USB Pen drive.
Double-click the file on the VNA and follow the instruction.