Other topics about Measurement Example
Next, you need to eliminate errors produced between the test fixture and the E4990A. This process is called “fixture compensation.” You can perform the process by using three compensation functions: OPEN, SHORT, and LOAD.
Press the Cal key to display the Cal Compen (Calibration Compensation) menu.
Press the Fixture Compen softkey to display the Fixture Compen (Fixture Compensation) menu.
Ensure that the two test electrodes, HIGH and LOW, of the connected text fixture (16047E) are open. Fix the two electrodes in position by turning clockwise the fixture’s two electrode fastening screws.
Press the Open (0 S 0 F) softkey to measure the OPEN compensation data. While the instrument is measuring the compensation data, “Sweeping...” message is displayed on the Instrument Status Bar at the bottom-left area of the screen. Upon completion of measurement, the OPEN softkey label changes to ON, indicating that the OPEN compensation function is turned on.
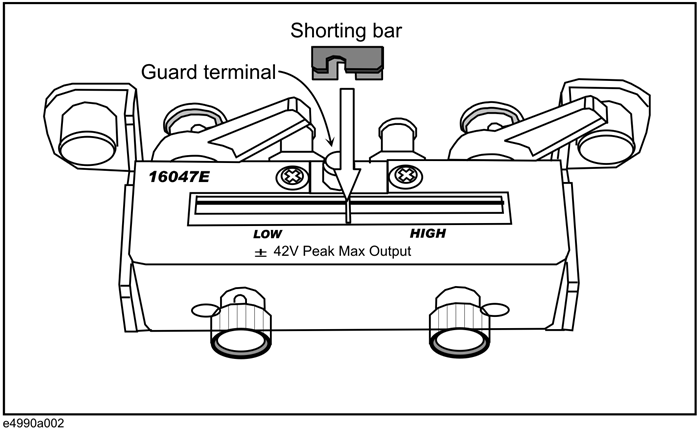
Place the short bar (a metal plate for SHORT compensation) between the HIGH and LOW terminals of the 16047E. Secure the short bar with the two electrode fastening screws as shown below.
Press the Short (0 W 0 H) key to measure the SHORT compensation data. While the instrument is measuring the compensation data, “Sweeping...” message is displayed on the Instrument Status Bar at the bottom-left area of the screen. Upon completion of measurement, the SHORT softkey label changes to ON, indicating that the SHORT compensation function is turned on.
Remove the short bar from the 16047E's test electrodes.
The E4990A provides three fixture compensation functions: OPEN, SHORT, and LOAD. You can turn on/off each of these compensation functions individually and use them in any combination to perform the fixture compensation process. In typical measurement use, it is recommended that you execute the OPEN and SHORT compensation functions.