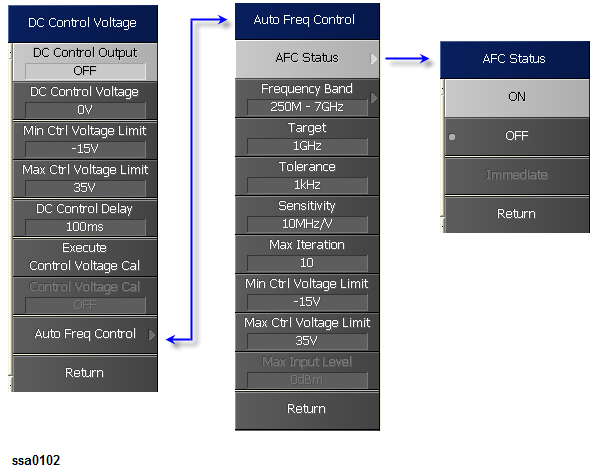
Auto Frequency Control Function

Other topics about Common Settings

Overview

The automatic frequency control (AFC) function can quickly set and maintain the DUT output frequency to the target frequency you want. It does this by controlling the internal DC control voltage and using the measurement results obtained by its internal frequency counter. The DC control voltage has to be turned on to use the AFC function.
 

The AFC status appears in the lower right corner of the measurement screen. Each background color indicates the respective AFC function.

Color

Status

Blue

The function is enabled.

Gray

The function is disabled. Check if the DC Control Output is turned OFF.

Specifying Auto Frequency Control Function

  1. Press DC Control > Auto Freq Control.

  2. Press Min Ctrl Voltage Limit.

  3. Enter the minimum allowance voltage for DC control to be used for the Auto Frequency Control function, in the data entry field that appears in the upper left of the screen.

  4. Comparing the value entered here with the value specified in Min Ctrl Voltage Limit under the DC Control menu, the E5052B will choose a higher value to apply the limit.

  1. Press Max Ctrl Voltage Limit.

  2. Enter the maximum allowance voltage for DC control to be used for the Auto Frequency Control function, in the data entry field that appears in the upper part of the screen.

  3. Comparing the value entered here with the value specified in Max Ctrl Voltage Limit under the DC Control menu, the E5052B will choose a lower value to apply the limit.

  1. Press Max Input Level.

  2. Enter the maximum level value of the measurement signal that is supplied from the Input port of the E5053A Microwave Downconverter in the Auto Frequency Control function, in the data entry field that appears in the upper part of the screen.

  3. With no settings other than the downconverter is turned on, the RF input is set to Downconverter, and the external mixer is set to Not Used, setting maximum input level is available.

  1. Press Frequency Band.

  2. Select an appropriate frequency band that contains the target carrier signal, from the softkey menu list.

  3. Selectable frequency bands differ depending on whether the E5053A Microwave Downconverter is used and whether the RF input is direct input or downconverter input.

Carrier Frequency Band

Standalone E5052B or Downconverter: OFF

Downconverter: ON & RF Input: E5052B Direct

Downconverter: ON & RF Input: Downconverter

10M - 1.5GHz

Y

Y

N

250M - 7GHz

Y

Y

N

3G - 10GHz

N

N

Y

9G - 26.5GHz

N

N

Y

  1. Press Target.

  2. Enter the target frequency of the output from the DUT in the data entry field that appears in the upper part of the screen. The unit is [Hz].

  3. In the analyzer mode, the frequency band is automatically altered so that the input signal frequency is within the band when the actual input frequency crosses the band.

    Also the E5053A downconverter is automatically controlled to offset the downconverter LO frequency to track the input signal frequency within the IF frequency being fed to the E5052B. Note that the maximum frequency step between the two adjacent measurement points may be limited due to the IF frequency range. Increase the number of measurement points for the E5052B to detect the input signal frequency within the IF frequency, when "Downconverter IF not found" error message is found.

  1. Press Tolerance.

  2. Enter the tolerance (an allowable range of difference between the target frequency and the actual frequency output from the DUT) in the data entry field that appears in the upper part of the screen. The unit is [Hz].

  3. Press Sensitivity.

  4. Enter an approximate control sensitivity of the DUT in the data entry field that appears in the upper part of the screen. The unit is [Hz/V].

  5. Press Max Iteration.

  6. Enter the maximum number of times to perform repetitive measurements and calculation (control -voltage setting loop) for determining the optimum control voltage, in the data entry field that appears in the upper part of the screen.

  7. Press AFC Status.

  8. Select the status of the Auto Frequency Control function from the softkey menu list.
     

    Softkey

    Function

    OFF

    The Auto Frequency Control will not be performed.

    ON

    The Auto Frequency Control will be performed prior to each sweep.

    Immediate

    The Auto Frequency Control will be performed only once. If the status is changed this during sweep, the sweep will be interrupted and Auto Frequency Control will be performed.