Setting External Trigger
When the trigger source is set to External, the input signal is regarded as the start trigger of measurement, which is transmitted to the external trigger input connector (Ext Trig) from the external instruments. When the connector detects more than 20 us of pulse transition upward or downward, a measurement starts. A TTL compatible signal is used as the trigger signal.
Follow the steps below to set up the external trigger.
Connect the trigger output connector of the external instrument to the E5052B’s connector on the rear panel.
-
Press Trigger > Source.
-
Select External from the softkey menu list.
-
Press Trigger > Ext Trig Polarity to select the polarity of the external trigger. You can select either Positive (upward) or Negative (downward).
-
Press Trigger > Ext Trig Output.
-
Select State > ON | OFF from the softkey menu list.
-
Select Polarity to select the polarity of the external trigger output. You can select either Positive or Negative.
-
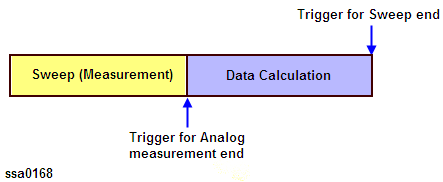
Select Selection to set the trigger timing. You can select either Sweep end or Analog meas end.