Other topics about Controlling E5052B
This section describes how to control the E5052B's VBA externally.
You can execute VBA from an external PC by running either macros or the user menu.
To start VBA from an external PC, use the following command:
• SCPI.MMEMory.LOAD.PROGram
• SCPI.PROGram.COM.EVENt
• SCPI.PROGram.SELected.STATe
To execute the user menu from an external PC, use the following command:This command executes the first of the menu.
To execute the user menu, you must execute the user menu function in advance. For more information, refer to Running User Menu and SCPI.PROGram.SKEY.Item(1).IMMediate
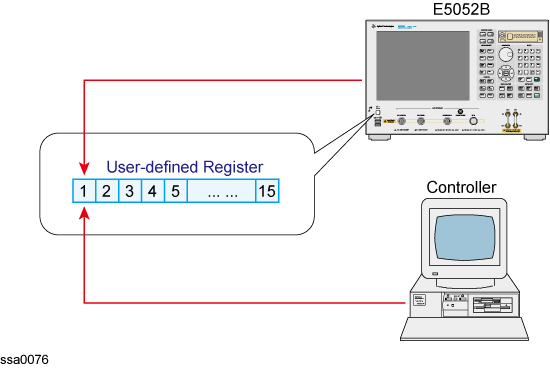
To allow the external controller to receive the termination of VBA from the E5052B, you may either confirm the operational status of VBA or use the user-defined register.
To confirm the operational status of VBA, use the following command:
• SCPI.PROGram.SELected.STATe
To use the user-defined register, use the following command:For more information, refer to Using User-defined Register.
• SCPI.STATus.OPERation.BIT12.CLEar
• SCPI.STATus.OPERation.BIT12.CONDition
• SCPI.STATus.OPERation.BIT12.ENABle
• SCPI.STATus.OPERation.BIT12.EVENt
• SCPI.STATus.OPERation.BIT12.NTRansition
• SCPI.STATus.OPERation.BIT12.PTRansition
• SCPI.STATus.OPERation.BIT12.SET
The E5052B does not control the individual status flag of the user-defined register. In order to start the E5052B VBA using the external controller to obtain the end bit, the user must make the user-defined register to be controlled within the program.
The user can assign any register number to the user-defined register which he/she wants to use. Available register numbers are 1 to 15 (0 to 14 bit).
If you use the user-defined register, you must specify the same register number for both the external controller side and the E5052B’s program side.
Reference of User-defined Register
The following is a sample program which:
Clears the first condition register to be used (bit 0).
These lines configure the instrument so that the operation use-defined status event register's bit 0 is set to 1, when the operation use-defined condition register's bit 0 is changed from 0 to 1 (i.e. positive transition).
Executes the user menu.
Repeats until the termination of VBA is detected.
A Sample Program to Control User-defined Register (On the Controller Side
An event occurs when the softkey is pressed from the user menu.
E5052B will be reset to the initial setting, when the first softkey is pressed.
The message box will appear, when the second softkey is pressed.
An event will occur when the triggered sweep ends.
A message box will appear when the sweep ends.
Sets a flag to the first of the user-defined register (bit 0).
This procedure terminates the program.
A Sample Program to Control User-defined Register (On the E5052B Side)
10|Private Sub app_OnEvent(ByVal ReasonStr As String, ByVal OptionStr As String)
20| Select Case ReasonStr
30| Case "UserLabel"
40| Select Case OptionStr
50| Case 1
60| SCPI.SYSTem.PRESet
70| Case 2
80| MsgBox "Program ended"
90| End Select
100| Case "SweepEnd"
110| MsgBox "Sweep ended"
120| End Select
130| SCPI.STATus.OPERation.BIT12.SET = 0
140| End
150|End Sub
For more information on the user-defined register, refer to the status reporting system.
The E5052B has an area for which the users may set any value. The areas are divided for each data type.
An area can be used up to 10 (1 to 10) for each command.
The values set by a command cannot be removed by executing preset.
• SCPI.PROGram.VARiable.ARRay(1-10).DATA
• SCPI.PROGram.VARiable.ARRay(1-10).POINts
• SCPI.PROGram.VARiable.DOUBle(1-10)
• SCPI.PROGram.VARiable.INTeger(1-10)
• SCPI.PROGram.VARiable.STRing(1-10)
These commands do not refer to or change the results within the E5052B.
The following is a sample program for configuration, which demonstrates how to use the floating-point-formatted user-defined array.
Define the variables.
Assign values to the variables.
Call the function to trigger the instrument.
Configure marker X for frequency measurement (trace 1).
Read out marker Y for frequency measurement (trace 1).
Configure marker X for power measurement (trace 2).
Read out marker Y for power measurement (trace 2).
Set the value of marker Y for frequency measurement at the beginning of the user-defined array.
Set the value of marker Y for power measurement to that of the 2nd dimension of the user-defined array.
Example of using floating point formatted user-defined array
10| Sub Main()
20|
30| Dim Vcc1 As Double
40| Dim FP_Freq As Double
50| Dim FP_Power As Double
60|
70| Vcc1 = 0.5
80|
90| Call FP_SingleSweep
100|
110| SCPI.CALCulate.FP.Trace(1).MARKer(1).X = Vcc1
120| FP_Freq = SCPI.CALCulate.FP.Trace(1).MARKer(1).Y
130| SCPI.CALCulate.FP.Trace(2).MARKer(1).X = Vcc1
140| FP_Power = SCPI.CALCulate.FP.Trace(2).MARKer(1).Y
150|
160| SCPI.PROGram.VARiable.DOUBle(1) = FP_Freq
170| SCPI.PROGram.VARiable.DOUBle(2) = FP_Power
180| End Sub
The following sample program demonstrates how to use the array-formatted user-defined array.
Define the variables.
Call the function to trigger the instrument.
Read out the number of points and set it to the variable.
Redefine the array (variable).
Read out the trace data and set it to the variable.
Read out the X-axis data and set them to the variable.
Specify the number of data points at the beginning of the user-defined array.
Specify the trace data at the beginning of the user-defined array.
Specify the number of data points to that of the 2nd dimension of the user-defined array.
Specify the X-axis data to that of the 2nd dimension of the user-defined array.
Example of using array formatted user-defined array
10| Sub Main()
20|
30| Dim PN_Nop As Long
40| Dim PN_Trace() As Double
50| Dim PN_Freq() As Double
60|
70| Call PN_SingleSweep
80|
90| PN_Nop = SCPI.SENSe.PN.SWEep.POINts
100| ReDim PN_Trace(PN_Nop - 1)
110| ReDim PN_Freq(PN_Nop - 1)
120|
130| PN_Trace = SCPI.CALCulate.PN.Trace.DATA.FDATa
140| PN_Freq = SCPI.CALCulate.PN.DATA.XDATa
150|
160| SCPI.PROGram.VARiable. Array (1).POINts = PN_Nop
170| SCPI.PROGram.VARiable.Array(1).DATA = PN_Trace
180|
190| SCPI.PROGram.VARiable.Array(2).POINts = PN_Nop
200| SCPI.PROGram.VARiable.Array(2).DATA = PN_Freq
210|
220| End Sub