Other topics about Optimizing Measurement
The dynamic range is the finite difference between the maximum input power level and the minimum measurement power level (noise floor) of the analyzer. In evaluating a characteristic accompanied by a large change in the amplitude (the pass band and stop band of a filter, for example), it is important to increase the dynamic range.
Lowering the noise floor of the receiver enables you to expand the dynamic range. The following methods can be used to lower the receiver noise floor.
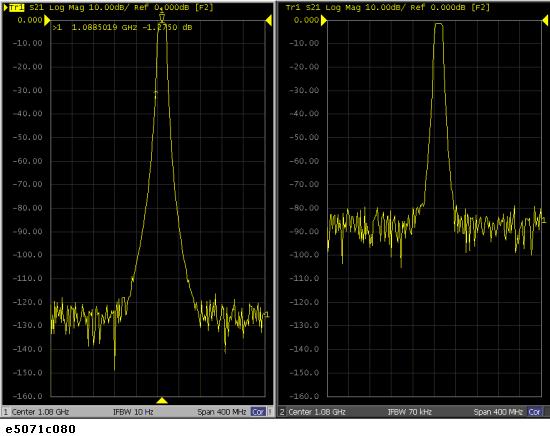
Narrowing the receiver IF bandwidth enables you to reduce the effect of random noise on measurements. Narrowing the IF bandwidth to 1/10 the original bandwidth causes the receiver noise floor to decrease by 10 dB.
To specify the IF bandwidth, follow the steps described below.
Press Channel Next (or Channel Prev) to select a channel on which to specify the IF bandwidth.
Press Avg key.
Click IF Bandwidth, then change the IF bandwidth in the data entry area.
The IF bandwidth auto mode helps you to improve the measurement speed, when the sweep mode is set at log especially. When you make a measurement with wide span from lower frequency and the IF bandwidth is set at fixed frequency, the measurement would be slow or higher noise floor in lower frequency. This function allows you to measure narrower IF bandwidth (lower noise) in lower frequency and wider IF bandwidth (faster ) in higher frequency.
Press Avg key.
Click IFBW Auto to turn ON the IF bandwidth auto mode.
If you want to set an upper limit of IF bandwidth in auto mode, press IFBW Auto Limit, and enter the upper limit with enter keys.
In IF bandwidth auto mode, the IF bandwidth is automatically set to equal to or less than 1/5 of each measurement frequency. (The E5063A does not change IFBW for each test points in IF BW auto mode. The E5063A divides its measurement span into several segments which are defined internally. The IFBW is set at equal to or less than 1/5 of the start frequency of each segment.)
IFBW Auto On may make the sweep time be longer than IFBW Auto Off. This is because IFBW auto operation requires some additional time.
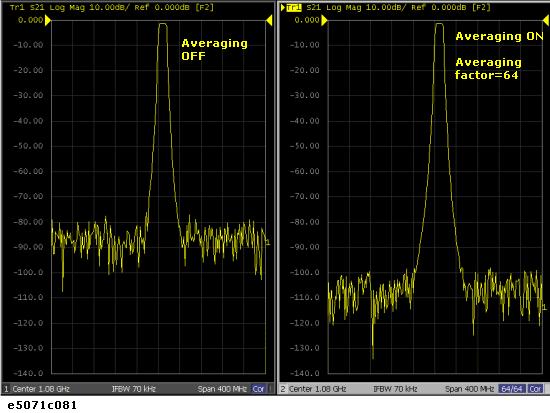
Using sweep averaging also enables you to reduce the effects of random noise on the measurements.
Sweep averaging averages data from each point (vector quantity) based on the exponential average of a continuous sweep weighted by the averaging factor specified by the user. Sweep averaging is expressed in the following equation.
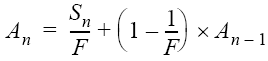
where:
An = Result of the calculation of sweep averaging for the nth sweep operation at the point in question (a vector quantity)
Sn = Measurement value obtained at the nth sweep operation at the point in question (a vector quantity)
F = Sweep averaging factor (an integer between 1 and 999)
Define the sweep averaging by following the steps below.
Press Channel Next (or Channel Prev) to select the channel on which you want to define the sweep averaging.
Press Avg > Avg Factor, then change the averaging factor in the data entry area.
Click Averaging to turn ON the averaging.
Clicking Averaging Restart resets n to 1 in Sweep Averaging equation in Turning on Sweep Averaging