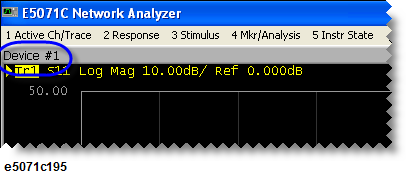
Press Channel Next/Channel Prev keys to select the channel to be labeled.
Press Display key.
Click Edit Title Label,then the title label input dialog box appears.

Other topics about Setting Measurement Conditions
When using multiple channels, it is possible to maximize a specific channel window on the screen. When multiple traces are displayed in a channel window, it is also possible to maximize a specific trace displayed within that channel window.
The Window/Trace Display data can be preset to factory settings using the Preset option
Press Channel Next (or Channel Prev) to select the channel whose window will be maximized.
Press Channel Max to maximize the channel window.
Press Channel Max one more time to reduce the window to its previous size.
Press Channel Next (or Channel Prev) to select the channel to which the trace belongs.
Press Trace Next (or Trace Prev) to select the trace whose display will be maximized.
Press Trace Max to maximize the trace display.
Press Trace Max one more time to reduce the display to its previous size.
When using a rectangular display format, the graph area can be expanded to the left by turning off the display of graticule labels.
Press Channel Next (or Channel Prev) to select the channel for which graticule label display will be turned on or off.
Press Display.
Click Graticule Label to turn graticule label display on or off.
You can hide the frequency information from the screen in order to ensure its confidentiality or for other reasons.
Follow the steps below to hide frequency information on the measurement screen.
Press Display key.
Click Frequency to turn off the frequency display.
Turning off the frequency display using Display > Frequency key does not erase the frequency display within the Stimulus softkey, which is turned on by pressing Start, Stop, Center, and Span. The display of the softkey bar itself can be switched on or off by pressing Softkey On/Off.
You can delete the frequency information from the measurement screen, which changes the frequency information displayed in the Stimulus softkey and the data entry area for Hz unit to asterisks (***).
Press System key.
Click Service Menu, then click Security Level and select any of the following options for the frequency display.
|
Softkey |
Function |
|
None |
Displays the frequency information. |
|
Low |
Hides the frequency information with a series of asterisks. This can be turned to OFF by the Security Level menu. |
|
High |
Hides the frequency information with a series of asterisks. This cannot be turned to OFF by the Security Level menu. Resetting to OFF is only possible by executing Preset or Recall.
|
It is possible to assign a unique name to a channel and display it on the screen. This feature is useful in saving and/or printing measurement result for future reference.
Press Channel Next/Channel Prev keys to select the channel to be labeled.
Press Display key.
Click Edit Title Label,then the title label input dialog box appears.

Using the keys in the dialog box, type a label and click Enter.
Click Title Label to turn on the title display. The title will appear within a frame at the top of the channel window.

You can select the display mode of the LCD display from two modes: normal display (background: black) or inverted display (background: white). In normal display, the colors of items are preset so that you can recognize them easily on the display of the instrument. On the other hand, in inverted display, they are preset to colors obtained by nearly inverting the default settings of the normal display so that you can use data easily when storing it into a graphic file.
The selection procedure is as follows:
Press Display.
Click Invert Color to select the display color. OFF indicates the normal display; ON the inverted display.
You can set the display color to the normal display or the inverted display separately for each of the following items.
Data/memory trace
Labels and lines of graphs
File display of the limit test and limit lines
Background
You set the color of each item by specifying the amounts of red (R), green (G), and blue (B) contained in the color. You can specify each level of R, G, and B in 6 steps (0 to 5). Therefore, 216 colors in total are available by combining them. The table below shows the R, G, and B values for the main colors as a reference.
|
|
R |
G |
B |
|
R |
G |
B |
|
R |
G |
B |
|
White |
5 |
5 |
5 |
Gray |
2 |
2 |
2 |
Black |
0 |
0 |
0 |
|
Light red |
5 |
3 |
3 |
Red |
5 |
0 |
0 |
Dark Red |
2 |
0 |
0 |
|
Light yellow |
5 |
5 |
3 |
Yellow |
5 |
5 |
0 |
Dark Yellow |
2 |
2 |
0 |
|
Light green |
3 |
5 |
3 |
Green |
0 |
5 |
0 |
Dark Green |
0 |
2 |
0 |
|
Light cyan |
3 |
5 |
5 |
Cyan |
0 |
5 |
5 |
Dark cyan |
0 |
2 |
2 |
|
Light blue |
3 |
3 |
5 |
Blue |
0 |
0 |
5 |
Dark Blue |
0 |
0 |
2 |
|
Light magenta |
5 |
3 |
5 |
Magenta |
5 |
0 |
5 |
Dark Magenta |
2 |
0 |
2 |
The setting procedure is as follows:
Press System > Misc Setup > Display Setup > Color Setup
Click Normal (for normal display) or Invert (for inverted display).
Click the softkey corresponding to the item for which you want to set the display color.
|
Softkey |
Function |
|
Data Trace 1 to 16 |
Specifies the data trace of traces 1 to 16 |
|
Mem Trace 1 to 16 |
Specifies the memory trace of traces 1 to 16 |
|
Graticule Main |
Specifies the graticule label and the outer lines of graphs |
|
Graticule Sub |
Specifies the grid of graphs |
|
Limit Fail |
Specifies the fail display in the limit test result |
|
Limit Line |
Specifies the limit line |
|
Background |
Specifies the background |
Click Red (or, Green, or Blue).
Select the amount of the selected color from 0 to 5.
You can reset the display colors in normal display and inverted display to the preset factory state.
The selection procedure is as follows:
Press System > Misc Setup > Display Setup > Color Setup.
Click Normal (for normal display) or Invert (for inverted display).
Click Reset Color > OK.
You can reset the display magnification to Small, Normal or Large.
The selection procedure is as follows:
Press System > Misc Setup > Display Setup > Magnification.
Click Normal, Small or Large.
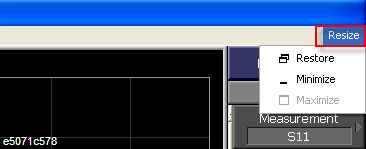
You can resize the E5071C screen by minimizing, maximizing or restoring it to its original size.
The resizing procedure is as follows:
Click Resize at the top right corner of the screen.

A drop-down menu prompts and the available options are:
|
Softkey |
Function |
|
Restore |
Restores the screen to its default size. |
|
Minimize |
Minimizes the screen. |
|
Maximize |
Displays the screen in full page size. |
Click Restore,Minimize or Maximize.
When the screen is resized according to an option, its related softkey is disabled. For example, when the screen is displayed in full page size, Maximize is disabled.
Another option to minimize the E5071C screen is by using the Menu Bar and the procedure is as follows:
Press Display.
Click Minimize E5071C.
You can also hide and restore the title bar of the E5071C screen and the procedure is as follows:
Press Display.
Click E5071C Title bar.
Click ON to restore the title bar.
Click OFF to hide the title bar.