|
|
The Agilent License Manager typically takes about fifteen seconds to open. The program may not provide any visible indication to show that it is opening. |
Last Updated: August 29, 2007
The test capability of the test set is determined by the licenses installed in it. Therefore, new test capability can be added easily and can be ready for use in very little time. The test set includes a program called the Agilent License Manager. You can use the Agilent License Manager to review, install, and remove licenses. This section covers the use of the Agilent License Manager to work with licenses on the test set.
This topic provides procedures for the following tasks related to licenses:
Reviewing installed licenses and license version information
Remove existing time perishable licenses for the same application
To review all licenses installed on your test set:
On the test set, open the Agilent License Manager. To do this,
under SCREENS, press the Config key,
select the Start Agilent License Manager softkey. The Agilent License Manager window is displayed.
|
|
The Agilent License Manager typically takes about fifteen seconds to open. The program may not provide any visible indication to show that it is opening. |
When the Agilent License
Manager opens, the licenses currently installed are listed under the Feature and Description headings.
When you have finished reviewing the license installation, close the Agilent License Manager.
It is necessary to remove time perishable licenses on your test set before installing a new license for the same application. It is not necessary to remove perpetual licenses for the same application.
To determine if a license is time perishable refer to the Type column in the Agilent License Manager as shown below:

If you have a 1, 3, 6 or 12 month time perishable license on your test set and you are replacing it with another license of any type (time perishable, perpetual or transportable perpetual) for the same application then you must remove the existing time perishable license before installing the new license.
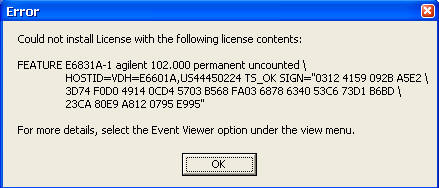
If you do not remove the existing time perishable license prior to installing the replacement license then the following will occur:
If the replacement
license is a perpetual license the test set may display an error message
detailing that the new license could not be installed as shown below:
If the replacement license is a time perishable license the license may appear to install correctly however at a later date the test set may start to display false license alert messages associated with the original license indicating that the license is soon to expire. To determine if your license is about to expire you should view the Agilent License Manager. The Agilent License Manager can be started from the E6601A WCTS Configuration Screen.
In the Agilent License Manager, select the license you want to delete then select Delete. Then press Yes to confirm the license deletion. For more information on deleting licenses refer to the Agilent License Manager Help.
When a new test capability is purchased, you are supplied with a Software Entitlement Certificate which is used to redeem a license for the test set. The Software Entitlement Certificate can be sent to you electronically if this is specified when purchased. You redeem a license using the Agilent Software License Web site. The following steps show you how to redeem a license from the Web site and save the license to a portable USB memory drive for installation on the test set.
Before going to the Agilent Software License web site, prepare by ensuring that you have the following items and facilities available:
The Software Entitlement Certificate for the license you want to redeem.
The model number (E6601A) and serial number of the test set that will have a license installed.
A computer with an Internet connection and an installed browser (such as Internet Explorer).
An e-mail address to provide to the Agilent Software License Web site. The license file is sent to this address.
A portable USB memory drive (or other compatible memory device) for storage of the license file(s).
Go to the Agilent Software License Web site at www.agilent.com/find/softwarelicense and follow the instructions. Please note, that on the main login page, you need to type the Order Number and Certificate Number from your Software Entitlement Certificate, but you do not need to make a selection in the Select a vendor name box.
On the first page after you log in, it is recommended that you select item I as this allows you to redeem more than one license at a time.
After you select item I, the next page requires you to:
Select a product (that is, the license you want to redeem)
Enter the quantity of licenses you want to use from the available quantity.
Use Add or Add All to include the licenses and quantities you want to redeem. (Delete removes licenses you have already added)
Use the Enter Model and Serial Number separated by a comma box to type your test set model number (E6601A) and serial number, in the following format:
E6601A,<serial number>
(Note that you do not type a space between the model number and serial
number.)
Note that you do not need to type any data in the Enter Agilent instrument serial number box because you are typing the required details in the Enter Model and Serial Number separated by a comma box.
Click Next after you have finished making your license selections to go to the Transaction Review page.
On the Transaction Review page, check that you have selected the licenses you want, and then either click Back if you want to change your selections, or click Next to go to the next page where you are asked to type your e-mail address.
After you have typed your e-mail address, click Next. A page is then displayed indicating that the license will be sent to the e-mail address you specified. It typically takes fifteen minutes or less for the e-mail with the license file to arrive.
When you receive the e-mail sent to you by the Agilent Software License Web site, the e-mail attachment contains the license file (<filename.lic>).
Ensure your portable USB memory drive is connected to your computer, and save the license file to this device, leaving the filename unchanged.
After the license file has been saved to the portable USB memory drive, you can remove the drive from your computer.
|
|
Licenses for multiple test sets and multiple applications can be combined into a single file when you redeem them from the Agilent Software License Web site. If you want to install licenses into multiple test sets, you can use the same license file. |
Ensure that you have completed the steps outlined in 3. Redeeming a license.
Connect the portable USB memory drive containing the license file to one of the test set's USB connectors and wait for the test set to find the license file. The test set automatically identifies the license file and installs the licenses that match the test set's serial number.
You can verify the license installation by using the Agilent License Manager as described in the previous section, Reviewing installed licenses and license version information.
If the automatic license installation process does not work, you can install licenses manually using the Agilent License Manager program. To do this, use the following procedure:
On the test set, open the Agilent License Manager. To do this,
under SCREENS, press the Config key,
select the Start Agilent License Manager softkey. The Agilent License Manager window is displayed.
|
|
The Agilent License Manager typically takes about fifteen seconds to open. The program may not provide any visible indication to show that it is opening. |
In the Agilent License Manager, click the File menu, and then click Install License(s)…
Browse to the drive and location where the license file is located, and then double-click the file.
You can verify the license installation using either of the following methods:
Use the Agilent License Manager to view the current licenses as described in the previous section, Reviewing installed licenses and license version information, or
Start the E6601A WCTS program, and on the Screens menu, click Configuration. In the Configuration screen, select Application Switch and in the Application Switch window, verify that the new application is on the list in the Selected Application drop-down menu.
The test set is now ready to make measurements. You do not need to run any alignments unless prompted to do so by the test set.
![]()
