![]()
When using the MXA as an input, the N5106A PXB puts the MXA into I/Q Analyzer mode with a 25 MHz bandwidth. You will need to configure the other MXA properties. Generally, you will want to set the following properties:
Mechanical Attenuation - Use new Level Function after enabling the IF gain and the preamp to automatically set this.
Electrical Attenuation - Turn Off the electrical attenuator to be able to use the preamp.
IF Gain - Enable if the input power level is less than –20 dBm.
Preamp - Enable if the input power level is less than –30 dBm.
|
|
For best performance, external instruments connected to PXB should have the same options and the same firmware revision. Mixing different models of analyzer or source, mixing options within those products, or mixing firmware revisions within those products will cause small latency differences between the channels. This can lead to unexpected degradations in the measurement's results. |
Optimization of the MXA for use by the PXB as a down converter really means maximizing the input signal dynamic range at the Analog-to-Digital Converter (ADC). There are three things that you can adjust to ensure that the ADC is fully utilized. Use the following process with the desired signal present at the MXA’s RF input. From the General Settings tab in the PXB’s MXA panel:
Disable the electronic attenuator. This is to enable the preamplifier property.
Press the Level button.
Check the Attenuator value. If it is greater than 0 dB, STOP: the MXA is optimized.
Enable the IF gain.
Press the Level button.
Check the Attenuator value. If it is greater than 0 dB, STOP: the MXA is optimized.
Enable the Preamplifier.
Press the Level button.
STOP: the MXA is optimized.
|
|
It's important to keep the input signal high enough to not give up any ADC dynamic range in the MXA. Set the desired signal output level on the PXB output signal generator. |
Reduce the MXA input attenuation until the ADC over range indicator flashes, then increase the attenuator 2 dB.
If the attenuation is 0 dB and the ADC over range indicator is not active, add the IF gain. Adjust the input attenuation as necessary to turn off the ADC over range indicator.
Additionally, If the attenuation is 0 dB and the ADC over range indicator is still not active, add the preamp gain. Adjust the input attenuation as necessary to turn off the ADC over range indicator.
The minimum signal level into the MXA that provides the maximum digital dynamic range is dependent on the input waveform crest factor, as shown by:
Pmin is approximately equal to CF – IF – PA – 8 dBm
Where, CF = waveform
crest factor (in dB)
IF = IF gain of the MXA (0 or 10 dB)
PA = preamp gain of the MXA (0 or 20 dB)
The following measurements were made using both the MXA IF gain and preamp gain. The input attenuator was set to zero and the input signal level was adjusted until the ADC over range indicator was silent.
|
Test Signals from MXG |
Waveform RMS (V) |
Crest Factor (Db) |
Minimum Signal Power with full ADC range |
||
|
No Gain |
IF |
Both IF & Preamp |
|||
|
SINE_TEST_WFM |
1.000 |
0.0 |
–8 |
–18 |
–38 |
|
WCDMA_TM1_64DPCH_WFM |
0.276 |
11.2 |
–19 |
–29 |
–49 |
|
WIMAX_10MHz_64QAM_WFM |
0.450 |
6.9 |
–14 |
–24 |
–43 |
|
WILAN20MHZ54M64QAM _WFM |
0.374 |
8.5 |
–18 |
–27 |
–46 |
|
LTE_TM20-20M (R4-081852) |
0.330 |
9.6 |
–18 |
–27 |
–47 |
|
LTE_ TM31-20M (R4-081852) |
0.270 |
11.4 |
–20 |
–29 |
–49 |
Figure 1 below shows the approximate minimum input signal level verses waveform crest factor that preserves maximum dynamic range out of the ADC. The vertical lines are actual measured data. Using both the IF gain and the preamp gain, it is possible to support input signal levels below –40 dBm. Without the preamp signal, levels must be above –30 dBm to preserve full range of the ADC. The PXB will work with lower input signal levels with some degradation to the final output EVM. Some users have had good success with signal levels as low as -60 dBm.
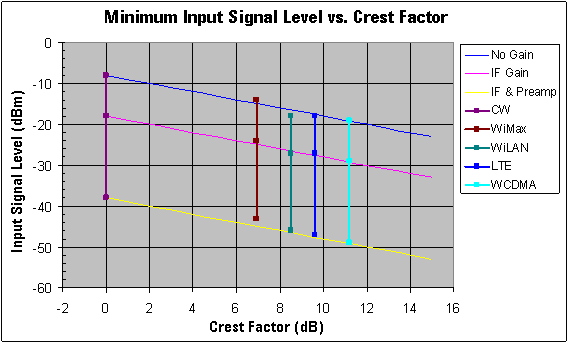
Figure 1. Minimum Input Signal Level for full ADC dynamic range versus Crest Factor.
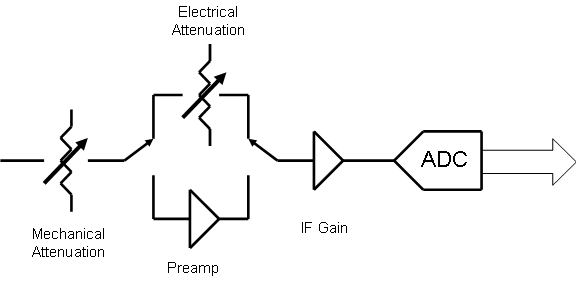
Figure 2. Abbreviated Signal Path to the ADC.
When the MXA is in the I/Q Analyzer mode, the input attenuation is not coupled to the reference level. Changing the reference level has no affect on the input attenuation. You must set the input attenuation directly. The electronic attenuation is only available below 3.6 GHz.
The input attenuation is found in the Amplitude menu (press AMPTD then Attenuation).
Both the mechanical and electronic attenuator can be used. However, as shown in Figure 2 above, the electronic attenuation and the preamp cannot be used at the same time.
The MXA SCPI commands to control the mechanical attenuator are:
[:SENSe]:POWer[:RF]:ATTenuation <value>
[:SENSe]:POWer[:RF]:EATTenuation:STATe OFF|ON|0|1
[:SENSe]:POWer[:RF]:EATTenuation <value>
|
|
These commands directly control the MXA. Send these commands to the MXA, not the PXB. |
The IF gain can be switched in or out. The IF gain is 10 dB.
The IF gain is found in the Measure Setup menu (press Meas Setup > More 1 of 2 > Advanced > More 1 of 2 > IF Gain).
The valid choices are:
Autorange – Follows signal. There is some course granularity, so it is better to set it to High or Low.
Low Range – Best for large signals
High Gain – When signal level is low
If the IF gain is set to Auto Range, the MXA automatically switches in the gain when needed. Because the IF gain is 13 dB, the input attenuator must be adjusted to ensure that the ADC is always providing a digitized signal with the best dynamic range. In some cases, increasing the input attenuation causes the IF gain to be switched in.
The MXA SCPI commands for the IF gain control are:
[:SENSe]:SPECtrum:IF:GAIN:AUTO OFF|ON|0|1
[:SENSe]:SPECtrum:IF:GAIN[:STATe] AUTOrange|LOW|HIGH
|
|
These commands directly control the MXA. Send these commands to the MXA, not the PXB. |
The preamp is an option in the MXA. If the preamp is available, it can be switched in or out. The preamp gain is 20 dB. The frequency range of the preamp may be ≤ the frequency range of the MXA. The preamp options are:
N9020A-P03 – 3 GHz
N9020A-P08 – 8 GHz
N9020A-P13 – 13 GHz
N9020A-P26 – 26 GHz
The preamp is found in the Amplitude menu (press AMPTD > More 1 of 2 > Internal Preamp).
Note: The electronic attenuator must be turned off to access the preamp.
The valid choices are:
Off
Low Band (3.6 GHz) – Provides improved signal for frequencies less than 10 MHz
Full Range (Depends on option) – Use this selection
The MXA SCPI commands to control the preamp are:
[:SENSe]:POWer[:RF]:GAIN[:STATe] OFF|ON|0|1
[:SENSe]:POWer[:RF]:GAIN:BAND LOW|FULL
|
|
These commands directly control the MXA. Send these commands to the MXA, not the PXB. |