
Resizing Window Panes and Cell Columns
Collapsing and Expanding Tables
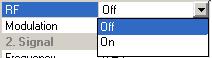
The software interface uses cells (similar to a spread sheet) for configuring various parameters. Some cells have discrete settings, others are arbitrary. For example, RF Output uses discrete settings. You must select from either ON or OFF.
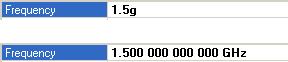
Frequency (Hz), on the other hand, uses arbitrary settings. You can enter any value within the designed range.

To change a discrete setting, double-click either the cell with the name of the parameter, or the setting. Each double-click cycles to the next selection. Notice that a non-default selection appears in bold.

You can also change the setting by clicking the down arrow of the setting cell and then moving the mouse pointer to click the desired selection.
To change an arbitrary setting, double click either the cell with the name of the parameter, or the setting. This highlights the current setting. Enter the new value. You do not need to type "GHz"; the letter "g" is sufficient. The same is true for MHz and kHz.
The left pane of the main window is called the tree view. It is useful for navigating between the quick setups, the waveform setup, and hardware setups. The right pane of the main window is called the parameter view. This area enables you to select waveforms and set parameters. Selecting an item in the tree view enables the related elements in the parameter view.

You can resize window panes and cell columns for better viewing. As you move the mouse pointer over a border, it changes form, indicating that the border can be moved horizontally or vertically. Hold down the left mouse button and drag the border to its new position.

Mouse pointer for
vertical resizing

Mouse pointer for
horizontal resizing
To create more viewing space in a window pane, you can collapse selection
tables you are not using. Click the minus  box next to the title of the table and the table collapses.
Click the plus
box next to the title of the table and the table collapses.
Click the plus  box
and it expands again.
box
and it expands again.
