HS-DPCCH Pattern Selection for Advanced UL (Release 10)
Access the  HS-DPCCH Pattern Selection dialog box from the
cell located in the HS-DPCCH channel settings table (See Channel Setup - Advanced Uplink Carrier for more details). Use this dialog box to select either a fixed pattern or a customized (user-defined)
HARQ pattern for up to 15,330 slots (1022 frames). The HS-DPCCH
Pattern table organizes the slots into groups of three. The first
slot of the group sets the HARQ response, which is transmitted during
the one slot. The second slot sets the CQI value for the CQI report. When
selected ( checkbox checked),
the report is transmitted over two slots (second and third slot of the
group).
HS-DPCCH Pattern Selection dialog box from the
cell located in the HS-DPCCH channel settings table (See Channel Setup - Advanced Uplink Carrier for more details). Use this dialog box to select either a fixed pattern or a customized (user-defined)
HARQ pattern for up to 15,330 slots (1022 frames). The HS-DPCCH
Pattern table organizes the slots into groups of three. The first
slot of the group sets the HARQ response, which is transmitted during
the one slot. The second slot sets the CQI value for the CQI report. When
selected ( checkbox checked),
the report is transmitted over two slots (second and third slot of the
group).
The software calculates the CQI based on the Secondary Cell Enabled and Active /MIMO state of each cell. In the software UI, some CQI parameter cells may appear active, but are ignored by the software for the CQI calculation. For more information, refer to the HS-DPCCH CQI Parameter Settings (R10) topic.
The Number of Frames cell in the advanced carrier view determines the length of the waveform. If the configured pattern length exceeds the waveform length, the software ignores the excess pattern slots.
Descriptions
This list enables you to quickly access the different areas of the dialog box shown above.
Fixed Pattern
This selection enables a configuration of an all ACK pattern using a CQI value of 13 for and non-MIMO configuration.
When using the Fixed Pattern selection, the software uses the default settings for the various parameters.
User Defined HS-DPCCH Pattern
This selection enables the dialog box editor and allows the user to customize an HARQ pattern using groups of three slots within each frame for up to 1022 frames.
Import
This button loads a user-defined pattern from a selected location. When you select this button, the dialog box appears for navigating to and selecting the desired file. An imported file automatically updates the area. The software accepts the following file types:
-
ASCII text
-
comma separated values (csv)
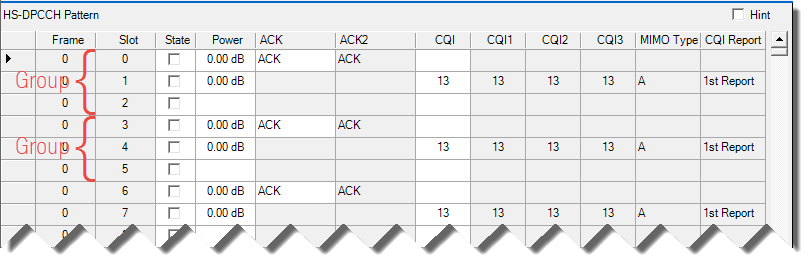
Notice in the following figure that the slots are shown in groups of three. Slots 0–2 is one group, 3–5 is another group and so on.
To create a file, enter a parameter for each column item in a slot whether it applies to the current slot and secondary cell active/MIMO status. Rel 10 carriers uses version 2.0 format for this file, so the text file will start at "Ver2.0".
After the version, 8 parameters will be followed in the first line, which are Secondary Cell Enabled, Primary Cell MIMO, Secondary Cell 1 Active, Secondary Cell 2 MIMO, Secondary Cell 2 Active, Secondary Cell 2 MIMO, Secondary Cell 3 Active and Secondary Cell 3 MIMO.
For example, a file with the first line:
Ver2.0,2,0,1,0,1,0,0,0,
This means secondary cell enabled is 2 with secondary cell 1 and secondary cell 2 active. None of the cells are configured in MIMO mode. See the table below.
| Ver2.0 | Secondary Cell Enabled | Primary Cell MIMO | Secondary Cell 1 Active | Secondary Cell 2 MIMO | Secondary Cell 2 Active | Secondary Cell 2 MIMO | Secondary Cell 3 Active | Secondary Cell 3 MIMO |
| Ver2.0 | 2 | 0 | 1 | 0 | 1 | 0 | 0 | 0 |
The following lines is for each slot parameters for HS-DPCCH. The parameter values are listed and separated with “,”: Frame Number, Slot Number, Power, HARQ_ACK1, HARQ_ACK2, CQI0-3, MIMO Type and CQI Report. For example,:
0,6,0.00 dB,1,A_A_A,AA_AA,13,13,13,13,A,1st Report
| Frame Number | Slot Number | Power | HARQ_ACK1 | HARQ_ACK2 | CQI0 | CQI1 | CQI2 | CQI3 | MIMO Type | CQI Report |
| 0 | 6 | 0.00 dB | A_A_A | AA_AA | 13 | 13 | 13 | 13 | A | 1st Report |
The power unit, and the space between the power value and dB is not required. If desired, place each slot setting on a separate line. The following three lines configure settings for Secondary Cell enabled = 2 and non-MIMO configuration:
1,1,0.00 dB,1,A_A_A,AA_AA,13,13,13,13,A,1st Report – Set slot 1 for frame 1
1,3,0.00 dB,1,A_A_A,AA_AA,13,13,13,13,A,1st Report – Set slot 3 for frame 1
The maximum file size should not exceed the data required to set the maximum number of slots (15,330) and the number of configured slots cannot exceed the waveform length.
Export
This button saves the current pattern, showing in the area, to a file. When you select this button, a dialog box appears for navigating to the location where you can save the file. The software saves the user data as one of the following user-selectable file types:
-
ASCII text
-
comma separated values (csv)
Clear
This button resets the table to the following values:
-
State is unchecked (off)
-
Power to 0.0 dB
-
All ACK columns set to ACK
-
All CQI columns set to 13
-
MIMO type to A
-
CQI Report set to 1st Report
The Clear button does not affect the , and status for each Primary Cell and Secondary Cell.
Secondary Cell Enabled
Choices: 0 | 1 | 2 | 3
Default: 0
Set the number of Secondary Cells. This setting determines whether and check boxes are enabled.
Secondary Cell Active
Choices: 0 | 1 | 2 | 3
Default: 0
Read only. This parameter is determined by the total number of the checked in the , and .
Primary Cell
Configure the Primary Cell as MIMO (On = checked), or Non-MIMO (Off = unchecked).
Secondary Cell 1/2/3
The number in determines the number of available secondary cells.
: Being checked means the cell is active.
: Being checked means the cell is configured as MIMO.
When = 0, all and in are grayed out.

When = 1, and in are available to set, others are grayed out.

When = 2, and in and are available to set.

When = 3, all and are available to set.

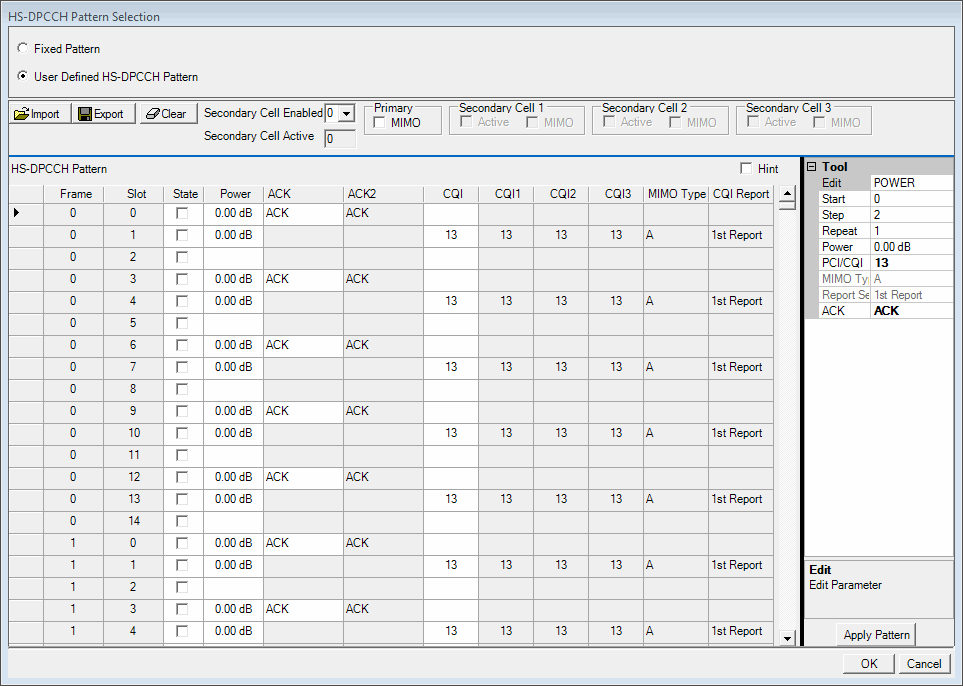
HS-DPCCH Pattern
The software organizes the pattern table into groups of three slots, so there are five groups per frame. Only the first two slots of each group are configurable:
-
The first slot of each group sets the HARQ. The HARQ transmission occurs over a one slot period.
-
The second slot of each group sets the CQI and the PCI (active for MIMO coding). The CQI and PCI transmission occurs over two slots, the second and third slot of each group.
HS-DPCCH Pattern Descriptions
Frame
Displays the frame number (0–1021). The frame number increments after every 15 slots.
Slot
Displays the slot number (0–14) for each frame. The slot numbers repeat after every 15 slots. The software supports a maximum of 15,330 slots, and the number of configured slots cannot exceed the waveform length.
State
Manually set the state to either on (checked) or off for a slot. The third slot of each group is always unchecked and cannot be changed. When the second slot of a group is on (send CQI/PCI), the software uses the second and third slot to transmit the data. Even in this instance, the third slot remains unchecked.
Unchecked slots are DTX, with the exception of the third slot when it is being used with the second slot.
Power
Range: -60 to 20 dB
Default: 0.00 dB
Manually set the power level for each slot. The bursting pattern uses the RMS of the carrier power as the absolute burst amplitude. During the power search the signal source uses the highest amplitudes of the channels (slot power + channel power) to find the RMS value. When you download the waveform, the software initiates an instrument power search.
When the waveform resides in an instrument's non-volatile memory and is loaded into volatile memory, manually perform an instrument RMS power search. For more information on performing an instrument power search, refer to the instrument's User Guide. You may also perform the RMS power search. from the software interface.
ACK
Choices: Depends on Secondary Cell Enabled and Active/MIMO settings on each cell. See HARQ-ACK and CQI Cells for more information.
Default: ACK
Always Active for slot 0, 3, 6, 9. Sets the desired HARQ-ACK or HARQ-ACK2 response.
Click the cell to see a drop down arrow from which when clicked, a menu appears showing the choices.
ACK2
Choices: A/D | N/D | AA/D | AN/D | NA/D | NN/D | D/A | D/N | D/AA | D/AN | D/NA | D/NN | A/A | A/N | N/A | N/N | A/AA | A/AN | A/NA | A/NN | N/AA | N/AN | N/NA | N/NN | AA/A | AA/N | AN/A | AN/N | NA/A | NA/N | NN/A | NN/N | AA/AA | AA/AN | AA/NA | AA/NN | AN/AA | AN/AN | AN/NA | AN/NN | NA/AA | NA/AN | NA/NA | NA/NN | NN/AA | NN/AN | NN/NA | NN/NN | PRE | POST
Default: AA/AA
Set the desired HARQ response. For an active (on) slot, click the cell to see a drop down arrow from which when clicked, a menu appears showing the choices.
Available when:
- Secondary Cell Enabled is 3 and Secondary Cell Active is 2 or 3, or,
- Secondary Cell Enabled is 2, Secondary Cell Active is 2 and MIMO is configured in at least one active cell.
ACK and ACK2 Coupling
ACK and ACK2 are valid only in slot 0, 3, 6, 9, ......, that is, when slot index is multiples of 3. Whether ACK2 is valid and the choices of ACK/ACK2 depend on Secondary Cell settings. See the following use cases for more coupling information.
- Case 1: When is 0 and in is unchecked, is grayed out and choices are: ACK | NACK | PRE | POST.
- Case 2: When is 1, in is unchecked, and in is unchecked, is grayed out and choices are: ACK | NACK | PRE | POST.
- Case 3: When is 0 and in is checked, is grayed out and choices are: ACK | NACK | ACK_ACK | ACK_NACK | NACK_NACK | NACK_ACK | PRE | POST.
- Case 4: When is 1, in and are unchecked, and in is checked, is grayed out and choices are: ACK | NACK | ACK_SEC | NACK_SEC | ACK_ACK | ACK_NACK | NACK_ACK | NACK_NACK | PRE | POST.
- Case 5: When is 2, in is unchecked, and in and are both unchecked, is grayed out and choices are:A/D/D | N/D/D | D/A/D | D/N/D | D/D/A | D/D/N | A/A/D | A/N/D | N/A/D | N/N/D | A/D/A | A/D/N | N/D/A | N/D/N | D/A/A | D/A/N |D/N/A | D/N/N | A/A/A | A/A/N | A/N/A | A/N/N | N/A/A | N/A/N | N/N/A | N/N/N | PRE | POST.
- Case 6: When is 1 and in is checked and one in is checked, is grayed out and choices are:A/D | N/D | AA/D | AN/D | NA/D | NN/D | D/A | D/N | D/AA | D/AN | D/NA | D/NN | A/A | A/N | N/A | N/N | A/AA | A/AN | A/NA | A/NN | N/AA | N/AN | N/NA | N/NN | AA/A | AA/N | AN/A | AN/N | NA/A | NA/N | NN/A | NN/N | AA/AA | AA/AN | AA/NA | AA/NN | AN/AA | N/AN | AN/NA | AN/NN | NA/AA | NA/AN | NA/NA | NA/NN | NN/AA | NN/AN | NN/NA | NN/NN | PRE | POST.
- Case 7: When is 2 or 3, is 0 or 1, and no is checked, is grayed out and choices are same as Case 6.
- Case 8: When is 2 or 3, is 2 or 3, and no is checked, and choices are same as Case 6.
- Case 9: When is 2 or 3, is 2 or 3, and at least one is checked, and choices are same as Case 6.
CQI0 or PCI/CQI0
Range: Depends on Secondary Cell Enabled and MIMO state of Primary Cell. Refer to the HS-DPCCH CQI Parameter Settings (R10) topic.
Default: 13
Available for all the cases. Set the CQI or PCI CQI value for Primary Cell. When Primary Cell is configured in MIMO mode, it shows as PCI/CQI0. When Primary Cell is not configured in MIMO mode, it shows as CQI0.
PCI/CQI0 can be calculated from PCI0 and CQI0 by the following formula:
For MIMO Type A, PCI/CQI = PCI + CQI x 4
For MIMO Type B, PCI/CQI = PCI + (CQI + 1) x 4
CQI1 or PCI/CQI1
Range: Depends on Secondary Cell Enabled and MIMO state of the first Secondary Cell. Refer to the HS-DPCCH CQI Parameter Settings (R10) topic.
Default: 13
Available for all the cases. Set the CQI or PCI CQI value for the first Secondary Cell. When Primary Cell is configured in MIMO mode, it shows as PCI/CQI1. When Primary Cell is not configured in MIMO mode, it shows as CQI1.
PCI/CQI1 can be calculated from PCI1 and CQI1 by the following formula:
For MIMO Type A, PCI/CQI = PCI + CQI x 4
For MIMO Type B, PCI/CQI = PCI + (CQI + 1) x 4
CQI2 or PCI/CQI2
Range: Depends on Secondary Cell Enabled and MIMO state of the first Secondary Cell. Refer to the HS-DPCCH CQI Parameter Settings (R10) topic.
Default: 13
Available for all the cases. Set the CQI or PCI CQI value for the second Secondary Cell. When Primary Cell is configured in MIMO mode, it shows as PCI/CQI2. When Primary Cell is not configured in MIMO mode, it shows as CQI2.
PCI/CQI2 can be calculated from PCI2 and CQI2 by the following formula:
For MIMO Type A, PCI/CQI = PCI + CQI x 4
For MIMO Type B, PCI/CQI = PCI + (CQI + 1) x 4
CQI3 or PCI/CQI3
Range: Depends on Secondary Cell Enabled and MIMO state of the first Secondary Cell. Refer to the HS-DPCCH CQI Parameter Settings (R10) topic.
Default: 13
Available for all the cases. Set the CQI or PCI CQI value for the third Secondary Cell. When Primary Cell is configured in MIMO mode, it shows as PCI/CQI3. When Primary Cell is not configured in MIMO mode, it shows as CQI3.
PCI/CQI3 can be calculated from PCI3 and CQI3 by the following formula:
For MIMO Type A, PCI/CQI = PCI + CQI x 4
For MIMO Type B, PCI/CQI = PCI + (CQI + 1) x 4
MIMO Type
Choices: A | B
Default: A
Available when at least one cell is configured as MIMO. Set the notification type for the serving cell.
For more information on the types (A or B), refer to the 3GPP standards.
CQI Report
Choices: 1st Report | 2nd Report
Default :1st Report
Set which CQI report to be transported in the slot.
Tool
Use this table to set up and apply a repeating HARQ pattern or CQI value to the table. The slots affected by the table settings are identified by the , , and cells.
To apply all settings from the table, requires three iterations:
-
Set the Secondary Cell Enabled.
-
Set Active/MIMO status for each Primary Cell and Secondary Cell.
-
Set the cell parameters.
-
Select the column type using the Edit cell.
-
Click the button.
-
Repeat Steps 4 and 5 for the remaining cell choices.
Tool Descriptions
Edit
Choices: POWER | HARQ-ACK | HARQ-ACK2 | CQI0 | CQI1 | CQI2 | CQI3 | MIMO Type | CQI Report
Default: POWER
For the indicated slots, select the column type to which the settings apply in the table. To completely setup the pattern table (all columns) with the table parameters, cycle through each choice in the drop down menu. To display the choices, click the cell to show the drop-down arrow, and then click the arrow .
|
POWER |
Sets the State to on (checked) and the power level. |
|
Sets the active slots in the indicated ACK column. |
|
| HARQ-ACK2 |
Sets the active slots in the indicated ACK2 column. |
|
CQI0 |
Sets the active slots in the indicated CQI0 column. |
|
CQI1 |
Sets the active slots in the indicated CQI1 column. |
|
CQI2 |
Sets the active slots in the indicated CQI2 column. |
|
CQI3 |
Sets the active slots in the indicated CQI3 column. |
| MIMO Type | Sets the notification type for the serving cell. |
| CQI Report | Sets which CQI report to be transported in the slot. |
Start
Range: 0 to 15329
Set the starting slot number offset. While the table slot numbers (0–14) repeat for each frame, the Start values continuously increment up to the maximum range value. For example, to start the pattern on frame 2, slot 10, set this cell's value to 40. To set slot 6 in frame 8, set the Start value to 126.
This setting accepts values that are smaller or larger than the range values. When the software recognizes a value that is outside of the range, it ignores the value.
Step
Range: 0 to 15329
This cell sets the pattern of transmitted slots by setting the interval of active slots. For example with a value of two, the software sets a repeating pattern for every other slot starting with the slot identified in the cell and ending with the number of repetitions identified in the cell. The software supports a maximum of 15,330 slots, and the number of configured slots cannot exceed the waveform length.
|
0 |
The pattern consists of only the slot identified with the starting value and ignores the repeat value. |
|
1...15329 |
The value determines whether the pattern transmits all slots from the Start value to the Repeat value or includes an integer number of DTX slots between each transmitted slot:
|
This setting accepts values that are smaller or larger than the range values. When the software recognizes a value that is outside of the range, it ignores the value.
Repeat
Range: 0 to 15330
Sets the number of slots to be configured.
|
0 |
No slots are set. |
|
1...15330 |
The value determines the number of configured slots.
|
If this value is larger than the number of remaining slots from the Start value to the last slot, then all remaining slots are included in the pattern. The number of configured slots cannot exceed the waveform length.
Power
Range: -60 to 20 dB
Sets the power level for the slots in the pattern. If needed and after applying the pattern, manually adjust the power level on individual checked slots. The bursting pattern uses the RMS of the carrier power as the absolute burst amplitude. During the power search the signal source uses the highest amplitudes of the channels (slot power + channel power) to find the RMS value. When you download the waveform, the software initiates an instrument power search.
When the waveform resides in an instruments non-volatile memory and is loaded into volatile memory, manually perform an instrument RMS power search. For more information on performing an instrument power search, refer to the instrument's User Guide. You may also perform the RMS power search. from the software interface.
The software lets you enter a value that is smaller or larger than the range limits. When this occurs and you apply the settings to the pattern table, the software enters the lower or upper range value respectively into the pattern table and leaves the over-range value in the table cell.
HARQ-ACK and CQI Cells
The and Tool table cell parameters change based on the and the status of of each cell. The following table shows the HARQ-ACK, ACK2 and each CQI cell by and the status of each cell:
When a cell is configured as MIMO, CQI is shown as PCI/CQI. It can be calculated by PCI and CQI. For more information, refer to the HS-DPCCH CQI Parameter Settings (R10) topic.
Coding for HS-DPCCH Selection
| HARQ-ACK | ACK2 | CQI | MIMO Type | CQI Report | |
|---|---|---|---|---|---|
|
Secondary Cell Enabled = 0 Primary Cell = unchecked MIMO |
Active |
Inactive | Only CQI0 active | Inactive | Inactive |
|
Secondary Cell Enabled = 0 Primary Cell = checked MIMO |
Active |
Inactive | Only CQI0 active, shown as PCI/CQI | Active | Inactive |
|
Secondary Cell Enabled = 1 Primary Cell = unchecked MIMO Secondary Cell 1 = unchecked MIMO |
Active |
Inactive |
CQI0 active CQI1 active when Secondary Cell 1 = Active |
Inactive | Inactive |
|
Secondary Cell Enabled = 1 Primary Cell or Secondary Cell 1 = checked MIMO |
Active |
Active |
CQI0 active, shown as PCI/CQI, when Primary Cell is MIMO mode. CQI1 is active when Secondary Cell 1 is active. CQI1 is shown as PCI/CQI1 when Secondary Cell 1 is MIMO mode. |
Active | Inactive |
|
Secondary Cell Enabled = 2 Primary Cell = unchecked MIMO Secondary Cell 1 = unchecked MIMO Secondary Cell 2 = unchecked MIMO |
Active |
Inactive |
CQI0 is active. CQI1 is active when Secondary Cell 1 is active. CQI2 is active when Secondary Cell 2 is active |
Inactive | Active |
|
Secondary Cell Enabled = 2 one of (Primary Cell, Secondary Cell 1, Secondary Cell 2) = checked MIMO |
Active |
Active when Secondary Cell Active = 2. Otherwise, Inactive. |
CQI0 is active, shown as PCI/CQI0 when Primary Cell is MIMO mode. CQI1 is active when Secondary Cell 1 is active. CQI1 is shown as PCI/CQI1 when Secondary Cell 1 is MIMO mode. CQI2 is active when Secondary Cell 2 is active. CQI2 is shown as PCI/CQI2 when Secondary Cell 2 is MIMO mode. |
Active | Active |
| Secondary Cell Enabled = 3 |
Active |
Active when Secondary Cell Active = 2 or 3. Otherwise, Inactive. |
CQI0 is active, shown as PCI/CQI0 when Primary Cell is MIMO mode. CQI1 is active when Secondary Cell 1 is active. CQI1 is shown as PCI/CQI1 when Secondary Cell 1 is MIMO mode. CQI2 is active when Secondary Cell 2 is active. CQI2 is shown as PCI/CQI2 when Secondary Cell 2 is MIMO mode. CQI3 is active when Secondary Cell 3 is active. CQI3 is shown as PCI/CQI3 when Secondary Cell 3 is MIMO mode. |
Active when a cell is configured as MIMO. Inactive when none cell is configured as MIMO. |
Active |
| Case 1 | ACK| NACK | PRE |POST |
| Case 2 | ACK | NACK | ACK_ACK | ACK_NACK | NACK_ACK | NACK_NACK | PRE | POST |
| Case 3 | ACK | NACK | ACK_SEC | NACK_SEC | ACK/ACK | ACK/NACK | NACK/ACK | NACK/NACK | PRE | POST |
| Case 4 | A/D | N/D | AA/D | AN/D | NA/D | NN/D | D/A | D/N | D/AA | D/AN | D/NA | D/NN | A/A | A/N | N/A | N/N | A/AA | A/AN | A/NA | A/NN | N/AA | N/AN | N/NA | N/NN | AA/A | AA/N | AN/A | AN/N | NA/A | NA/N | NN/A | NN/N | AA/AA | AA/AN | AA/NA | AA/NN | AN/AA | AN/AN | AN/NA | AN/NN | NA/AA | NA/AN | NA/NA | NA/NN | NN/AA | NN/AN | NN/NA | NN/NN | PRE | POST |
| Case 5 | A/D/D | N/D/D | D/A/D | D/N/D | D/D/A | D/D/N | A/A/D | A/N/D | N/A/D | N/N/D | A/D/A | A/D/N | N/D/A | N/D/N | D/A/A | D/A/N | D/N/A | D/N/N | A/A/A | A/A/N | A/N/A | A/N/N | N/A/A | N/A/N | N/N/A | N/N/N | PRE | POST |
The software lets you enter values that are smaller or larger than the range limits. When this occurs and you apply the settings to the pattern table, the software enters the lower or upper range value respectively into the pattern table and leaves the over-range value in the table cell.
Apply Pattern (Button)
Applies the repetition pattern to the HS-DPCCH Pattern table.
Channel Setup for Advanced Uplink Carrier