Marker Source Selection Dialog Box
Use the Marker Source Selection dialog box for the , or cells to set active marker
points within the waveform. The cells are located in the  Waveform Setup
parameter configuration table.
Waveform Setup
parameter configuration table.
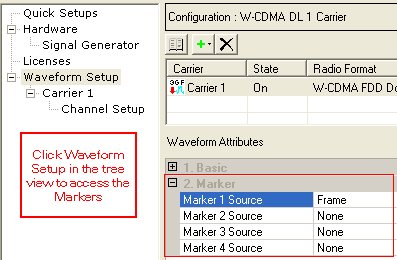
When Parameter Optimization in the Instrument node is set to , Marker 3 and Marker 4 source selection in the Waveform Setup node and the marker routing selected in the Dual Arb Marker Utilities are overridden.
To manually set Marker 3 and Marker 4 source, the marker routing, or both, set the Parameter Optimization to .
When using the dialog box, there are two ways to select the marker source:
-
Place the cursor on the radio selection and left click.
-
Use key board shortcut keys (the software accepts upper or lower case characters):
-
Alt+N = None
-
Alt+F = Frame
-
Alt+2 = 2 ms frame pulse
-
Alt+1 = 10 ms frame pulse
-
Alt+4 = 40 ms frame pulse
-
Alt+A = RF ALC Control
-
Alt+B = RF Blanking Control
-
Alt+T = Timing Control
-
Alt+U = User Defined Bits
-
Alt+O = OK
-

None
All maker points are set to zero (inactive).
Frame
The software sets the first five marker bits of the frame to 1 (high), which sets an active marker for the first five waveform samples (waveform points).
2 ms frame pulse
The software sets a marker bit high at each 2 ms (subframe) interval.
10 ms frame pulse
The software sets a marker bit high at each 10 ms (frame) interval.
40 ms frame pulse
The software sets a marker bit high at each 40 ms (four-frame) interval.
RF ALC Control
This choice is typically used for a pulsed signal such as the PRACH. For the selected marker, the software sets the bits high during the on part of the pulse. The instrument samples the pulse's amplitude for the duration of the set bits and holds the ALC level during the off portion of the signal. To enable RF ALC control, use the Dual ARB Marker Utilities function table found in the Instrument view.
RF Blanking
This choice is typically used for a pulsed signal such as the PRACH. For the selected marker, the software sets the marker bits high during the on part of the pulse. To enable RF blanking, use the Dual ARB Marker Utilities function table found in the Instrument view.
RF Blanking incorporates RF ALC Control, so there is no need to set markers for both functions.
Timing Control
-
For most carrier selections, the software sets the first five marker bits high at the beginning of the waveform. The actual marker bit setting is dependent on the carrier and its configuration.
-
For the PRACH carrier, the software sets the first five marker bits high at the beginning of the waveform and one bit high at each 10 ms interval.
User Defined Bits
This selection opens the user data entry
area,
which lets you customize the marker signal.
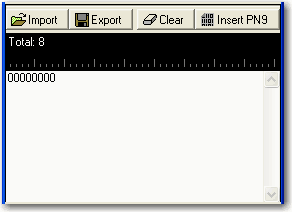
The user data area contains buttons to import, export, or clear user marker data along with the ability to insert a PN9 sequence as the marker bits. Optionally you can manually insert or delete marker data. To manually insert marker data, simply place the cursor within the data entry area or highlight existing bits, and insert bits. There are three ways to insert marker data:
-
using the 1 (marker active) and 0 (marker inactive) keys on the keyboard
-
using the Insert PN9 button
-
pasting data from a file or from within the current view
(The key board shortcuts Cntl+C and Cntl+V work for user data entry.)
To delete data, simply place the cursor at the desired location within the data or highlight bits, and delete data. The key board short cut Cntl+Z also deletes highlighted data.
The maximum number of marker bits for the user data entry area is 998,400, which is also the maximum file size. The proper marker file size for a given waveform is when the number of marker bits equals the value shown in the cell. .
The software lets you create a file larger than it uses for the waveform. When this occurs, the software truncates the excess marker bits. Conversely, if there are not enough marker bits, the software repeats the marker bit pattern until there are enough marker bits to match the Waveform Length cell value.
Import
This button loads a user-defined pattern from a selected location. When you select this button, the Open user defined data dialog box appears for navigating to and selecting the desired file. An imported file automatically updates the user data entry area. The software accepts the following file types:
-
ASCII text
-
comma separated values (csv)
-
binary
The maximum file size is 998,400 bits. If the imported file is larger than 998,400 bits, the software truncates the bits to conform to the maximum file size.
Export
This button saves the current data pattern, showing in the user data entry area, to a file. When you select this button, a Save user defined data dialog box appears for navigating to the location to where you can save the file. The software saves the user data as one of the following selected file types:
-
ASCII text
-
comma separated values (csv)
-
binary
Clear
This button clears all data showing in the user data entry area.
Insert PN9
This button inserts a fixed pseudo-random bit sequence (pattern) containing 511 bits (29-1) into the user data entry area. The software generates this fixed pattern in accordance with the CCITT recommendation O.153. Repeated clicking of this button adds additional PN9 sequences until the software attains the maximum file size of 998,400 bits. The software truncates data in excess of the maximum file size.
To edit the existing data pattern after reaching the maximum file size, insert the cursor at the desired point in the file, and press or use the keyboard 1 and 0 keys. The software inserts the data at the cursor position and truncates all data in excess of 998,400 bits.