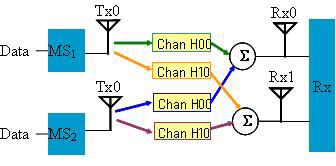
This example shows how to create waveforms for the uplink (TDD) Collaborative SM 1x2 system (as shown below) with one UL PUSC zone and two collaborative bursts using auto allocation. It assumes the you know the MAC PDUs that you want to configure, and uses auto allocation to fit those into the UL PUSC zone.
Set up the PC and the instruments as shown in Multiple Antennae Solution without Baseband Timing Alignment and RF Phase Coherency.
From the Quick Setups, select
Click the two under in the tree view to set up the frequency and amplitude for the instruments. The setting should be the same for both of them. See Power Setting for more details.
Click in the tree view. This section contains the key system parameters. Many of the default settings are used for this exercise.
Enter a name for your waveform.
: Use the default setting of 1.
: Select Uplink Only (TDD).
: Use the default setting, 50.0000. This parameter determines what portion of the total frame time is available for the downlink subframe.
: Use the default 10 MHz.
Leave the default settings for the other parameters.
Click in tree view.
: Use the default of 802.16e-2005 for this example. However, flexibility is provided to select either 802.16-2004/Cor1/D2 or 802.16-2004/Cor1/D3 depending on which standard specifications you want to use for subchannel randomization and subcarrier allocation.
:
Turn channel fading on if you want to create waveforms that would be received by the two base station antennae. In this case, two sets of fading channel parameters can be specified, each representing the conditions between one of the subscriber station and the 2 base station antennas in a 1x2 MIMO configuration.
Turn channel fading off if you want to create waveforms that correspond to the transmitted signals from the two subscriber stations. The master source will have the signal from the first subscriber with pilot pattern A, while the slave source will have the second subscriber with pilot pattern B.
Click the frame tab in the lower portion of the window to display the
frame plot view.
A small yellow triangle
at the bottom of the graph indicates the division between the downlink
and uplink. The available subframe time determines how many symbols can
be put into the subframe (see  example.)
Note that the RF burst off time will include any unused frame time, shown
as gap (TTG), plus the downlink portion (grayed out) of the TDD frame
when the Output Mode is Uplink Only (TDD).
example.)
Note that the RF burst off time will include any unused frame time, shown
as gap (TTG), plus the downlink portion (grayed out) of the TDD frame
when the Output Mode is Uplink Only (TDD).
Click Uplink
in tree view. The top half shows various uplink parameters that are automatically
calculated by the software. These cannot be modified. The bottom portion
of the screen allows you to add PUSC, OPUSC, AMC or Sounding zones (maximum
3) to the uplink. Click  to add a PUSC zone with a default burst and MAC PDU.
Click under Uplink in the tree view. Set the following parameters:
: Use the default (On).
: This parameter starts at 3 and will be incremented by the software as more MAC PDUs are added. Note that this must be a multiple of 3 because the UL PUSC zone is divided into slots which are 1 subchannel x 3 symbols (section 8.4.3.1).
Note that the available is 35.
In the lower half of the screen, click and select
to add two collaborative bursts. Fields that are white in the table may
be edited either here or from the burst editing window.
If you turn channel fading off, make sure all bursts under the PUSC zone are collaborative bursts and there is no regular burst existing. Signal Studio for Mobile WiMAX doesn't support the combination of regular and collaborative burst in PUSC zone when fading is turned to off.
Click under in the tree view to display the burst editing window. (You can also double-click in first column for Burst#1 in the table.) Leave all default values. Note that a power offset can be added to the burst. In the lower portion, one MAC PDU has been added by default.
Choose to be 64QAM 2/3. Note that a MAC PDU was automatically added in the lower half.
Set the that identifies a specified subscriber station where the UL MAP IE are described for.
In the tree view, click .
Enter a number for the CID (Connection Identifier) from 0 to 65535. This identifies a connection between the base station and a specific subscriber station.
Change to 500 bytes and note the increased size of the zone in the frame view and the burst allocation in the zone plot in the lower right. The zone is now extended from symbol 0 to symbol 8.
Click in the tree view to configure the next burst.
Choose to be 16QAM 1/2. Note that a MAC PDU was automatically added in the lower half.
Set to 2 dB.
Click under Burst#2 to configure this MAC PDU.
Enter a value for CID different from the one you previously used to indicate this MAC PDU is for a different subscriber station.
Click and select PN9.
Change to 600 bytes. Note in the zone plot in the lower right that the zone now extends out to symbol 14. Also note Burst#2 is smaller than Burst#1 (even though there are more data bytes) due to the higher order modulation.
In the lower half of the screens for Burst#1 and Burst#2, there are two tabs for you to select the subscriber to add the MAC PDUs and view the parameters. The subscriber 0 of the burst will be with Pilot Pattern A and the subscriber 1 of the burst will be with Pilot Pattern B.
Click
 to verify all parameters are okay. View the result in the
window at the bottom of the main window.
to verify all parameters are okay. View the result in the
window at the bottom of the main window.
Click on in the tree view to view the CCDF, Waveform, or Power Envelope graphs at the bottom of the page if desired.
Click  to generate waveform.
Click  to download waveforms to the instruments if you have configured the instrument
connection.
to download waveforms to the instruments if you have configured the instrument
connection.
When channel fading is off, the waveform for the subscriber 0 antenna will be downloaded to the master instrument and the waveform for the subscriber 1 antenna will be downloaded to the slave instrument.
When channel fading is on, the waveform for the base station antenna 0 will be downloaded to the master instrument and the waveform for the base station antenna 1 will be downloaded to the slave instrument.