This procedure guides you through the settings to edit a scenario using the Scenario Generator tab on the software user interface (UI): Use the Option 423 software to edit both Option 422 and Option 423 scenario files.
Even after editing and saving an Option 422 scenario file with this software, the file can only be played back on a signal generator licensed for Option 422.
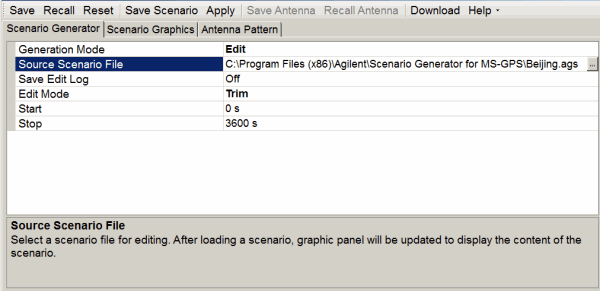
To view information for each setting, click on the cell and the information appears at the bottom of the window. In the above figure, the window displays the information for the highlighted Source Scenario File cell.
To view a list of the completed edits through the UI, see the log at the bottom of the view in the Scenario Graphics tab.
If the software is not open,
start the software by double clicking the desktop icon ![]() or access the software through the PC start
menu.
or access the software through the PC start
menu.
The software starts with Create as the default Generation Mode.
Click Generation Mode, and from the drop down menu, select Edit.
Click
the Source Scenario File cell,
and use the dialog box button ![]() to launch the Open
dialog box for navigating to and selecting the scenario file to edit.
to launch the Open
dialog box for navigating to and selecting the scenario file to edit.
If
there is a desire to keep track of the edits, click the Save
Edit Log
The software saves the log file with the same name (uses .log extension) and at the same location as the edited scenario file when you click the Save Scenario button.
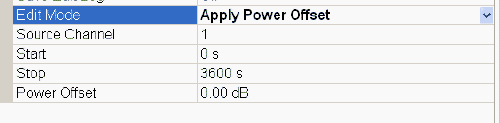
Click Edit Mode and from the drop down menu, select the mode:
The settings that follow the Edit Mode cell change based on this cell's selection.
Finish configuring the settings for the selected Edit Mode:
To  Trim
Trim
To make further edits using another mode, repeat Steps 5 and 6.
When all changes have been made, click the Save Scenario button to launch the Save As dialog box for selecting a location and saving the file.
Keep the file name to 23 characters or less. If you attempt to download a file with a name that contains more than 23 characters, the download will fail and the software displays an error message.