Last updated: 2014-11-28
This section is only applicable to the feature-licensed test application.
This page outlines the requirements to demonstrate Packet Switched Data connections using the TD-SCDMA user equipment (UE).
Testing of TD-HSDPA packet switched data will be the means by which you can check the actual data throughput of your TD-SCDMA UE.
Client PC:
Dialup connection using UE driver
FileZilla FTP Client [used for FTP]
iperf.exe in c:\bin [used for UDP]
Server PC:
iperf.exe in c:\bin [used for UDP]
FileZilla FTP server (see Appendix) [used for FTP]
Shared folder specified in FileZilla FTP, with large files to download [used for FTP]
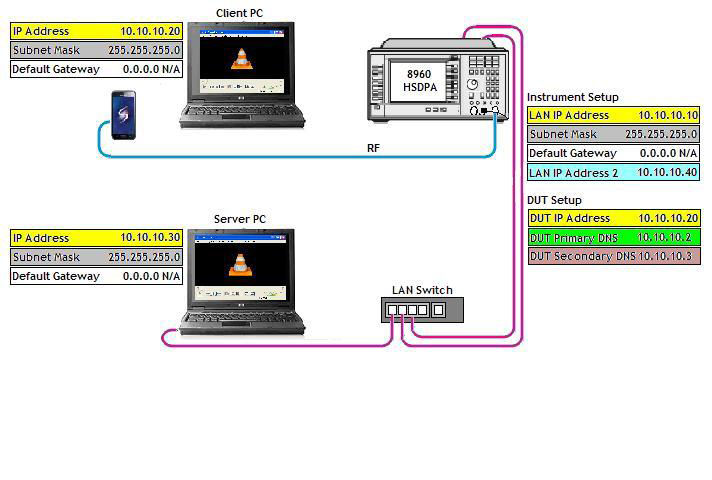
Use the following IP addresses as an example:
1. Press System Config, then Instrument Setup and enter:
LAN IP Address: 10.10.10.10
Subnet Mask: 255.255.255.0
Default Gateway: 0.0.0.0
2. Press System Config, then Instrument Setup, then scroll down and enter:
LAN IP Address 2: 10.10.10.40
3. Press Call Setup, then press the left handside More key until you reach page 3 of 3. Press Data Channels (F6), Press DUT IP Setup (F5) In the DUT IP Setup menu, enter:
DUT IP Address: 10.10.10.20 (this will be assigned to the client PC via UE)
DUT Primary DNS: 10.10.10.2
DNS Secondary DNS: 10.10.10.3
Note: You may need to turn off the firewall for the test purpose.
The server PC has a fixed IP address: 10.10.10.30. Ensure that your server PC includes all of the software and files listed under Software Requirements.
The client PC's IP address is assigned via the DUT IP Address setting in the 8960. Ensure that your client PC includes all of the software and files listed under Software Requirements.
Set the PS Domain Information to present. (Cell Info (F2 on Call Control 2 of 3)>>Cell Parameters (F1)>>PS Domain Information).
Set the T300 RRC Conn Req Retransmit Timer to 4000ms (Cell Info (F2 on Call Control 2 of 3)>>UE Timer and Constant Parms (F3) >> T300 RRC Conn Req Retransmit Timer)
Set the MNC to 1
Set the MCC to 1
Note: This is only required for the UE in this test.
Set the parameters related to the TD-HSDPA PS data service:
a. Set the PS Data HS-DSCH Configuration Type to UE Reported CQI (this is the default setting)
b. Set the PA Data MAC-d PDU Size to 336 (this is the default setting)
c. Set the PS Data Number of HS-PDSCH Timeslots to 5 (this is the default setting)
d. Set the PS Data First HS-PDSCH Timeslot to TS2 (this is the default setting)
e. Set the PS Data HS-PDSCH OVSF to SF1 (this is the default setting)
f. Set the PS Data Number of HS-PDSCH Channel Codes to 16 (this is the default setting)
g. Set the PS Data DL DPCH/HS-SCCH Timeslot to TS0 (this is the default setting)
h. Set the PS Data User Def Modulation Type to 16QAM (this is the default setting)
Connect your UE's RF cable to the test set. Power on the UE
Ensure that the UE correctly reported its HS-DSCH Category 15 (See UE Reported HS-DSCH Cat under UE Information on the front panel).
UDP flood confirms the UE's maximum data throughput at IP, without the added complication yet of acknowledgements from the UE.
Initiate the Data Throughput Monitor from the Instrument Selection key.
Select Axis Control (F1) and change Stop Data Rate to 3000 kbps. Select Return (F6)
On the client PC, initiate a PDP Context from the UE (see the Appendix 4.1). Call status should go to PDP Active.
Launch the command window, go to C:\bin, type “iperf –s –u”
Note: Ensure that the iperf.exe is already being put in to the folder “C:\bin”.
On the server PC, launch the command window. go to C:\bin, type “iperf –c <IP> -u -b <rate> –t <time>”
Note: <IP> should be the DUT IP address , <rate> should be the bps rate of the UDP flood. Time defines how many seconds the UDP flood will run. For example, you can type “iperf –c 10.10.10.20 -u -b 2800000 –t 1000”.
To ramp up the OTA Rx, you must increase the CQI Value if the “PS Data HS-DSCH Configuration Type” is defined to be “User Defined CQI” (HSDPA Parameters (F11)>>HSDPA PS Data Setup (F8)). A setting of 63 should achieve ~2.8 Mbps OTA.
Stop udp_flood in the server PC using Ctrl+c.
FTP requires TCP acknowledgements from the UE. Now all the layers are in action.
1. On the client PC, initiate a PDP Context from the UE (see the Appendix 4.1). Call status should go to PDP Active.
2. On the server PC, go to Start>>Control Panel>>Administrative Tools>>Services.
Start the FileZilla Server FTP service.
3. On the server PC, launch FileZilla FTP Server from the desktop shortcut.
Go to Edit>>Settings>>Miscellaneous
Set the Internal transfer buffer size to 1460.
Set Socket buffer size to 103360 (it must be bigger than the Internal transfer buffer size).
Select OK.
You must disconnect, then reconnect the server for the changes to take effect (using the lightning bolt icon).
4. Open FileZilla FTP Client on the client PC.
Type in 10.10.10.30 under Address, anonymous under User, leave Password blank, then hit Quickconnect.
Double-click on a file in the “Remote Site” window to download.
Observe the Data Throughput Monitor.
Change CQI Value from 63 to decrease the data throughput.
Close FileZilla FTP Client.
Insert the USB cable into the PC and power on the UE
Install the USB modem driver on the client PC.
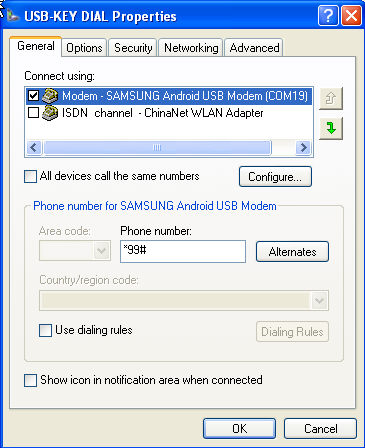
Setup a PS Data connection: Click on [start], [connect to] [show all connections]
Click the UE icon and select properties
Then check the UE driver and enter *99# for a PS data call