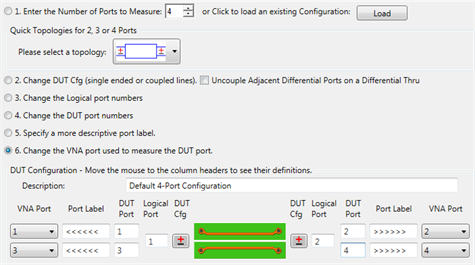
These selections are best made in the specified order.
When each step is selected, the appropriate field in the diagram below becomes available and remains available while subsequent steps are selected.
1. Enter the number of DUT ports to calibrate and measure. Beginning with PLTS 2018, the maximum number of DUT ports is 64.
Or click Load to recall a previously saved configuration (*.dcf) file.
Quick Topologies for 2,3, or 4 Ports
For convenience, when 2, 3, or 4 ports are selected, then select from the following topologies:
2-ports
|
Single Ended - Single Ended |
Differential Reflection |
3-ports
|
Differential - Single Ended |
Single Ended - Single Ended |
4-ports
|
Differential - Differential |
Differential - Single Ended |
|
Single Ended - Differential |
|
Single Ended - Single Ended |
2. Change DUT Configuration On the diagram below, click...
|
Indicates Differential port |
Indicates Single-ended port |
Uncouple Adjacent Differential Ports on a Differential Thru (this is a convenience setting).
When cleared (default setting), clicking the DUT configuration symbol (Differential or Single-ended) on either the Input or Output will change the other automatically.
When checked, the Input and Output is changed independently.
3. Change Logical port numbers. For differential pairs, the logical port is comprised of two DUT ports. For single-ended ports, the logical port can be a different number than the DUT port.
4. Change the DUT port numbers (DUT Port).
|
Logical ports are comprised of the adjacent single-ended DUT ports. |
5. Specify a more descriptive label. For the PNA/ Single-ended DUT port. The text replaces input and output arrows (<<<< and >>>>).
6. Change the VNA port used to measure the DUT. The E5071C ENA has some limitations that must be considered. See E5071C Limitations.
DUT Configuration
Description File name of the current configuration. Change this text, then click Save As to store the current configuration to a *.dcf file using this file name.
Save As Store the current configuration. This file can later be recalled using the Load button.
OK Applies current settings to the measurement and closes the dialog.
Cancel Discards the changes you made since open the dialog and closes the dialog.
Reset Recall the Default Configuration.


