Importing Data


Important Notes

  • PLTS will NOT import files with Power Sweep data. Attempting to import files with Power Sweep data could cause PLTS to close without notice.

  • Beginning with Rev 4.0, PLTS can import and change data files with an unlimited number of ports.

  • Beginning with Rev 4.5, PLTS can import Time Domain text data and DCA XY Verbose waveform data.

  • Beginning with Rev 5.0, PLTS can import Balanced ONLY data, and then calculate the Single-Ended S-parameters if enough Balanced data is available. PLTS will notify you if there is NOT enough data to perform the calculations. You may have obtained Balanced ONLY data using a TDR to make measurements, or from using the Export feature.  When using a VNA, PLTS always makes single-ended measurements and from them calculates balanced parameters.

  • Beginning with Rev. 2014, Multiple Files importing can Map Single-Ended file parameters to Differential DUT parameters. Learn more.

  • When attempting to import TS2 (*.snp)  or *.cti files with different port impedances, the following dialog appears:

    However, these files CAN be successfully opened using the AFR and De-embedding features.

  • Beginning with PLTS 2018, 64 ports are supported.

  • Beginning with PLTS 2021:

    • N1000A connection and XY Verbose waveform data import is supported.

    • Support to import XY verbose data file of DCA in .txt or .csv format.

How to Import Data

Click File, then Import, then select either Single File, or Build File (from Multiple Files).

Import a Single File dialog

Import a single file into PLTS for data analysis.

1. Select Data Domain to Import: Frequency or Time.  

  • When Time is selected, also enter the Stop Frequency to be used in the Fast Fourier Transform algorithm. 20 GHz is the default value, and is best for most applications.

  • Time data can be imported as Text files and Touchstone files.

2. Select File Type: Click the down-arrow to import one of the following:

3. Select File to Import: Click Browse to find the file to import.

4. Configuration of Data to Import: Click Change to launch the DUT Configuration dialog.

Important Note:

Changing the DUT configuration resulting picture does NOT map the data as it is imported. It only changes how PLTS will perform the differential math.

To change the port mapping for a file, do one of the following:


5. Limit Data Range to Import:

  • All - Import all of the available data.

  • Subset  The following settings define the subset. Some settings may require you to first check Interpolate.

    • Start  Lowest frequency or time of the data to import.

    • Stop  Highest frequency or time of the data to import.

    • Points  Number of data points measured from Start to Stop frequency.

    • Step  Frequency or time range between each data point; available ONLY with Linear Spacing.

  • Interpolate  May be checked automatically by PLTS if a subset setting is made that requires Interpolation. Interpolated data is not as accurate as measured data.

    • Checked - Subset settings have been changed that require the imported data to be interpolated.

    • Cleared -  Imported data is NOT interpolated.

  • Reset  Returns the Subset settings to the original values.

Import Multiple Files (Build a File)

Import Multiple Files dialog

Build a single DUT file by importing data from multiple files . The imported data are mapped to various parameters or ports. The subsequent data can then be exported or analyzed by PLTS.

1. Select Data Domain to Import: Frequency or Time.  If Time is selected, also type the Stop Frequency to be used in the Fast Fourier Transform algorithm. 20 GHz is the default value, and is best for most applications.

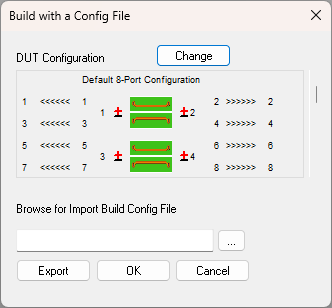
2.  Configuration of Data to Import (Build). Click Change to launch the DUT configuration dialog. These changes are reflected in the DUT Configuration diagram in the upper-right corner of the dialog.

Important Note:

The DUT Configuration Change and resulting picture does NOT map the data as it is imported.

The DUT Configuration diagram in the upper-right corner of the dialog does the following:

  • Shows the number of ports of the DUT to be built.

  • Shows how PLTS will perform the differential math.

  • Documents the DUT configuration as you intend it to be built.

Use Step 5. and Step 6. to map the parameter data and ports.

3.  Select File Type: Click the down-arrow to import one of the following:

4.  Select File to Import: Click Browse to find the file to import.

5.  Choose Parameter Mapping:  In the following field, choose to map either Individual parameters or Ports.

Note: To perform NO re-mapping, select Port, then click >> to retain the original port mapping.

6.  Select one file parameter to map to one or more selected DUT parameters.

This setting allows you to re-map the imported data to alternate DUT ports.

  1. Choose from:

    • Single-Ended - Map Single-Ended file parameters to Single-Ended DUT parameters.

    • Differential - Map Differential file parameters to Differential DUT parameters.

    • Single-Ended to Differential - Map Single-Ended file parameters to Differential DUT parameters.

  1. Choose a parameter in the left column (imported data) to be remapped.

  2. Choose a parameter or port in the right column.

  3. Click >> to make the change.

  • Parameter mapping can be changed and overwritten.

  • The OK button is not available until all of the DUT parameters (boxes in the grid) are selected.

7. Limit Data Range to Import:

  • All - Import all of the available data.

  • Subset  The following settings define the subset. Some settings may require you to first check Interpolate.

    • Start  Lowest frequency or time of the data to import.

    • Stop  Highest frequency or time of the data to import.

    • Points  Number of data points measured from Start to Stop frequency.

    • Step  Frequency or time range between each data point; available ONLY with Linear Spacing.

  • Interpolate  May be checked automatically by PLTS if a subset setting is made that requires Interpolation. Interpolated data is not as accurate as measured data.

    • Checked - Subset settings have been changed that require the imported data to be interpolated.

    • Cleared -  Imported data is NOT interpolated. When Linear Spacing is selected, PLTS will change Subset settings that you enter to the closest measured data values which do not require interpolation. When Log, Dec, or Oct Spacing is selected, PLTS may not allow Interpolate to be cleared after changing settings. Click Reset to return to the original values.

  • Reset  Returns the Subset settings to the original values.

Export  (Optional) Click to export the remapped data.

Click OK to close the dialog.

See Also


Last Modified:

3-Dec-2020

Added PLTS2021 new functions under "Important Notes"

4-Dec-2019

Added Configuration of Data to Import for PLTS2020

28-Dec-2014

Added import TD touchstone files

3-Apr-2008

Added Single-ended and Differential data