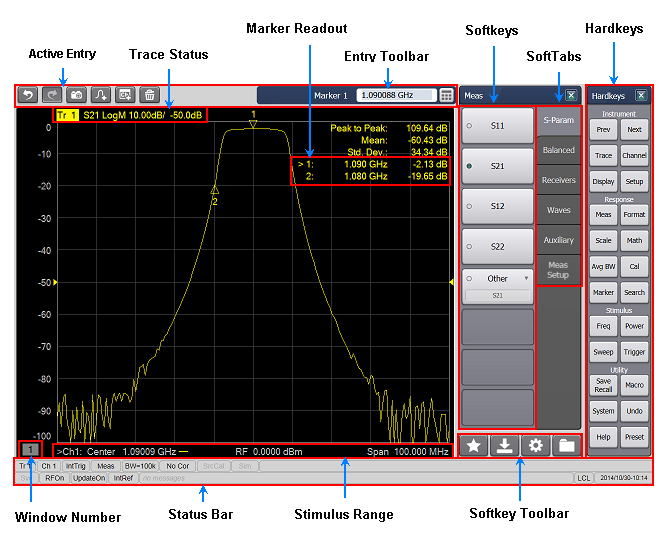
Click on image areas to learn more.

The VNA display is controlled by a third-party display driver. This driver is capable of producing many display effects which are beyond the basic needs of the VNA measurement environment. Keysight does not specify or warrant these display settings.
WARNING: The VNA display must remain in the 16 bit color setting in order to comply with international emissions regulations.
When using external programs to control the VNA, it is possible that the display settings may become corrupt. When this occurs, the following will restore the VNA display settings:
Press System > Main > Minimize Application.
Right-click on the desktop, then click Personalize.
On the Themes tab, select Keysight Theme.
|
To calibrate Touchscreen: Note: The Touchscreen is self calibrating and should not require calibration. However, if the touch locations are not accurate, perform the following procedure to calibrate the Touchscreen.
To calibrate Touchscreen when external monitor is connected to PNA: When a second monitor is added to a Windows PC where the primary monitor has a touchscreen, Windows may associate touch inputs with the window shown on the extended monitor rather than on the monitor that has the touchscreen. Since the computer in a PNA runs on the Windows operating system, the PNA can exhibit this condition. Note: The Touchscreen is self calibrating and should not require calibration. However, if the touch locations are not accurate, perform the following procedure to calibrate the Touchscreen.
Note:
If the calibration makes the touch operation worse, click on the
Reset button in the Tablet PC Settings dialog to
reset the calibration data. |
Allows you easily select the tools. Learn more.
Provides details of each trace in the window. Highlighted trace indicates the active trace. Learn more.
Along with the softkeys, allows numeric values to be entered for settings. Learn about all toolbars.
Provides stimulus and response information for markers. Learn about customizing the marker readout area. See also Marker Drag.
The combination of hardkeys and softkeys allows easy access to all VNA features without a mouse.
Pressing these tabs will display corresponding softkeys.
Performs interface operations that are equivalent to those of keys in the INSTRUMENT keys, RESPONSE keys, STIMULUS keys and UTILITY keys on the front panel of VNA. Learn more.
Provides window identification which is useful for remote programmers.
Provides detail about all aspects of the status of the analyzer. Learn more.
Displays the start and stop values of the sweep range.
These icons provide shortcuts to quickly select the softkey tools. Learn more.
Drag a displayed marker across the trace using a finger (with touchscreen ON) or a mouse. Learn more.
Cursor changes to a “hand” when hovering over a clickable object.
Right-click on the Entry toolbar to launch a mouse-compatible numeric pad.
Right-click or long press on a window area to make selections pertaining to that window.
Double-click on a window area to maximize the window. To return to original window configuration, right-click on window area, then click Tile.
Left-click on X-axis annotation to select the active channel/trace.
Right-click on X-axis annotation and click Start/Stop/Center to change stimulus properties. Applications are not fully supported.
Quickly change Scale, Reference Level, and Position. Learn how.
Right-click on Y-axis annotation and click Scale to change Scale.
Drag a trace from one window to another. Click or touch either the trace or the Trace Status. Drag the trace to another window, then release the mouse or lift your finger.
Left-click a trace or Trace Status to make it the selected trace.
Double-click on a trace or Trace Status to maximize the trace. Double-click again to return to the original trace configuration.
Set a preference to always widen the active trace.
Set a preference to briefly widen the active trace.
Drag a trace from one window to another. Click or touch either the trace or the Trace Status. Drag the trace to another window, then release the mouse or lift your finger.
Markers
Right-click on a trace or Trace Status to add a marker.
Right-click a marker to make selections pertaining to that marker, such as Marker Search or Function.
Use the Touchscreen or adjacent buttons to select from eight dynamic softkey menu choices.
To Show the softkeys, press any front-panel hardkey and the corresponding softkey menu will be launched.
Softkey Annotations
Item |
Description |
|
|
Selection launches a dialog box. |
|
|
Selection launches another level of softkeys. |
|
|
Indicates the item (marker, trace, window) is ON. Any number of objects can be ON. |
|
|
Indicates the item (marker, trace, window) is OFF. Click to turn item ON. |
|
|
Indicates the item IS selected. |
|
|
Indicates the item is NOT selected. Click to select. Only one item in the collection can be ON. |
|
|
Enter value in Entry toolbar. |
|
|
Capitalization indicates the current setting. |