Open topic with navigation
Frequency Agile Example
The Frequency Agile example demonstrates using the Pulse Building application's
GUI to create a frequency hopping
pattern. The pattern uses three different pulse definitions and modulations.
Each pulse is a trapezoidal pulse type, but created using different methods
available in the Pulse Building GUI. The first pulse, CW1, is created
using the Pulse Building application's built-in definition parameters
for a trapezoidal pulse type. The second pulse, CW2, is created using
an I/Q data text file and the third pulse, CW3, uses a custom profile
definition defined in a text file. Each pattern item in the frequency
agile pattern is offset in frequency and one item uses a 10 dB power scaling offset.
This example demonstrates how to:
-
Create three different trapezoidal pulses
-
Build a pattern of pulses
-
Use pattern parameter properties such as repeats, edge
jitter, and so forth
-
Set pattern power level and frequency
-
Use the power scale function to scale the amplitude
of a pulse
-
Use the Pulse Building application's Import function
Creating the Pulses
The following procedure will guide you through the steps necessary to
create the three pulses used in this example.
-
Run the Pulse Building application.
-
Save this project. Use the
menu selection to save the project as Frequency
Agile.pbp.
-
Enter the following information into the Pulse Library
form:
-
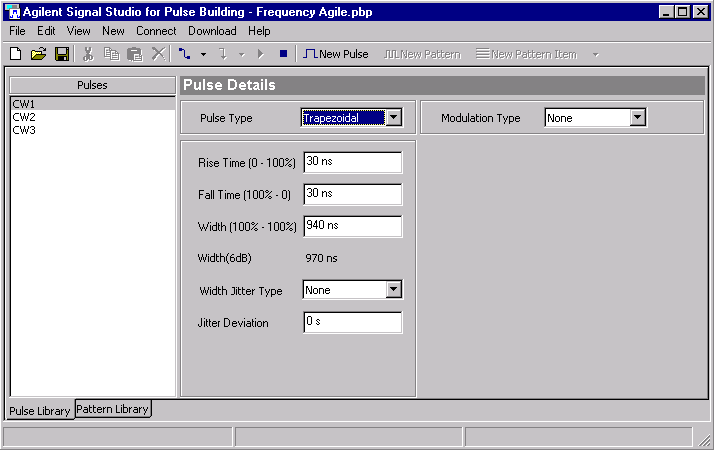
Name: CW1. Place the mouse pointer on the New Pulse 1 pulse, click
the right mouse button, select Rename, and change the pulse name to CW1.
-
Pulse Type: Trapezoidal
-
Rise Time: 30 ns
-
Fall Time: 30 ns
-
Width (100%~100%): 940 ns
-
Width Jitter Type: None
-
Jitter Deviation: 0 s
-
Modulation Type: None
The Pulse Library
form shown below displays the parameter settings for the CW1 pulse.

-
Click
the New Pulse button  in the Pulse Library form.
-
Enter the following information into the Pulse Library
form:
-
Name: CW2. Place the mouse pointer on the New Pulse 1 pulse, click the right
mouse button, select Rename, and change the pulse name to CW2.
-
Pulse Type: Custom I/Q
-
Modulation Type: None
-
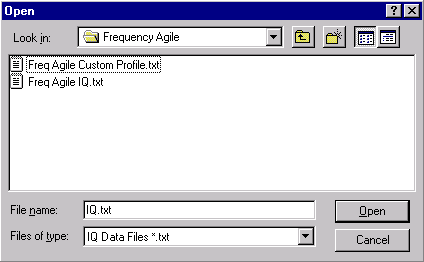
Click the
Import  command button. Use the Open dialog box to
navigate to the Freq Agile I/Q.txt
file. The file is located in the default Pulse Building application's
...\Samples\VB6\Frequency Agile directory.
-
Click the
Freq Agile I/Q.txt file and select
Open. The I/Q data will be imported into the IQ Data table.

-
Click New
pulse  in the Pulse Library form.
-
Enter the following information into the Pulse Library
form:
-
Name: CW3. Place the mouse pointer on the New Pulse 1 pulse, click the left mouse
button, click the right mouse button, select Rename, and change the pulse
name to CW3.
-
Pulse Type: Custom Profile
-
Modulation Type:None
-
Click the Import command button. Use the Open dialog
box to navigate to the Freq
Agile Custom Profile.txt file. The file is located in the default
Pulse Building application's ...\Samples\VB6\Frequency Agile directory.
-
Click the
Freq Agile Custom Profile.txt file
and select Open. The custom profile data will be imported into the Profile
Data table.
Creating the Pattern
There are now three pulses
CW1, CW2, and CW3 stored in the Frequency Agile project's Pulse Library.
This section details the steps needed to create a pattern using these
three pulses.
-
Click the
Pattern Library tab at the lower left corner of the Pulse Library form.
-
If New Pattern 1 is not displayed in the
Pattern Library view, click the  icon.
icon.
-
Rename New Pattern 1 to Frequency
Agile.
-
Click
the mouse pointer anywhere in the pattern details section of the form
-
Click
the mouse pointer on New Pattern 1 in
the patterns section of the form
-
Click
the right mouse button
-
Select
Rename from the menu and type in Frequency Agile
-
Add nine
pattern items to the Frequency Agile pattern. Click the  icon nine times.
-
Select CW2 for the Frequency Agile pattern item at Index
2:
-
Select CW3 for the Frequency Agile pattern item at Index
3:
-
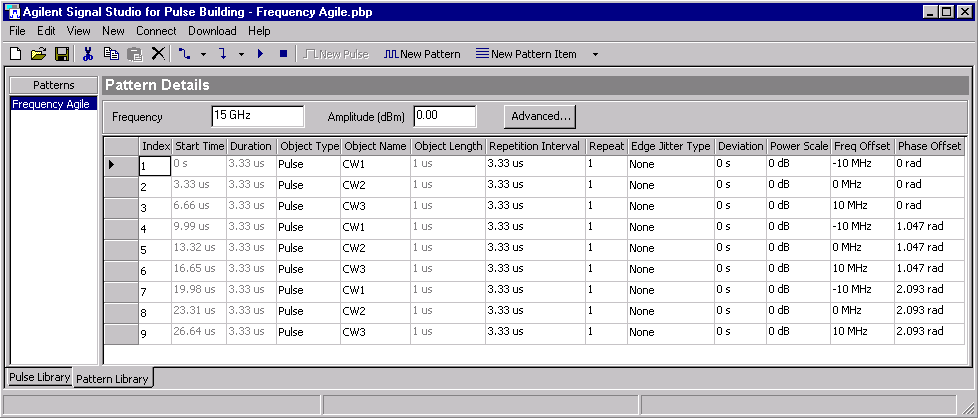
Enter the
parameters and information as presented in the Pattern Details form below.

-
Index 1
- Object Name: CW1, Repetition Interval: 3.33 us, Repeat: 1, Edge Jitter
Type: None, Deviation: 0, Power Scale: 0, Freq Offset: -10 MHz, Phase
Offset 0 rad
-
Index 2
- Object Name: CW2, Repetition Interval: 3.33 us, Repeat: 1, Edge Jitter
Type: None, Deviation: 0, Power Scale: 0, Freq Offset: 0 MHz, Phase Offset
0 rad
-
Index 3
- Object Name: CW3, Repetition Interval: 3.33 us, Repeat: 1, Edge Jitter
Type: None, Deviation: 0, Power Scale: 0, Freq Offset: 10 MHz, Phase Offset
0 rad
-
Index 4
- Object Name: CW1, Repetition Interval: 3.33 us, Repeat: 1, Edge Jitter
Type: None, Deviation: 0, Power Scale: 0, Freq Offset: -10 MHz, Phase
Offset 1.047 rad
-
Index 5
- Object Name: CW2, Repetition Interval: 3.33 us, Repeat: 1, Edge Jitter
Type: None, Deviation: 0, Power Scale: 0, Freq Offset: 0 MHz, Phase Offset
1.047 rad
-
Index 6
- Object Name: CW3, Repetition Interval: 3.33 us, Repeat: 1, Edge Jitter
Type: None, Deviation: 0, Power Scale: 0, Freq Offset: 10 MHz, Phase Offset
1.047 rad
-
Index 7
- Object Name: CW1, Repetition Interval: 3.33 us, Repeat: 1, Edge Jitter
Type: None, Deviation: 0, Power Scale: 0, Freq Offset: -10 MHz, Phase
Offset 2.093 rad
-
Index 8
- Object Name: CW2, Repetition Interval: 3.33 us, Repeat: 1, Edge Jitter
Type: None, Deviation: 0, Power Scale: 0, Freq Offset: 0
MHz, Phase Offset 2.093 rad
-
Index 9
- Object Name: CW3, Repetition Interval: 3.33 us, Repeat: 1, Edge Jitter
Type: None, Deviation: 0, Power Scale: 0, Freq Offset: 10 MHz, Phase Offset
2.093 rad
Download and Play
-
Click the
Connect
to Instrument button  .
.
-
Enter TCP/IP
or GPIB interface parameters for the instrument in the System Configuration wizard.
-
Click the
Test I/Ocommand button. The Status
text box in the I/O Connection form should display: Connected
If an error or timeout occurs, refer to the troubleshooting section
in this Help document or VISA documentation.
-
Click OK.
If you do not have an analyzer, you must
disable the Auto-Correction routine. Go to and remove the check mark from the Auto-Correction
check box.
If you are using an analyzer,
perform the following steps:
-
Click the
Connect
to Instrument button  .
.
-
Enter TCP/IP
or GPIB interface parameters for the instrument in the System Configuration wizard.
-
Click the
TestI/Ocommand button. The Status text box in the I/O Connection form
should display: Connected
If an error or a timeout occurs, refer to the troubleshooting section
in this Help document or VISA documentation.
-
Click OK.
Click the Download menu
item at the top of the form and select Download & Play. The lower
section of the form, labeled VerifySignal
Result: indicates the result of the signal creation
and download process.
At this point the signal,
defined by the Frequency Agile pattern, is loaded in the signal generator's
volatile waveform memory
and the signal generator is playing the signal. You can use the analyzer
to view this signal. Use the following analyzer settings:
You can save this waveform
file in the signal generator's non-volatile waveform memory. When you
save the waveform file, instrument state parameters configured in the
Advanced settings section such as frequency and amplitude are not included.
Use the signal generator's Save/Recall
registers to save the signal generator's instrument state. When you want
to re-load the signal and play it back:
-
Load the
signal into volatile waveform memory.
-
Recall the
register with the signal generator's instrument state associated with
the waveform file.
A signal downloaded to the signal generator's
memory has a sequence file associated with it. These sequence files are
loaded into the signal generator's non-volatile memory and will remain
in memory until manually removed. The Pulse Building application does
not remove unused sequence files.
If you delete a waveform file, delete the associated non-volatile
sequence file. Unused sequence files can consume signal generator memory.
Related Topics
Frequency Agile API Program Example

 in the Pulse Library form.
  command button. Use the Open dialog box to
navigate to the Freq Agile I/Q.txt
file. The file is located in the default Pulse Building application's
...\Samples\VB6\Frequency Agile directory.
 in the Pulse Library form.
 .
.