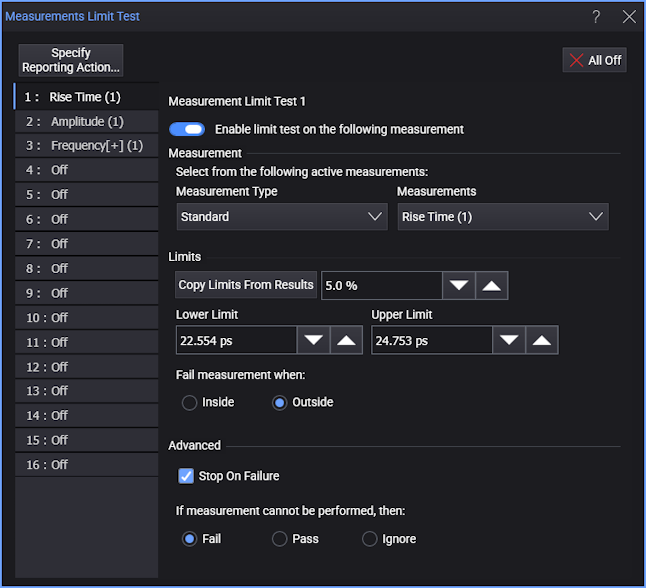
Measurement Limits
Use the Measurements LImit Test dialog box to simultaneously perform limit testing on up to 16 active measurements.
To define a measurement limit test
- Select one of 16 tabs that are on the dialog box's left side.
- Select the Measurement Type which is related to the measurement panel on which the measurement is listed.
- Select the Measurement.
- Click Specify Reporting Action... to select how the limit test results are reported.
- Click Enable limit test on the following measurement to immediately start all defined measurement limit tests.
Dialog Box Controls
-
Specify Reporting Action... — Opens a dialog box with tabs for each type of action that can be taken when the limit is reached. See Reporting Actions.
-
All Off — Quickly turns off all running measurement limit tests.
After clicking this button, although all tabs read Off, none of your definitions have been erased. To restart a test, simply open a tab and select Enable limit test on the following measurement.
-
Enable limit test on the following measurement — Enable or disables the measurement limits.
Enabling immediately starts the test. To start after you close the dialog box, use the Stop, Single, and Run acquisition controls on the menu bar.
-
Measurement — Selects the measurement to limit test:
-
Measurement Type. — Select the type of measurement you want to limit test: Standard or Mask Test N.
With Mask Test N, a measurements limit test stops mask testing after a number of mask violations has occurred from a specific mask area or mask margin region. Select the region from the Measurements drop down list.
If you want to include the violations from all mask and mask margin regions in the total number of failures, use the Mask Test Limits limit test.
-
Measurements. — Select an active measurement for the limit test from this drop-down list.
-
-
Limits — Contains the controls for setting limits and whether failures are inside or outside the limits:
-
Copy Limits From Results — If there are measurement results, click this button to copy the measurement results' Min and Max values, minus or plus, respectively, the specified % margin, to the Lower Limit and Upper Limit fields.
Make sure the measurement count is sufficient to yield reasonable Min and Max values.
If the % margin is set to 0%, the minimum and maximum values are copied exactly to the limits, increasing the likelihood of a failure. Setting a % margin decreases the minimum limit and increases the maximum limit by the entered percentage of the measurement result Range (Max - Min).
-
Lower Limit, Upper Limit — These fields establish a range of measurement values.
-
Fail measurement when — Relative to the Limits range, measurements are considered to be passed or failed according to the following selections:
- Inside. — Measurement fails when a measurement value is within the lower and upper limits.
- Outside. — Measurement fails when a measurement value is beyond the lower and upper limits. This is the default setting.
-
-
Stop On Failure — Stops making acquisitions on a failure.
When the measurement whose limits are being tested is measuring all occurrences within an acquisition, multiple measurements can be made per acquisition, and within those measurements, multiple can have limit failures. This means an acquisition that causes a stop can show multiple failures.
-
If measurement cannot be performed, then — Select the action to take when a measurement cannot be performed: Fail, Pass, or Ignore.
An example of this selection being used would be if the waveform's edge could not be located in a rise time measurement.
The default setting is Fail, which stops the measurement after the specified number of failed waveforms occurs. This selection is used in most applications.
Action Taken When Measurement Cannot be Performed Setting Failure Count Number of Waveforms Fail incremented incremented Pass — incremented Ignore — —
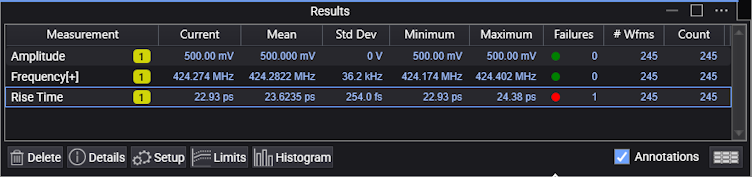
Status of Measurement Limit Tests
The status of the current limit tests are shown in the Failures column of the Results panel. A green dot ( ) in the column indicates that no failures have occurred. A red dot (
 ) indicates a failure. The Failures column shows the number of failures that occur for measurement limit test. The # Wfms column shows the total number of waveforms sampled from the active measurements.