This is the switch used for choosing between power-on ( | ) and standby (O) state of E4982A. Do not connect any USB memory at power ON.
To turn OFF the power to the E4982A, be sure to follow the steps described below:
The color on the button indicates the status as shown below:
|
Indicator Color |
Description |
|
Green |
Normal power ON status. |
|
Orange |
Standby status. |
|
Red |
Illegal power ON status. |
If you directly interrupt the power supply to the power cable receptacle when the power supply is ON, or turn OFF the Line Switch (Always ON), the shutdown process will not work. This could damage the software and hardware of the E4982A and lead to device failure.
Turning ON the power supply after a faulty shutdown may cause the system to start up in a condition called "safe mode." If this occurs, first shut down the system to put it into the standby state and then turn on the power supply again to start up the system in normal mode.
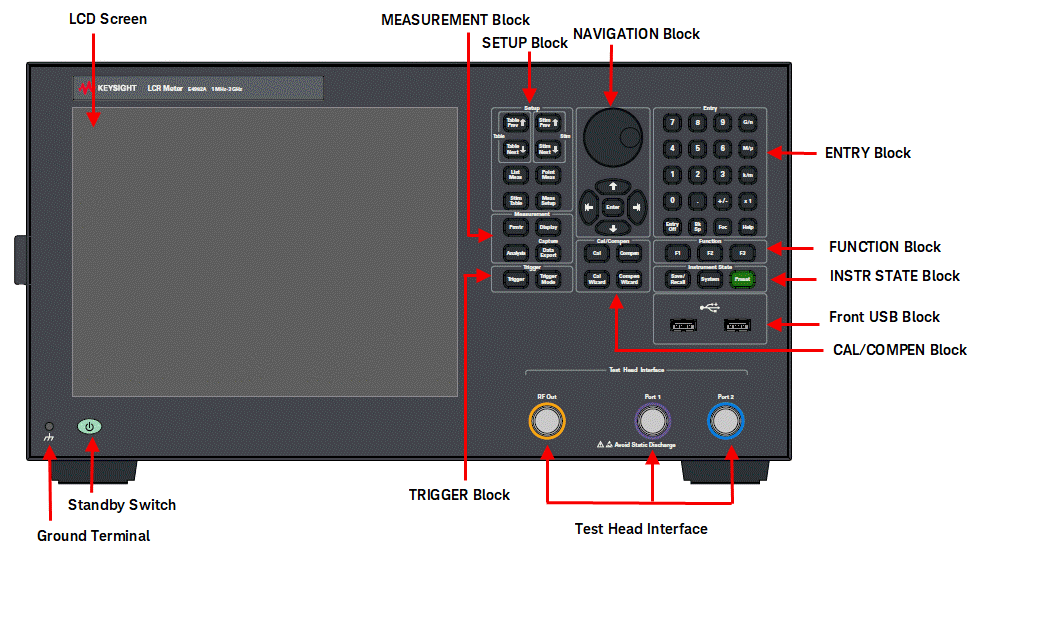
The E4982A is equipped with a 10.4-inch TFT color, touch-sensitive LCD screen for displaying measurement value, setup state, result of data processing, result of evaluation, settings, softkeys, indications and other measurement related information. The touch screen LCD allows you to manipulate softkeys by touching the LCD screen directly with a finger. For more information on the LCD screen, see Screen Area.
A group of keys used to set up the basic measurement conditions of E4982A.
|
Key Name |
Description |
|
Table Prev |
Selects the previous table as the active table. |
|
Table Next |
Selects the next table as the active table. |
|
Stim Prev |
Can be used at single point measurement display and list measurement display to view the previous point as the active point. |
|
Stim Next |
Can be used at single point measurement display and list measurement display to view the next point as the active point. |
|
List Meas |
Displays list measurement display of all the points in the active table. |
|
Point Meas |
Displays single point measurement display of the active point. |
|
Stim Table |
Displays four tab: Stimulus, Cal Kit, Compen Kit and Comparator. These four displays can be switched in sequence by repeatedly pressing this key. |
|
Meas Setup |
Displays the Measurement Setup softkey menu bar on the right side of the display. These softkeys are used to select the measurement setup parameter. This menu is displayed in either one of these two types of measurement displays:single point measurement display and list measurement display. |
A group of keys used to set up the parameters, display settings, perform analysis function and export data of E4982A.
|
Key Name |
Description |
|
Prmtr |
Displays the Parameter softkey menu bar on the right side of the display. These softkeys are used to select the measurement parameter. |
|
Display |
Displays the Display softkey menu bar on the right side of the display. This menu is used to specify how to display the measurement results. |
|
Analysis |
Displays the Analysis softkey menu bar on the right side of the display. Manipulating this menu is enables you to use the analytical function. |
|
Data Export |
Displays the Data Export softkey menu bar on the right side of the display. This menu is used to export image and data as well as to set file utility. |
A group of keys used to set trigger mode and trigger E4982A.
|
Key Name |
Description |
|
Trigger |
Generates trigger when pressed, if the trigger mode is set to Manual. |
|
Trigger Mode |
Displays the Trigger Mode softkey menu bar on the right side of the display. This menu is used to specify the trigger mode, delay and input polarity. |
The keys and knob in the NAVIGATION Block are used to navigate between softkey menus, selected (highlighted) areas in a dialog box as well as to change a numeric value in the data entry area by stepping up or down. When selecting one of two or more objects (softkey menus, data entry areas, etc.) to manipulate with the NAVIGATION Block keys displayed on the screen, first press the Foc key in the ENTRY Block to select the object to be manipulated (placing focus on the object) and then manipulate the NAVIGATION Block keys (knob) to move among selected (highlighted) objects or change numeric values.
The following descriptions show how the NAVIGATION Block keys work both when the focus is on a softkey menu and when the focus is on the data entry area.
When the focus is placed on a softkey menu, the NAVIGATION Block keys work as described below.
|
Key Name |
Description |
|
|
Moves the softkey selection (highlighted display) up or down. |
|
|
Moves the softkey selection (highlighted display) up or down. |
|
|
Displays the softkey menu one layer above. |
|
|
Displays the softkey menu one layer below. |
|
Enter or |
Executes the function of the selected softkey. |
After pressing the data entry softkey, the focus automatically moves to the data entry area.
When the focus is placed on the data entry area, the NAVIGATION Block keys work as described below.
|
Key Name |
Description |
|
|
Increases or decreases the numeric value in the data entry area in small steps. |
|
|
Increases or decreases the numeric value in the data entry area in large steps. |
|
|
Moves the cursor (|) in the data entry area laterally back and forth. Use it together with the ENTRY Block keys to change data one character at a time. |
|
Enter or |
Finishes the entry in the data entry area and moves the focus to the softkey menu. |
A group of keys used to set up the functions to control and manage calibration and compensation of E4982A.
|
Key Name |
Description |
|
Cal |
Displays the Calibration softkey menu bar on the right side of the display. This menu is used to execute calibration. |
|
Compen |
Displays the Compensation softkey menu bar on the right side of the display. This menu is used to execute compensation. |
|
Cal Wizard |
Displays the Calibration Wizard that guides you step by step in performing calibration. |
|
Compen Wizard |
Displays the Compensation Wizard that guides you step by step in performing compensation. |
A group of keys used for entering numeric data is provided on the front panel of the E4982A.
|
Key Name |
Description |
|
0, 1, 2, 3 ..... 9 , . (numeric keys) |
Type numeric characters or a decimal point at the position of the cursor in the data entry area. |
|
+/- |
+/- alternately changes the sign (+, - ) of a numeric value in the data entry area. |
|
G/n, M/u, k/m, x1 |
Adds a prefix to the numeric data typed by using the numeric key and +/- key. One of the two prefixes written on the surface of the key is automatically selected depending on the parameter to be entered. x1 is entered without a prefix. |
|
Entry Off |
Turns OFF the data entry bar if it is displayed. If the dialog box is displayed, it cancels the entry and closes the dialog box. If the data entry bar and dialog box are not displayed, it turns the softkey menu display to OFF if it is ON, except for Stim Table softkey. |
|
Bk Sp |
Backspace key. |
|
Foc |
Changes the selection (focus) among the objects to be manipulated by the NAVIGATION Block keys and ENTRY Block keys. The objects to be manipulated by the NAVIGATION Block keys and ENTRY Block keys include softkey menus, data entry areas, and dialog boxes. When two or more of these are displayed on the screen and need selecting, use this key to change the selection (focus) among the objects to be manipulated. When a softkey menu is selected, the menu name area at the top of the menu is displayed in blue. When a data entry area is selected, the data entry bar is displayed in blue. When a table is selected, the frame of the table window is displayed in light gray. While a dialog box is displayed, the focus is fixed on the dialog box and cannot be changed. |
|
Help |
Displays help for E4982A. |
A group of function keys with default setting. However, these settings can be changed at System > Misc Setup > F1 Key/F2 Key/F3 Key followed by the setting option. By default, the function keys are set as follows:
|
Key Name |
Description |
|
F1 |
Capture Image. Captures the image of the current screen display. |
|
F2 |
File Utility. It pops-up the Windows Explorer window. |
|
F3 |
Toggle Beeper Warning. |
A group of keys related to the control/management function, and the presetting of the E4982A (returning it to the preset state).
|
Key Name |
Description |
|
Save/Recall |
Displays the Save/Recall softkey menu bar on the right side of the display. This menu is used to save the E4982A setup state and measurement data in a storage device of the E4982A and to recall them up when required. |
|
System |
Displays the System softkey menu bar on the right side of the display. This menu is used to control and manage the entire measuring instrument. |
|
Preset |
Use this key to set the E4982A to an initialized state called the Preset State. Click Undo Preset to return to the setting prior to the preset action. |
This interface includes the three ports used to connect the test head: RF OUT, PORT 1, and PORT 2. All ports are N-type connectors (female).
To prevent the E4982A from malfunctioning, do not apply DC voltage or DC current to the test head’s DUT port. The capacitor in particular could be charged. When you connect a capacitor, discharge it sufficiently before connecting it to the test fixture that is connected to the test head’s DUT port.
Two USB (Universal Serial Bus) ports are provided that can be used for connecting to USB keyboard, USB mouse, and/or USB memory.
Ground terminal is connected to the chassis of the E4982A and is provided with the E4982A. You can connect a banana-type plug to this terminal for grounding.