![]()
![]()
Sweep Type
Wide-Narrow- Wideband (WB) and one narrow band (NB1) measurements
Narrow-Narow - two narrow band measurements, Narrow band 1 (NB1) and Narrow band 2 (NB2). Both bands are identical.
Time Coupling - All traces for both measurement share the same time settings.
NOP - Shows the number of Point in the transient sweep. NOP is automatically set and cannot be changed.
Wide
Frequency Range - Specify the frequency range of wide band.
Max Frequency - Input the maximum frequency. This input is required when the frequency band is set at Max Freq. > 8 GHz.
Min Frequency- Shows the minimum frequency according to the specified maximum frequency. (Minimum frequency = Maximum Frequency - 7 GHz)
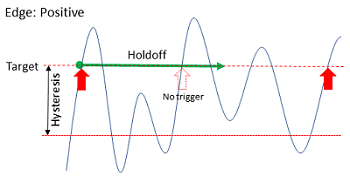
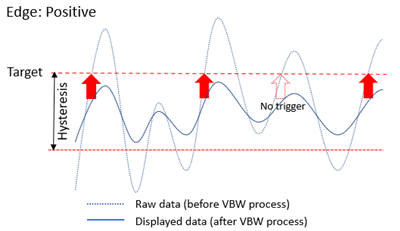
VBW - Default is Auto (Auto Check Box is enabled). A larger VBW can measure faster transient but frequency measurement fluctuation will be bigger
Time Span - Specify the time span of horizontal axis.
Frequency Range |
Minimum Time Span |
1 MHz – 40 MHz |
200 μs |
40 MHz – 160 MHz |
10 μs |
80 MHz – 320 MHz |
10 μs |
160 MHz – 640 MHz |
10 μs |
320 MHz – 1.28 GHz |
10 μs |
640 MHz – 2.56 GHz |
10 μs |
1.28 GHz – 5.12 GHz |
10 μs |
2.56 GHz – 8 GHz |
10 μs |
256 MHz – 8 GHz |
200 μs |
8 GHz - 54 GHz |
10 μs |
Time offset - Specify the offset time at the reference point
Reference - Specify the reference location of the horizontal axis. Choose from Right, Center or Left.
Narrow1/Narrow2
Center Frequency - The center frequency of narrow band 1/2. It is the value at reference point of vertical axis of Narrow band window.
Frequency Span - The frequency span of narrow band 1/2. The minimum time span and minimum center frequency are limited by this as follows. The power measurement in narrow band cannot be selected when the frequency span is 80 MHz and above.
Frequency Span
Minimum Time Span
Minimum Center Frequency
3.125 kHz
100 ms
900 kHz
25 kHz
10 ms
900 kHz
312.5 kHz
1 ms
900 kHz
2.5 MHz
100 μs
5 MHz
10 MHz
50 μs
100 MHz
30 MHz
10 μs
200 MHz
80 MHz
10 μs
200 MHz
160 MHz
10 μs
400 MHz
320 MHz
10 μs
800 MHz
VBW - Default is Auto (Auto Check Box is enabled). A larger VBW can measure faster transient but frequency measurement fluctuation will be bigger
Time Span - The time span of horizontal axis.
Time offset - The offset time at the reference point
Reference - Select the reference location of the horizontal axis. Choose from Right, Center or Left.
Note: Displayed area (time and frequency) needs to be set to keep frequency transient within NB1 Center Freq +- NB1 Freq Span / 2. Otherwise, a user will see an invalid trace. The same applies to Narrow band 2. Displayed area needs to be set to keep frequency transient within NB2 Center Freq +- NB2 Freq Span / 2.