The ripple limit function can be executed independently of limit test function. Independently of the limit test, you can evaluate the measurement results on a PASS/FAIL basis by setting a limit for the ripple. This function is called the Ripple Limit Test.
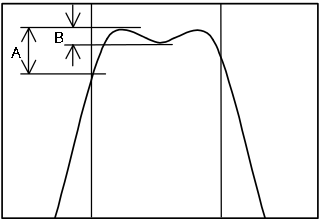
In this picture, A is greater than B. Therefore, A is considered as the ripple of the specified stimulus range.
The ripple limit function evaluates the measurement point values only. Interpolated values are not used.
The ripple limit test is a function for evaluating the results on a Pass/Fail basis based on the ripple limit, which is set using the ripple limit table. Ripple is defined as the difference between the largest and smallest value within a specified stimulus range. You can specify up to 12 frequency bands, which permits a test for each frequency band.
The ripple limit test judges the measurement as "Pass" when the ripple value specified with the ripple limit is not exceeded by any of the measurement points on the trace; Otherwise, it judges the measurement as "Fail." For the measurement points in a stimulus range without a specified ripple limit, the test judges the measurement as "Pass."
Note: The measurement point alone is the target of evaluation for pass/fail. The interpolated part between measurement points is not evaluated.
The ripple limit is defined with the start point stimulus value, end point stimulus value, ripple limit value and type (on/off). For detailed information, see Ripple Limit Table.
While the ripple limit test function is turned on, the measurement points corresponding to a "FAIL" judgment will be indicated in red on the screen and the trace's test results based on the results of each measurement point will be displayed (judged as "Fail" if one or more red measurement point exist on the trace). For information on how to display the results, see Ripple Limit Setup. You can also confirm the channel test results on the screen (judged as "Fail" if one or more failed traces appear in the limit test, ripple limit test or bandwidth limit test within the channel).
You can create ripple limit lines for all measurement traces. The ripple limit lines are the same color as the measurement trace.
Ripple limit lines are made up of discrete lines with three coordinates:
Begin Stimulus and End Stimulus - X-axis values.
Max Ripple - Y-axis values.
You must configure the ripple limit before you can use the ripple limit test function. You can specify a ripple limit table for each trace, where up to 12 ripple limit bands (frequency bands) can be configured.
How to turn ON/OFF Ripple Limit Table |
|
Using Hardkey/SoftTab/Softkey |
|
|
|
Note: To ADD a frequency band to the ripple limit table, change the last ripple limit line to either ON or OFF.
Note: No frequency band is provided in the ripple limit table by default.
In the Type area of the Ripple Limit Table, select ON or OFF for Ripple Limit Line 1.
ON - Band used for the ripple limit test.
OFF - Band not used for the ripple limit test.
Click Begin Stimulus for Ripple Limit Segment 1. Enter the desired value.
Click End Stimulus for Ripple Limit Segment 1. Enter the desired value.
Click Max Ripple for Ripple Limit Segment 1. Enter the desired value.
Repeat Steps 1-4 for each desired ripple limit line.
How to turn ON/OFF the Ripple Limit Table
Note: Acceptable range for the stimulus value: -500G to +500G. If any out ranging value is specified, it will be reset to fall within the range.
Note: Even if the VNA's sweep range is changed after the stimulus value has been set, the stimulus value is not susceptible.
The individual frequency bands for the ripple limit test can overlap each other; in this case, the ripple limit test is performed for each frequency band.
Even if the VNA's span value is set to zero, you must enter a parameter for both Begin Stimulus and End Stimulus.
If the data format is Smith chart or polar, the limit test is performed for the main response value among the two marker response values.
The test result for the trace will be indicated as Pass or Fail in the upper-left area of the graph. You can also display the ripple value at the selected frequency band. If a trace is unsatisfactory, test results and ripple lines are displayed by red color.
The result will be displayed as Ripln: Pass (or Fail) for each trace. n denotes the trace number. Bn will be followed by the ripple value (if the ripple display is turned off, only Bn will be displayed without the ripple value).
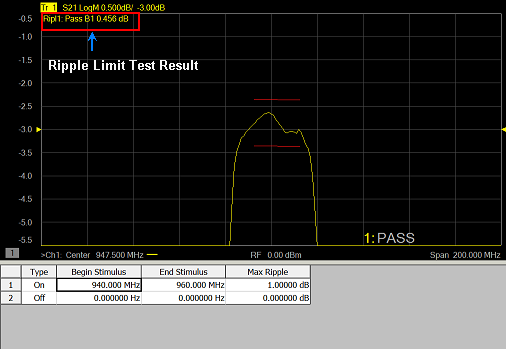
The Global Pass/Fail setting in the limit tab is applied to ripple limit test. It will be judged as failed if one or more unsatisfactory trace exists in any of the ripple limit test within the channel).
How to set Ripple Limit Test Setup |
|
Using Hardkey/SoftTab/Softkey |
|
|
|
|
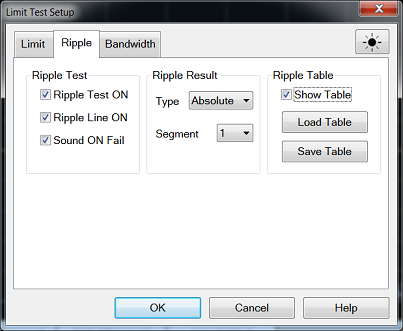
(Ripple) Limit Test Setup Dialog Box Help |
|
Ripple Test Ripple Test ON - Check the box to set the ripple test ON or OFF and also display PASS or FAIL. Ripple Line ON - Check the box to make the ripple limit line visible on the screen (Test still runs even though the ripple line does not turns on).
Ripple Result Type - Sets how the ripple values are displayed. Available settings are Off, Absolute value (difference between maximum and minimum values within the band) display and Margin (difference between absolute value of ripple and ripple limit) display. Segment - Enable to specify a ripple limit table up to 12 stimulus segment for each trace.
Ripple Table Show Table - Check the box to show the table that allows you to create and edit limits. Load Table - Recall the saved ripple limit table. Learn more. Save Table - Save the ripple limit table. Learn more. |
The ripple limit table can be saved in a file and recalled later for use on the screen. The file is saved in the csv format (with the extension *.csv), and values are saved as a character string with the unit. The csv formatted file can also be reused in spreadsheet software made for PCs.
How to set Ripple Limit Setup |
|
Using Hardkey/SoftTab/Softkey |
|
|
No Programming are available for this feature |
Load Table
To recall the saved ripple limit table, click Load Table from the Ripple Limit Test Setup dialog and a Recall dialog box is open. At this time, CSV Files (with the extension *.csv) is selected as the file type.
Specify the folder that contains the file and then select the file. Click Recall to recall the saved ripple limit table on the screen.
Note: You can recall a ripple limit table from a trace on any channel independently of the channel and trace that were active when the ripple limit table was saved to the file.
Save Table
To save the ripple limit table, click Save Table from the Ripple Limit Test Setup dialog and a Save As dialog box is open. At this time, CSV Files (with the extension *.csv) is selected as the file type.
Specify any folder in which you want to save the file and enter the file name. Click Save to save the ripple limit table displayed on the screen to a file.
First line indicates the type of limit test of the instrument.
Second line indicates the revision of the limit test.
Third line indicates a header for the segment items that are output from the fourth line onward.
From the fourth line onward, the segment data are output.
Sample Ripple Limit table saved format:
"# E5080 Ripple Limit Test"
"# Revision: 1.00"
TYPE, BEGIN STIMULUS, END STIMULUS, MAX RIPPLE
ON, 933.0000000 MHz, 964.0000000 MHz, 1.5 dB
ON, 938.0000000 MHz, 953.0000000 MHz, 500 mdB