Display > Num of Traces > 2.
Display > Allocate Traces > ![]() .
.
Start > 2.0000 GHz.
Stop > 8.0000 GHz.
Scale > Autoscale All.
Other topics about Data Analysis
You can search for a position that matches your specified criteria by using the Marker Search feature. Marker Search allows you to search for a position that matches any of the following criteria.
The Marker Search feature allows you to set part of the sweep range as the search target (Partial Search feature) as well as the entire search range. For the Partial Search feature, you can select whether to couple traces in the channel. The Marker Statistics value is calculated by using the search range.
Press Channel Next/Channel Prev keys and Trace Next/Trace Prev keys to activate the trace for which you want to set the search range.
Press Marker Search key.
Click Search Range.
Click Couple to toggle ON/OFF trace coupling within the search range.
Press Channel Next/Channel Prev keys and Trace Next/Trace Prev keys to activate the trace for which you want to set the search range.
Press Marker Search key.
Click Search Range.
Click Search Range to turn ON the Partial Search feature.
Click Start, then enter the start value (lower limit) of the search range.
Click Stop, then enter the stop value (upper limit) of the search range.
Set and define a search range as described above.
Press Marker Fctn key.
Click Statistics to turn ON. The statistics values are calculated and displayed on the screen.
The Multiple Range feature allows you to set up to 16 search range in a channel. You can select more than one marker in a search range. You can select to couple the search range among the traces in the channel.
The Marker Statistics value is calculated by using the search range of the active marker. If no active marker is selected, by default the search range of marker 1 is used.
The below example shows how to place multiple markers within several search range on two traces. In this example, stimulus is set for two. Then, two multiple ranges are set and two markers are assigned to each search range as min and max. The effect of search range coupling and trace coupling on multiple range is also shown in this example.
Display > Num of Traces > 2.
Display > Allocate Traces > ![]() .
.
Start > 2.0000 GHz.
Stop > 8.0000 GHz.
Scale > Autoscale All.
Select Trace 1.
Press Marker Search key.
Click Search Range > Search Range > ON to turn ON the partial search feature.
Click Multiple Range > Multiple Range > ON to turn ON the multiple search range feature.
Click Target Range and select within 1 to 16 which represents the search range number. In this example, select 1 which represents Search Range 1.
Click Start, then enter 3.0000 GHz, the start value (lower limit) of the search range.
Click Stop, then enter 4.5000 GHz, the stop value (upper limit) of the search range.
Similarly, click Target Range > 2.
Start > 5.0000 GHz.
Stop > 6.5000 GHz.
The search range is set for both, Trace 1 and Trace 2. Note that the search range is not displayed as no Marker is assigned to these search range.
Marker > Marker 1 to turn it ON.
Marker Search > Search Range > Multiple Range > Target Range > 1 to activate search range 1.
Similarly, turn ON Marker 2.
Activate search range 1, by following Step 2.
Note that now, search range 1 is displayed, and marker 1 and marker 2 are placed within search range 1.
Marker > Marker 1 to activate it.
Marker Search > Max. Marker 1 is placed at the maximum point within search range 1.
Marker > Marker 2 to activate it.
Marker Search > Min. Marker 2 is placed at the minimum point within search range 1.
Select Trace 2.
By default, search range coupling is turned ON. Marker Search > Search Range > Couple > OFF to turn OFF search range coupling.
Marker > Marker 3 to activate it.
Activate search range 2.
Note that Trace 1 displays search range 1 while Trace 2 displays search range 2.
Marker Search > Max. Marker 3 is now placed at the maximum point within search range 2. Marker 3 at Trace 1 is in parallel with Marker 3 at Trace 2. However, Trace 1 still displays search range 1 while Trace 2 displays search range 2.
By default, marker coupling is turned ON. Marker Fctn > Couple > OFF to turn OFF marker coupling.
Marker > Marker 4 to activate it. As marker coupling is turned OFF, marker 4 is activated for Trace 2 only. To learn more about marker coupling, refer to Setting up markers for each trace/Setting up markers for coupled operations between traces.
Activate search range 2.
Marker Search > Min. Marker 4 is now placed at the minimum point within search range 2. However, note that Marker 4 is not shown at Trace 1.
Click Search Range > Multiple Range > Target Range.
Select the search range number which you want its statistics value to be calculated and shown on the screen.
Press Marker Fctn key.
Click Statistics to turn ON the display of statistics data.
Search tracking is a function that sets a search to be repeated every time a sweep is done even if the execution key for the search (maximum, minimum, peak, and target) is not pressed. This function facilitates observation of measurement results such as the maximum value of traces (e.g., the insertion loss of a band pass filter).
Press Channel Next/Channel Prev keys and Trace Next/Trace Prev keys to activate the trace on which you want to set up search tracking.
Press Marker Search key.
Click Tracking and turn the search tracking function ON/OFF.
You can search for the maximum or minimum measured value on the trace and move a marker to that point.
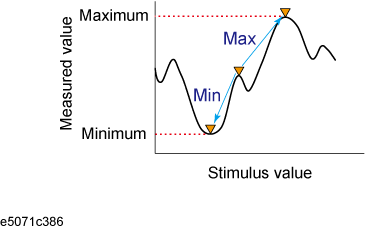
|
Search for maximum (Max) |
Move active marker to point on trace where measured value is greatest |
|
Search for minimum (Min) |
Move active marker to point on trace where measured value is lowest |
Activate the marker you are using to search for the maximum and minimum values.
Press Marker Search key.
Click the corresponding softkey to move the marker to the maximum or minimum measured value.
When the data format is in Smith chart or polar format, execute the search only for the main response value.
The target search is a function that searches for a target that matches the pre-defined target value and transition type(s) (positive, negative, or both positive and negative) and then moves the marker to that target.
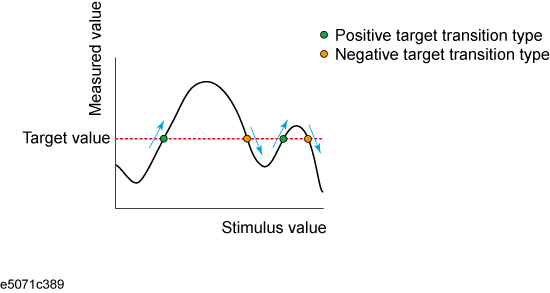
A target is a point that has a specific measured value on the trace. Targets can be divided into the two groups shown below depending on their transition type.
|
Transition type: Positive (Positive) |
When the value of the target is larger than the measured value that immediately precedes it (on the left side) |
|
Transition type: Negative (Negative) |
When the value of the target is smaller than the measured value that precedes immediately it (on the left side) |
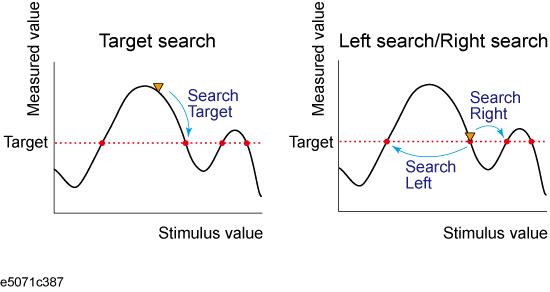
The following three methods are available for executing the target search:
|
Target search (Search Peak) |
The marker moves to the peak with maximum response value if the peak polarity is Positive or Both or to the peak with minimum response value if the peak polarity is Negative. |
|
Search left (Search Left) |
Executes the search from the current marker position to the smaller stimulus values and moves the marker to first target encountered. |
|
Search right (Search Right) |
Executes the search from the current marker position to the larger stimulus values and moves the marker to first target encountered. |
Activate the marker you are using for the target search.
Press Marker Search key.
Click Target > Target Value, then enter the target value.
Click Target Transition, then select a transition type.
Press the corresponding softkey to move the marker to the target.
When the data format is in Smith chart or polar format, execute the search for the main response value of the two marker response values.
Changing the settings of target value or transition type executes new search for multiple target.
The multi-target search is a function that searches for targets that match to pre-defined target value and transition type(s) (positive, negative, or both of positive and negative) and displays markers on the targets being searched.
Depending on the number of detected targets, markers 1 through 9 are displayed from the start frequency. The reference marker is not affected.
When the multi-target search is executed, search and tracking settings for markers 1 through 9 are ignored and the settings for the multi-target search are used.
Press Marker Search > Multi Target > Target Value, then enter the target value.
Click Target Transition, then select a transition type.
Click Search Multi Target to show the markers on the multiple target.
Changing the settings of target value or transition type executes new search for multiple target.
Press Marker > Clear Marker Menu > All OFF to clear all markers.
Search Range is applied for multiple target search, however Multiple Range is not applied.
Search tracking is valid for multiple peak search.
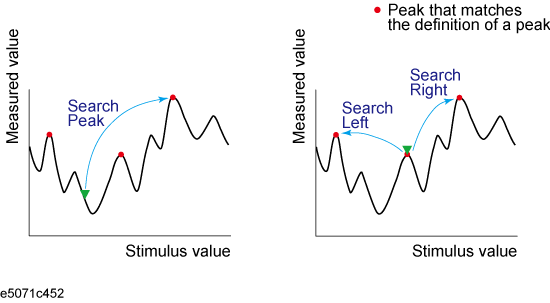
The peak search function enables you to move the marker to the peak on the trace.
A peak is a measurement point whose value is greater or smaller than the adjoining measurement points on its right and left sides. Peaks are classified into the following two types depending on the difference in magnitude from the measurement points on either side of it.
|
Positive peak |
A peak whose measured value is greater than those of the measurement points on either side of it (peak polarity: positive) |
|
Negative peak |
A peak whose measured value is smaller than those of the measuring points on either side of it (peak polarity: negative) |
The peak excursion value is the smaller of the differences in measured values from the adjoining peaks of the opposite polarity.
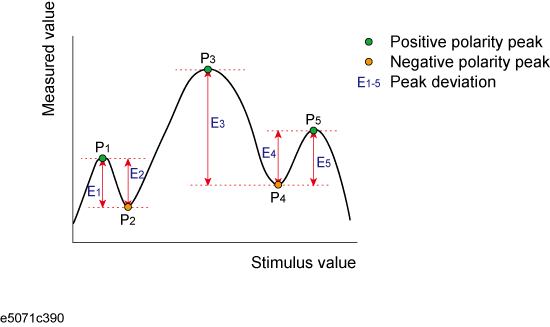
The following three methods are available for executing the peak search:
|
Peak search |
Moves the marker to the maximum peak when peak polarity is Positive or Both. Moves the marker to the minimum peak when peak polarity is Negative. |
|
Left search |
Executes the search from current marker position to the smaller stimulus values and moves the marker to first peak encountered. |
|
Right search |
Execute the search from current marker position to the larger stimulus values and moves the marker to first peak encountered. |
Activate the marker you are using for the peak search.
Press Marker Search key.
Click Peak > Peak Excursion, then enter the lower limit for the peak excursion value.
Click Peak Polarity, then select a peak polarity.
Click the corresponding softkey to move the marker to the peak.
When the data format is in Smith chart or polar format, execute the search for the main response value of the two marker response values.
Changing the settings of peak excursion value or peak polarity executes new search for multiple peak.
The multi-peak search function enables you to display markers on multiple peaks on traces. Depending on the number of detected peaks, markers 1 through 9 are displayed from the start frequency. The reference marker is not affected.
When the multiple peak search is executed, search and tracking settings for markers 1 through 9 are ignored and the settings for the multiple peak search are used.
Press Marker Search > Multi Peak > Peak Excursion, then enter the lower limit for the peak excursion value.
Press Peak Polarity, then select a peak polarity.
Press Search Multi Peak to show the markers on the multiple peaks.
Changing the settings of peak excursion value or peak polarity executes new search for multiple peak.
Press Marker > Clear Marker Menu > All OFF to clear all markers.
Search Range is applied for multiple peak search, however Multiple Range is not applied.
Search tracking is valid for multiple peak search.