Other topics about Time Domain Analysis
|
Item |
Description |
|
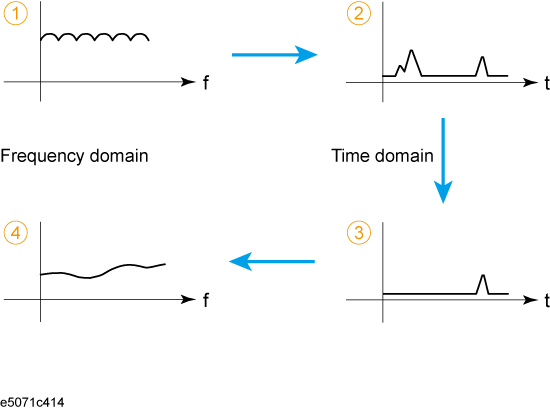
1. Measurement in frequency domain |
Executes measurement in frequency domain |
|
2. Transformation to time domain |
Enables transformation function and transforms measurement data to data in time domain |
|
3. Setting the gate |
Makes the following settings of the gate to select the necessary domain:
|
|
4. Transformation back to frequency domain |
Disables transformation function and displays response in frequency domain corresponding to the data selected with the gate |
The following figure shows the change in the waveform at each step of the flow.

The E5071C lets you choose from the following two gate types:
|
Gate type |
Description |
|
Band pass |
Deletes response outside the gate range |
|
Notch |
Deletes response inside the gate range |
Press Channel Next/Channel Prev keys and Trace Next/Trace prev keys to activate the trace for which you want to set the gate type.
Press Analysis key, then click Gating to display the Gating menu.
Click Type to toggle between band pass (Bandpass) and notch (Notch).
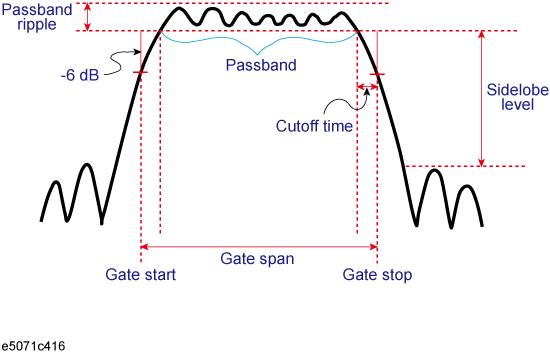
The gate is a filter whose shape looks like a band pass filter. There are several parameters that indicate the gate shape. The following figure shows the definition of the gate shape parameters.

The following table compares the characteristics according to the gate shape. When the shape is "minimum," the cutoff time is shorter and the response is deleted abruptly, but the sidelobe level and band pass ripples become larger. When it is "maximum," cutoff is gentler, but the sidelobe level and the band pass ripple become smaller. The minimum gate span in the following table is the minimum gate range you can set. This value is defined as the minimum gate span necessary for the existence of the pass band and is equal to 2 times the cutoff time.
|
Gate shape |
Passband ripple |
Sidelobe level |
Cutoff time |
Minimum gate span |
|
Minimum |
± 0.13 dB |
- 48 dB |
1.4/frequency span |
2.8/frequency span |
|
Normal |
± 0.01 dB |
- 68 dB |
2.8/frequency span |
5.6/frequency span |
|
Wide |
± 0.01 dB |
- 57 dB |
4.4/frequency span |
8.8/frequency span |
|
Maximum |
± 0.01 dB |
- 70 dB |
12.7/frequency span |
25.4/frequency span |
Press Channel Next/Channel Prev keys and Trace Next/Trace prev keys to activate a trace for which you want to set the gate shape.
Press Analysis key, then click Gating to display the Gating menu.
Press Shape and then select the gate shape.
Specify the gate range in time. The ends of the range are defined as the - 6 dB attenuation points shown in the figure above. You can set the gate range by specifying the start and stop times or the center and span. The E5071C has the following limitations on the gate range you can set.
Lower limit -Tspan
Upper limit Tspan
Tspan is the measurement range expressed in time obtained in Measurement range.
Press Channel Next/Channel Prev keys and Trace Next/Trace prev keys to activate the trace for which you want to set the gate range.
Press Analysis key, then click Gating to display the "Gating" menu.
Press each of the following softkeys to specify the gate range. Distance corresponding to the setting time is displayed at the side of the set value area in the data entry bar. The displayed distance is a value that takes the velocity factor into consideration.
|
Softkey |
Function |
|
Start |
Sets the start time |
|
Stop |
Sets the stop time |
|
Center |
Sets the center of the gate in time |
|
Span |
Sets the gate span in time |
No Hardkey is provided for this setting. The hardkeys are dedicated to setting the sweep range.
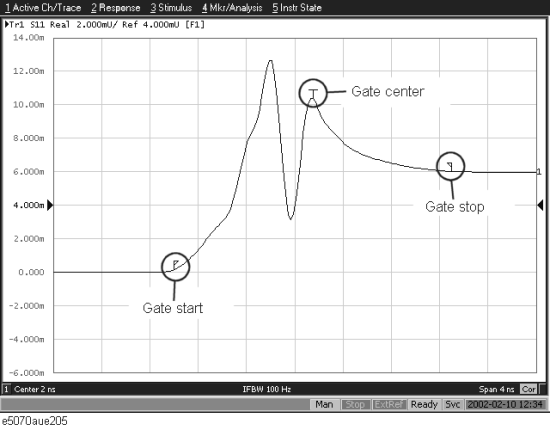
You can set the center and span by dragging and dropping flags indicating the gate range.
When you enable the gating function, data within the specified range is deleted. When the transformation function is enabled, the flags indicating the gate range is displayed as shown in the following figure.
In the figure, the gate type is set to band pass. When it is set to notch, the directions of the flags indicating the ends of the gate range are reversed.

Press Channel Next/Channel Prev keys and Trace Next/Trace prev keys to activate the trace for which you want to use the gate function.
Press Analysis key, then click Gating to display the "Gating" menu.
Use Gating to enable (ON) the gate function.