Using ECal
This topic discusses all aspects of performing an ECal:
See Also:
ECal User-Characterization
Perform a 4-Port Cal with ONE 2-Port ECal Module
Restore ECal Module Memory
See other Calibration Topics
ECal Overview
ECal is a complete solid-state calibration solution. Every ECal module contains electronic standards that are automatically switched into position during a VNA measurement calibration. These electronic standards have been measured at the factory and the data stored within the memory of the ECal module. The VNA uses this stored data, along with the PNA-measured data, to calculate the error terms for a measurement calibration.
ECal modules are available in 2-port and 4-port models and a variety of connector types, covering many frequency ranges. See Analyzer Accessories for more about available ECal modules and ordering information.
You can perform the following calibrations with ECal:
Verify the validity of a mechanical or ECal calibration with ECal confidence check.
Care and Handling of ECal Modules
You can improve accuracy, repeatability, and avoid costly repair of equipment in the following ways.
Power Level into an ECal module
-
NEVER exceed the following Damage levels to the ECal module.
-
For highest accuracy, do not exceed the following ECal Compression levels when calibrating:
|
Model
|
Compression level
|
Damage level
|
|
N469x series
|
-5 dBm
|
+10 dBm
|
|
N4432A series
N4433A series
|
-7 dBm
|
+20 dBm
|
|
N4431x series
|
+7 dBm
|
+20 dBm
|
|
8509x series
|
+9 dBm
|
+20 dBm
|
Connect ECal Module to the VNA
ECal modules are controlled and powered through a USB connection to the VNA. When you connect the module, the VNA automatically recognizes the type of module, frequency range, and connector type.
.
ECal modules connect to the USB port on the front or rear panel of the VNA.
-
Wear a grounded wrist strap when making connections.
-
Connect the USB cable Type B connector to the ECal module and the USB cable Type A connector to the front or rear panel USB connector of the analyzer.
Notes:
-
Unused ECal modules that have completed a calibration may remain connected to the USB port.
-
You can connect and disconnect the ECal module while the analyzer is operating. However, DO NOT connect or disconnect the module while data transfer is in progress. This can result in damage or at least corrupted data.
How to Perform a Calibration Using ECal
Select an ECal module that has connectors of the same type and gender as the DUT. If such an ECal module is not available, a module with connectors different from the DUT can be used by using Advanced Settings or User Characterization. See Also: Perform a 4-Port Cal with ONE 2-Port ECal Module
Connect the ECal module ports to the VNA ports. During the calibration process the VNA can either automatically detect how the ECal module is connected, or the orientation can be performed manually.
-
Connect the ECal module USB cable to the analyzer USB. See Connect ECal Module USB to VNA USB.
-
Allow the module to warm up until it indicates READY.
-
Enter the analyzer settings. See Set Up Measurements.
-
Do one of the following to start the Calibration Wizard
|
|
Using Hardkey/SoftTab/Softkey
|
-
Press Cal > Main > Ecal.
|
|

|
-
In the Guided Calibration Wizard dialog box (step 2), select ECal option from the Cal Kits combo box..
|
|
Select Calibration Ports and ECal Module dialog box help
|
|

Allows you to select calibration type and settings.
Cal Type Selection / Configuration Select the number of ports to calibrate. Then select the port number configuration.
4 Port ECal Available only if using a 4-port VNA. No additional configuration necessary.
3 Port ECal Available only if using a 4-port VNA.
2 Port ECal
1 Port ECal- (Reflection) Advanced Settings are not available.
View/Select ECal Module Click to Select the ECal module if more than one ECal module is connected to the VNA. Also, Select the User Characterization within the module. Learn more about User Characterization.
Show Advanced Settings Check to display the Advanced Settings when Next is clicked.
Back Return to Cal Wizard Begin dialog. If checked, you can clear the Save Preferences checkbox to see the Begin page when the Cal Wizard begins.
Note: The VNA no longer allows ECal isolation to be performed. The inherent isolation of the VNA is better than that attained with correction using an ECal module.
Note: Terminate any unused ECal ports with a 50 ohm load.
Note: Do not connect any USB memory during ECal calibration.
|
|
ECal module not found dialog box help
|
|
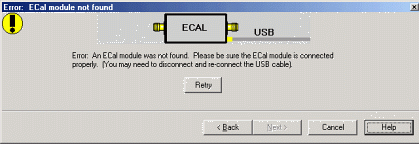
When this dialog appears, the ECal module is not connected or has not been recognized by the network analyzer.
Retry Check the USB connections and click to continue.
Notes:
-
If your ECal module is not detected, try to unplug, then reconnect the USB connector to the VNA.
-
When the ECal module is connected to the network analyzer for the first time, it may take approximately 30 seconds for the analyzer to recognize the module and make it available for calibration.
-
For best accuracy, allow the ECal module to warm-up until it indicates READY.
-
Keysight 8509x and N4431 ECal modules, when first connected, draw significantly more current than other modules. This could cause the USB to stop working in certain situations. See USB limitations.
-
See Connect ECal Module USB to VNA USB.
|
|
Select Module and Characterization dialog box help
|
|
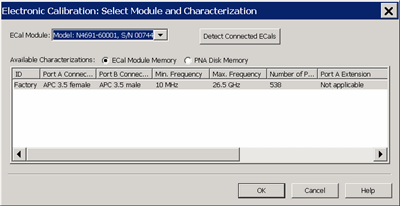
ECal Module Select one of the ECal modules that are connected to the VNA.
Detect Connected ECals Click to rescan the USB for ECal modules.
Available Characterizations
ECal Module Memory - Displays the factory and user characterizations that are stored in the ECal module.
VNA Disk Memory - Displays the user characterizations that are stored in VNA Disk Memory. Learn more User Characterizations in VNA Disk Memory.
Select either the characterization data to use for the calibration. Once selected, that characterization becomes the default selection until the VNA is turned OFF and restarted. When restarted, Factory again becomes the default selection.
|
|
Error: Frequency Range dialog box help
|
|
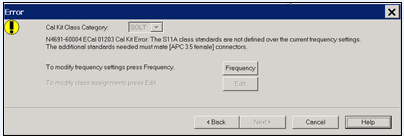
When this dialog appears, the current cal standards (or ECAL module) does not cover the current frequency range of the measurement. Do one of the following to correct the problem:
Cal Kit Class Category Not available with ECal modules.
Frequency Change the frequency range of the active channel.
Edit Not available with ECal modules.
Back Select a different characterization that covers the required frequency range.
Cancel Re-characterize the module with an increased frequency range.
|
|
Select DUT Connectors and Cal Kits dialog box help
|
|
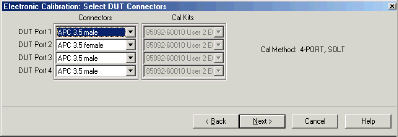
If the ECal module or selected User Characterization has more than one connector type, then the following dialog box is presented which allows you to describe the DUT connector type. Otherwise, click next to proceed to Advanced Settings (if checked) or ECal Steps.
Connectors
The available connectors are listed for each DUT port.
|
|
Advanced Settings dialog box help
|
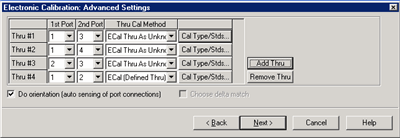
Thru #n
Lists the proposed Thru connections to be made during the calibration process. You can change these Thru connections to better suit your test setup.
Add Thru
Click to add a Thru connection. Learn more
Remove Thru
Select a Thru by clicking the "Thru #N" field or the "1st Port / 2nd Port" field. Then click "Remove Thru". This selection is NOT available if the selected Thru is required for the calibration.
1st Port / 2nd Port
Click to change the two ports to be included in the Thru connection. The order of the port numbers (1st or 2nd) is not critical.
Thru Cal Method
Lists the available Thru Cal methods for the specified port pairs.
Learn about ECal Thru Methods
Cal Type/ Stds
Click to invoke the View / Modify Properties of Cal dialog box
Do orientation
When this box is checked (the default setting) the VNA automatically senses the model and direction in which an ECal module port is connected to the VNA ports. If power to the ECal module is too low, it will appear as if there is no ECal module connected. If you use low power and are having this problem, clear this check box to provide the orientation manually.
Orientation occurs first at the middle of the frequency range that you are calibrating. If a signal is not detected, it tries again at the lowest frequency in the range.
Choose delta match
Available only when a Delta Match Cal is required.
|
|
Specify how the ECal module is connected dialog box help
|
|
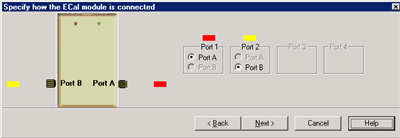
This dialog box appears when the Do orientation checkbox in the previous dialog box is cleared.
Click the ECal Port that is connected to each VNA port.
|
|
Electronic Calibration Steps dialog box help
|
|
Note: ECal can be performed with External triggers. Learn more.
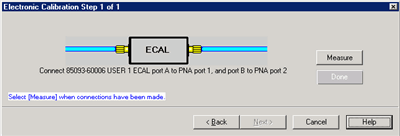
Displays the instructions for each measurement required for calibration.
Measure Measures the ECal standards.
Done Click when last standard has been measured.
|
Saving an ECal Calibration
When complete, you can save the new calibration. Learn how.
Last modified:
![]()


