Controlling the PXB Over LAN
The LAN interface can be used to control the
PXB using a PC. The PXB can be remotely programmed via a 100Base-T LAN
interface or 10Base-T LAN interface and LAN-connected computer using one
of several LAN interface protocols. LAN and its associated interface operations
are defined in the IEEE 802.2 standard. For more information, refer to http://www.ieee.org.
The PXB supports the following LAN (TCP/IP)
interface protocols used for general programming using the LAN interfaces:
Other supported LAN capabilities include:
-
Telnet LAN can be
used for communicating over LAN with the PXB for interactive, one command
at a time instrument control on port 5024.
-
Sockets
LAN accesses port 5025 on the PXB to control the PXB using SCPI commands
that are output to a socket connection established in your program.
-
FTP can be used to transfer
files between the PXB and any computer connected to the LAN. When logged
onto the PXB with the FTP command, the PXB's file structure can be accessed.
View the following topics for related information.
Configuring the LAN Interface
Setting
IP Addresses Manually on the PXB (Static)
The following procedure shows how to set a static
IP address for the PXB. For further information on setting a static IP
address, refer to the Windows online help.
-
On
the PXB, click Start > Control Panel.
-
Click
Network and Internet Connections.
-
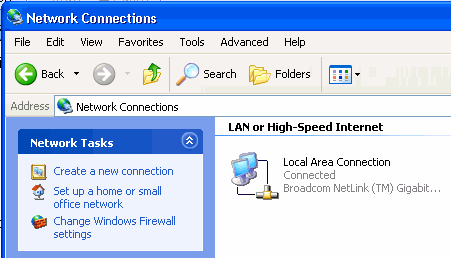
Click
Network Connections to view the LAN connection.  Illustration...
-
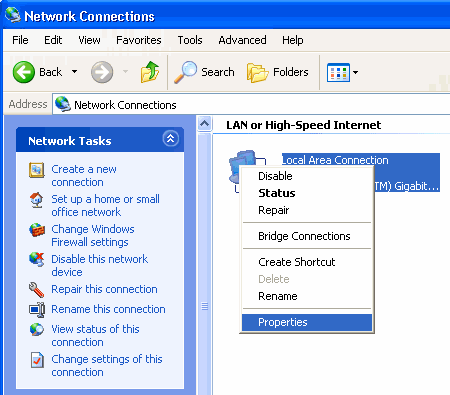
Right-click
the Local Area Connection icon.
-
Select
Properties. Illustration...
-
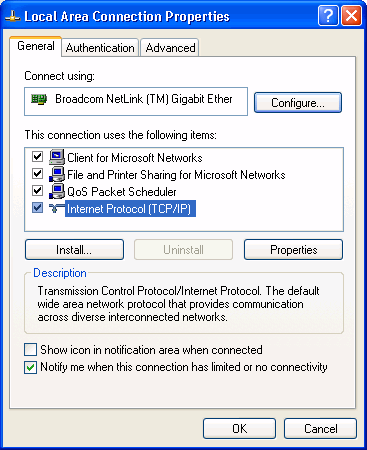
In
the Local Area Connection Properties dialog, select Internet Protocol
(TCP/IP), then click the Properties button. Illustration...
-
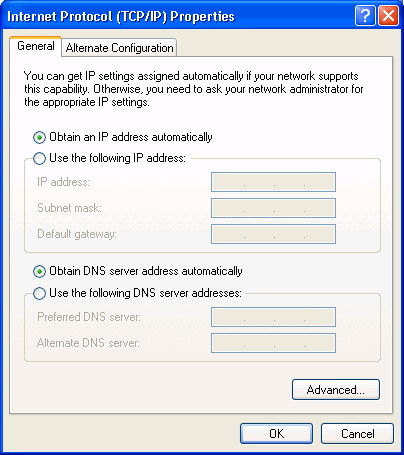
In
the Internet Protocol (TCP/IP) Properties dialog, select Use
the following IP address and enter the IP address, Subnet mask,
and Default gateway. If you are not sure which addresses to use, contact
your system administrator. Illustration...
-
Enter
the Preferred DNS server address of the primary DNS server and enter the
Alternate DNS server address of the secondary DNS server. If you are not
sure which addresses to use, contact your system administrator.
-
Click
OK.
DHCP Configuration
DHCP (dynamic host configuration protocol) automatically
assigns IP addresses for instruments on the network. In DHCP mode, the
PXB will request a new IP address from the DHCP server upon rebooting
to determine the assigned IP address.
If the DHCP server uses dynamic DNS (domain
name system) to link the hostname with the assigned IP address, the hostname
may be used in place of the IP address. Otherwise, the hostname is not
usable.
Return
to top
The following procedure shows how to configure
the PXB as a DHCP client.
-
On
the PXB, click Start > Control Panel.
-
Click
Network and Internet Connections.
-
Click
Network Connections to view the LAN connection. Illustration...
-
Right-click
the Local Area Connection icon.
-
Select
Properties. Illustration...
-
In
the Local Area Connection Properties dialog, select Internet Protocol
(TCP/IP), then click the Properties button. Illustration...
-
In
the Internet Protocol (TCP/IP) Properties dialog, select Obtain
an IP address automatically. Illustration...
-
Click
OK.
Setting
up Private LAN
You can connect the PXB directly to a PC using
a crossover cable. To do this, you should either set the IP addresses
of the PC and PXB to differ only in the last digit (example: PC’s
IP: 1.1.1.1 and PXB’s IP: 1.1.1.2); or you can use the DHCP feature
or Auto-IP feature if your PC supports them. For more information refer
to the Connection Guide in the Agilent Connection Expert Help.
Return
to top
Configuring for Sockets LAN
|

|
Users with Windows XP operating systems and newer can use this section
to better understand how to use the PXB with port settings. For more information,
refer to the help software of the IO libraries being used.
|
Sockets LAN is a method used to communicate
with the PXB over the LAN interface using the Transmission Control Protocol/Internet
Protocol (TCP/IP). A socket is a fundamental technology used for computer
networking and allows applications to communicate using standard mechanisms
built into network hardware and operating systems. The method accesses
a port on the PXB from which bidirectional communication with a network
computer can be established.
Sockets LAN can be described as an internet
address that combines Internet Protocol (IP) with a device port number
and represents a single connection between two pieces of software. The
socket can be accessed using code libraries packaged with the computer
operating system. A common version of socket library is the Winsock for
Microsoft operating systems.
The PXB implements a sockets Applications Programming
Interface (API) that is compatible with Winsock for Microsoft systems.
The PXB is also compatible with other standard sockets APIs. The PXB can
be controlled using SCPI commands that are output to a socket connection
established in your program.
Before you can use sockets LAN, you must select
the PXB’s sockets port number to use:
-
On
the PC, click the Agilent IO Control icon
in the lower-right of the Windows desktop.
-
Select
Agilent Connection Expert from the pop-up menu.
-
In
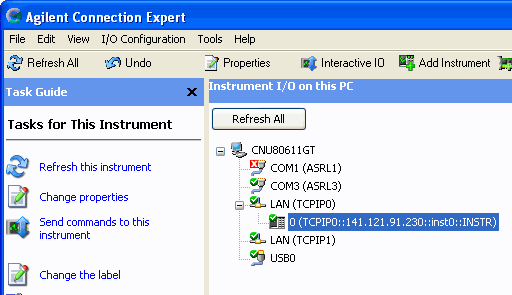
the Connection Expert explorer pane, select the LAN instrument. Illustration...
-
In
the LAN instrument pane, click the Change
Properties... button. Illustration...
-
Click
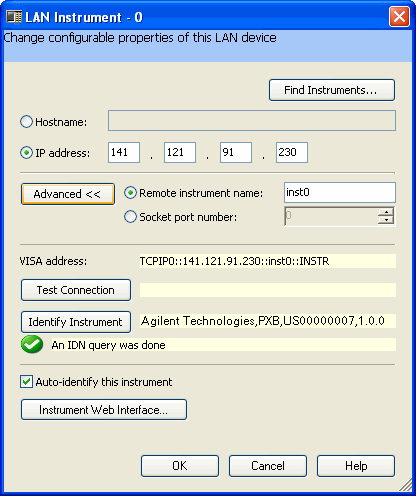
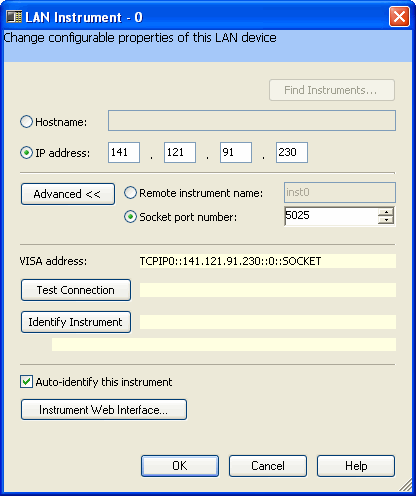
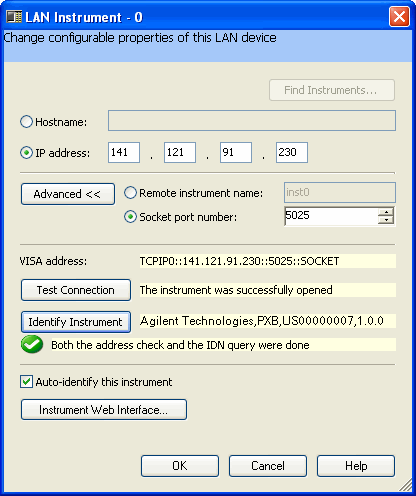
the Advanced<< button. Illustration...
-
Select
the Socket port number and enter the port number. Illustration...
-
Click
the Test Connection and Identify Instrument buttons to verify the connection
is functioning properly. Illustration...
-
Click
OK.
Return
to top
Verifying the LAN Connection
For LAN operation, the PXB must be connected
to the LAN using a 100Base-T LAN or 10Base-T LAN cable. If the site LAN
supports DHCP (dynamic host configuration protocol), IP addresses for
instruments are automatically assigned by the network. If the site LAN
does not support DHCP or if you want to set a fixed (static) IP address
for the PXB, the system administrator must assign the static IP addresses
and you must manually configure the PXB. The PXB is set to use DHCP.
-
Connect
the PC and the PXB to the LAN using a 100Base-T LAN or 10Base-T LAN cable.
-
Turn
the PC and PXB power on.
-
On
the PC, click the Agilent IO Control icon
in the lower-right of the Windows desktop.
-
Select
Agilent Connection Expert from the pop-up menu.
-
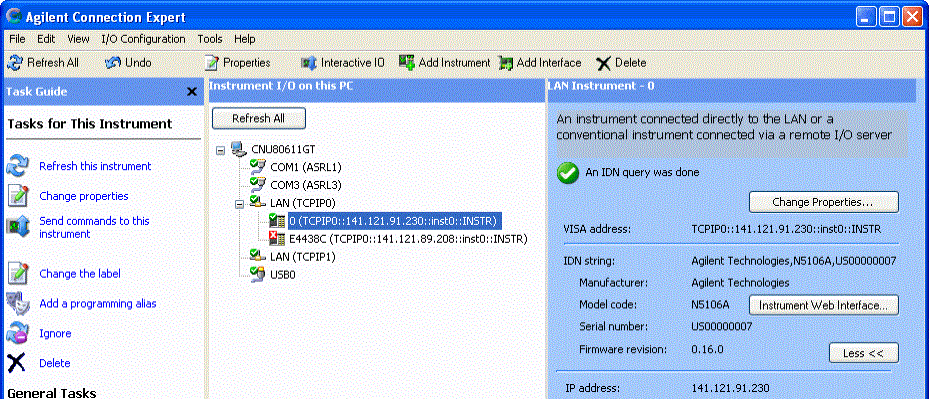
Agilent
Connection Expert will automatically scan the LAN for instruments connected
directly to the LAN or connected via a remote I/O server. If Agilent Connection
Expert discovered the PXB, you will see the LAN instrument entry under
the appropriate TCP/IP interface (for example, under TCPIP0). Illustration...
-
If
the Agilent Connection Expert did not discover the PXB, perform the following
procedure.
-
Select
a TCP/IP interface node in the Connection Expert explorer pane. If there
is not a TCP/IP interface available, or if you wish to use different connection
parameters (such as different connect timeouts), click Add
Interface on the Connection Expert tool bar to create a new TCP/IP
interface.
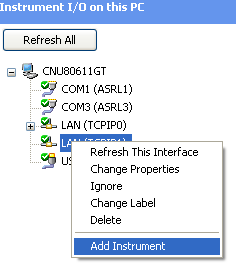
-
Right-click
the TCP/IP interface node and select Add
Instrument. Illustration...
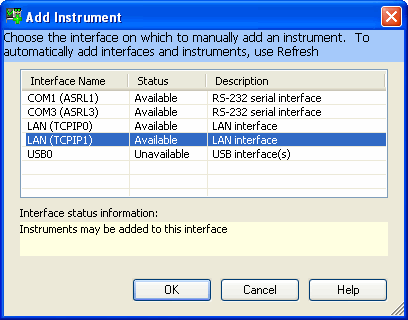
-
The
instrument will be added to the selected interface by default.
-
Click
OK to accept that default in the Add Instrument dialog box. Illustration...
-
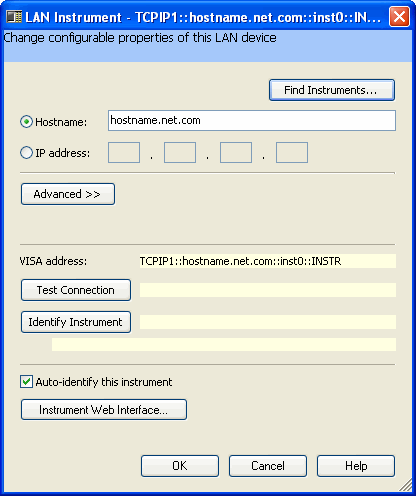
The
dialog box to configure the LAN instrument is displayed. Ensure that the
Auto-identify this instrument box is checked. Illustration...
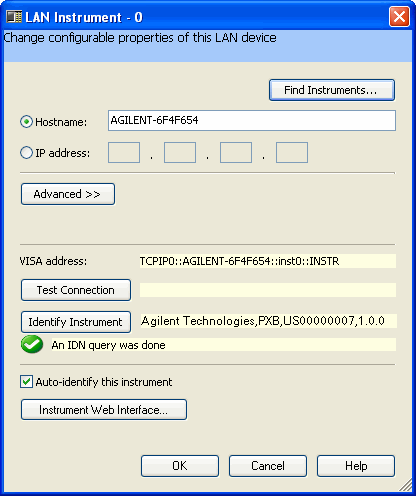
You may want to use a hostname when your network
is set up to use DHCP to dynamically assign an IP address at the time
each PC, instrument, or interface either starts up or restarts. This requires
that your network have a DNS (domain name system) server to provide the
DHCP service and map the hostname to an IP address. Note that the VISA
address string includes either the hostname or the IP address in the actual
connection address.
-
If you want to use the PXB's
hostname (full computer name), select Hostname,
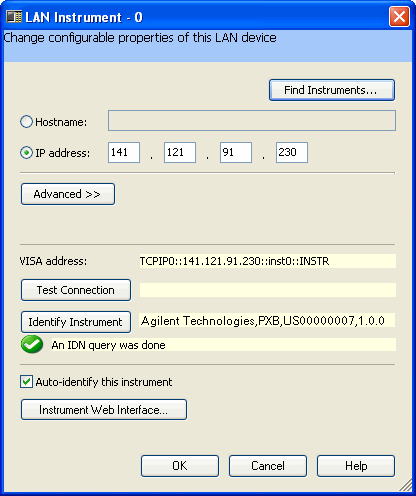
and enter the PXB's hostname. Illustration...
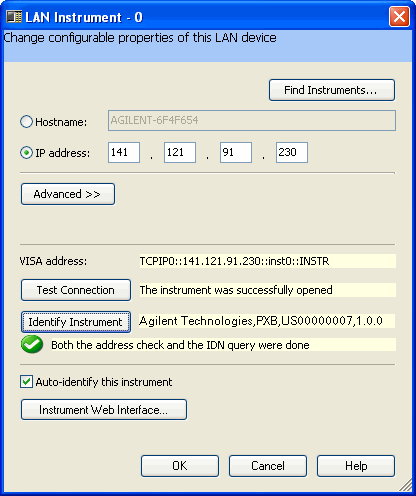
-
If
you want to use the PXB's IP address, select IP
address, and enter the PXB's IP address. Illustration...
-
Click
Test Connection and Identify
Instrument to ensure that your connection to the instrument is
active and that you have selected the right instrument (in this case the
PXB). Illustration...
-
Click
OK to exit Connection Expert.
LAN Programming Interface
Example
Refer to the Agilent IO Libraries documentation and the Agilent IO Libraries
programming examples for information on how to open a session with an
instrument.
Return
to top
Troubleshooting the LAN
Interface
Verify the communications link between the PC
and the PXB remote file server using the ping utility. Compare your ping
response to those described in the LAN
Ping Responses description.
From the MS-DOS® Command Prompt or Windows environment,
type:
ping
-n 10 <hostname or IP address>
where <hostname
or IP address> is your instrument’s name or IP address
and 10 is the number of echo requests. Type ping at the command prompt
for details on the ping command.
|
|
In DHCP mode, if the DHCP server uses dynamic DNS to link the hostname
with the assigned IP address, the hostname may be used in place of the
IP address. Otherwise, the hostname is not usable and you must use the
IP address to communicate with the PXB over the LAN.
|
LAN
Ping Responses
|
Normal Response for DOS or Windows
|
A normal response to the ping command will be
a total of 9 or 10 packets received if 10 echo requests were specified.
|
|
Error Messages
|
If error messages appear, check the command
syntax before continuing with troubleshooting. If the syntax is correct,
resolve the error messages using your network documentation or by consulting
your network administrator.
If an unknown
host error message appears, try using the IP address instead of the hostname.
Also, verify that the host name and IP address for the PXB have been registered
by your IT administrator.
Check that the hostname and IP address are correctly
entered in the node names database. To do this, enter the nslookup
<hostname> command from the command prompt.
|
|
No Response
|
If there is no response from a ping, no packets
were received. Check that the typed address or hostname matches the IP
address or hostname assigned to the PXB in the System
> Product Information menu in the PXB user interface.
Ping each node along the route between your
workstation and the PXB, starting with your workstation. If a node doesn’t
respond, contact your IT administrator.
If the PXB still does not respond to ping, you
should suspect a hardware problem.
|
|
Intermittent Response
|
If you received 1 to 8 packets back, there maybe
a problem with the network. In networks with switches and bridges, the
first few pings may be lost until these devices ’learn’ the
location of hosts. Also, because the number of packets received depends
on your network traffic and integrity, the number might be different for
your network. Problems of this nature are best resolved by your IT department.
|
Return
to top
Using Interactive IO
Use the Agilent Connection Expert Interactive
IO available in the Agilent IO Libraries Suite to verify instrument communication
over the LAN interface by using standard IEEE 488.2 commands.
-
On
the PC, click the Agilent IO Control icon
in the lower-right of the Windows desktop.
-
Select
Agilent Connection Expert from the pop-up menu.
-
In
the Connection Expert explorer pane, select the LAN instrument connection
currently connected to the PXB. Illustration...
-
In
the LAN Instrument pane, note that an IDN query (identification string)
was done indicating whether or not the LAN connection to the PXB has been
made.
-
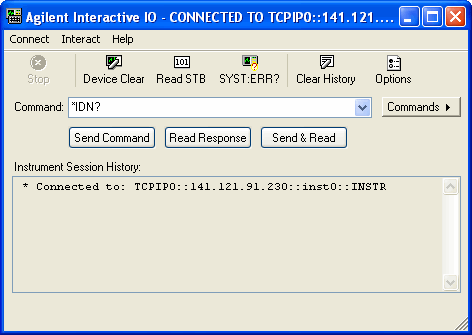
Select
Interactive IO from the Connection
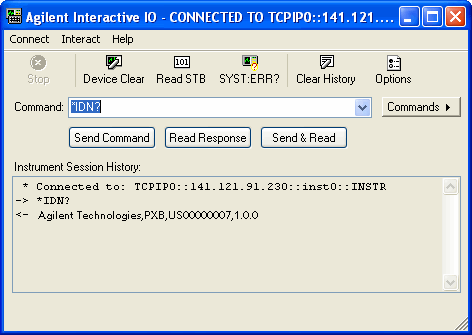
Expert tool bar. The Agilent Interactive IO dialog box is displayed. Illustration...
-
With
the *IDN? command in the Command box, click Send & Read. Illustration...
The default command is the Identification (IDN) query, which outputs
an identifying string. The response will show the following information:
<company name>, <model number>, <serial number>,
<firmware revision>
-
Close
the Agilent Interactive IO dialog box and then the Agilent Connection
Expert.
If
You Have Problems
-
If
you are experiencing problems with the LAN connection on the PXB, verify
the rear panel LAN connector green LED is on.
-
For
additional information on troubleshooting your LAN connection, refer to
the online help in the Agilent IO Libraries and documentation for LAN
connections and problems.
Return
to top