Controlling the PXB Using
GPIB
The GPIB interface in the PXB is shipped from the factory configured
as a listener, which means that it is ready to be controlled over GPIB.
The PXB's internal GPIB interface can also be configured
as a talker (output or controller) using the Agilent IO Libraries.
|

|
Only one device can be the system controller (it is usually the device
installed in the PC or PXB). Each GPIB interface has its own independent
bus. Thus, each interface may be a system controller as long as it is
not chained together with other GPIB interfaces. However, two or more
system controllers on the same bus will cause the bus to be inoperative.
|
GPIB and its associated interface operations
are defined in the ANSI/IEEE Standard 488.1-1987 and ANSI/IEEE Standard
488.2-1992. See the IEEE website, http://www.ieee.org, for details on these standards.
View the following topics for related information.
Installing the
GPIB Interface in Your PC
The following
table lists some of the available interface cards that can be installed
in the remote PC used to control the PXB. Follow the interface card instructions
for installing and configuring the card. Refer to the Agilent website,
http://www.agilent.com/find/gpib,
for details on GPIB interface cards.
|
Interface Type
|
Operating System
|
IO Library
|
Languages
|
Backplane/BUS
|
Max IO (kB/sec)
|
Buffering
|
|
Agilent GPIB Interface Card
for PC-Based Systems
|
|
|
|
|
|
|
|
Agilent 82341C for ISA bus computers
|
WindowsTM
95/98 / NT/ 2000®
|
VISA / SICL
|
C/C++, Visual Basic, Agilent VEE, HP Basic for
Windows
|
ISA/EISA, 16 bit
|
750
|
Built-in
|
|
Agilent 82341D Plug&Play for PC
|
Windows 95
|
VISA / SICL
|
C/C++, Visual Basic, Agilent VEE, HP Basic for Windows
|
ISA/EISA, 16 bit
|
750
|
Built-in
|
|
Agilent 82350A for PCI bus computers
|
Windows 95/98 / NT / 2000
|
VISA / SICL
|
C/C++, Visual Basic, Agilent VEE, HP Basic for Windows
|
PCI 32 bit
|
750
|
Built-in
|
|
Agilent 82350B for PCI bus computers
|
Windows 98(SE)/ME/ 2000 / XP / Vista
|
VISA / SICL
|
C/C++, Visual Basic, Agilent VEE, HP Basic for Windows, NI LabView,
Visual Studio
|
PCI 32 bit
|
> 900
|
Built-in
|
|
Agilent 82351A for PCIe bus computers
|
Windows 2000 /XP / Vista
|
VISA / VISA COM / SICL/NI-488.2
|
C++, Visual Basic, Agilent VEE, HP Basic for Windows, NI LabView,
Visual Studio
|
PCIe 32 bit
|
1.4 MBps
|
Built-in
|
|
NI-GPIB Interface Card for
PC-Based Systems
|
|
|
|
|
|
|
|
National Instruments
PCI-GPIB
|
Windows
95 / 98 / 2000 / ME / NT
|
VISA NI-488.2
|
C/C++, Visual BASIC, LabView
|
PCI 32 bit
|
1.5 MBps
|
Built-in
|
|
National Instruments PCI-GPIB+
|
Windows 2000 / ME / NT / XP
|
VISA NI-488.2
|
LabView, Visual Studio, LabWindows / CVI, Measurement
Studio
|
PCI 32 bit
|
1.5 MBps
|
Built-in
|
USB to GPIB Interface
You can also connect the PXB's GPIB interface to the PC's USB port using
the Agilent 82357B USB/GPIB Interface Converter, which eliminates the
need for a GPIB card in the PC. Before connecting the interface converter
from your PC to the PXB, ensure that your PC has the latest IO libraries
and 82357B driver installed.
With the USB/GPIB converter, the USB interface functions as a GPIB interface
to the external instruments.
|
Interface Type
|
Operating System
|
IO Library
|
Languages
|
Backplane/BUS
|
Max IO (kB/sec)
|
Buffering
|
|
Agilent USB/GPIB Interface
Converter for PC-Based Systems
|
|
|
|
|
|
|
|
Agilent 82357A Converter
|
Windows 98(SE)/ME/
2000/XP
|
VISA / SICL
|
Visual C++, Visual Basic, Agilent VEE, HP Basic
for Windows, NI LabView, Visual Studio
|
USB 2.0
(1.1 compatible)
|
850
|
Built-in
|
|
Agilent 82357B Converter
|
Windows 2000/ XP /Vista
|
VISA / VISA COM / SICL
|
Visual C++, Visual Basic, Agilent VEE, HP Basic
for Windows, NI LabView, Visual Studio
|
USB 2.0
|
1.15 MBps
|
Built-in
|
Verifying the GPIB Connection
Connect a GPIB interface cable between the PXB
and the PC. The following table lists cable part numbers.
|
Model
|
10833A
|
10833B
|
10833C
|
10833D
|
10833F
|
10833G
|
|
Length
|
1 meter
|
2 meters
|
4 meters
|
.5 meter
|
6 meters
|
8 meters
|
Confirm the PXB is Configured
as a Listener
The PXB is set to listener as its default configuration. You can verify
this using the following procedure.
-
On
the PXB, click the Agilent IO Control  icon
in the lower-right of the Windows desktop.
-
Select
Agilent Connection Expert from the popup menu.
-
In
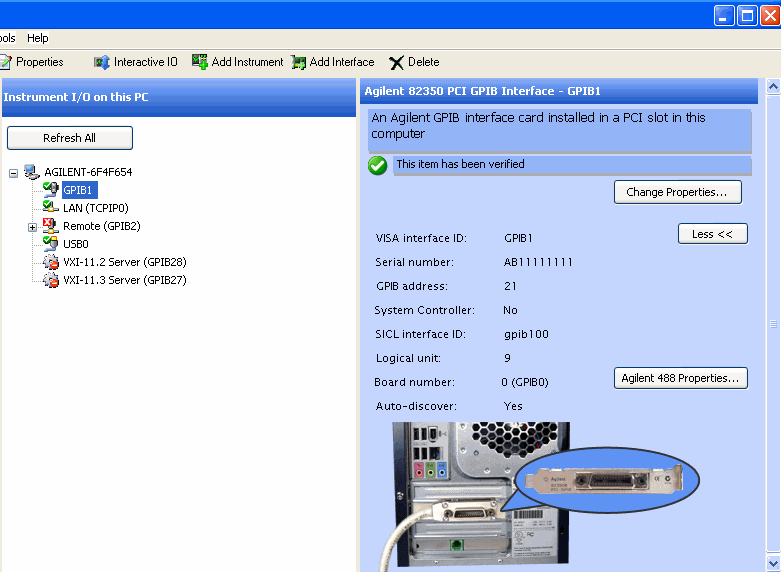
the Connection Expert explorer pane, select the PXB's GPIB interface node.
 Illustration...
-
In
the Agilent 82350 PCI GPIB Interface panel, ensure that System Controller
is not selected.  Illustration...
-
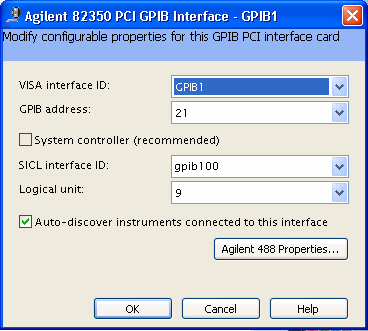
If
System Controller is selected, click the Change
Properties... button, and perform the following procedure.
-
Clear
the System controller (recommended) check box.
-
Click
OK to accept the changes.
-
Close
the Agilent Connection Expert.
-
Ensure
that the Agilent IO Libraries Suite is installed on your PC.
-
Reboot
the PXB.
Configure the PC
The following procedure
shows how to set up the connection to the PXB from the remote PC after
you have installed the GPIB card in your PC.
-
Ensure
that your PC has a GPIB card installed and ready for use.
-
On
the PC, click the Agilent IO Control  icon
in the lower-right of the Windows desktop.
-
Select
Agilent Connection Expert from the pop-up menu.
-
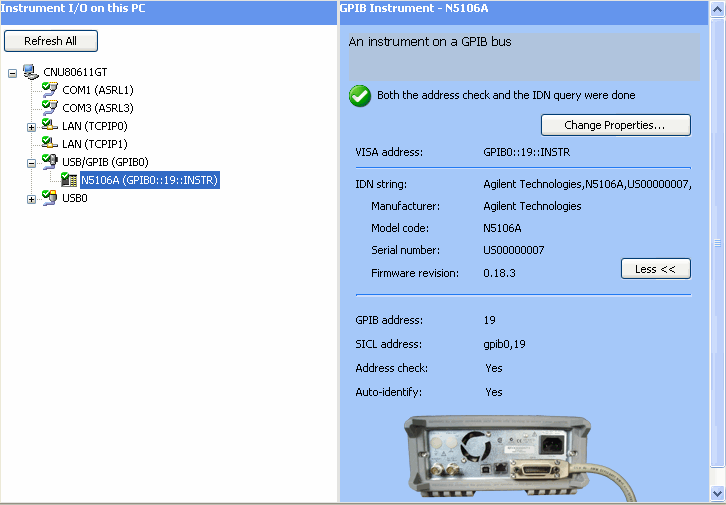
In
the Connection Expert explorer pane, select the PXB's GPIB instrument
connection.  Illustration...
-
In
the GPIB Instrument panel, click the Change
Properties... button.
-
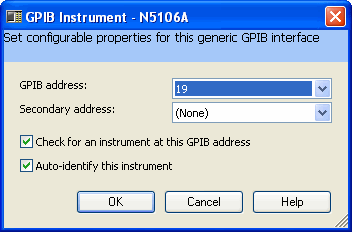
If
you have changed
the PXB's GPIB address, ensure that you select the correct address
in the GPIB address drop-down menu.  Illustration...
-
If
desired, select a secondary address using the Secondary address drop-down
menu.
-
Click
OK to accept the changes.
-
Close
the Agilent Connection Expert.
Setting the PXB GPIB Address
The following procedure sets the PXB's GPIB address from the PXB user
interface.
If several devices
exist on a bus, be sure each has a unique GPIB bus address.
-
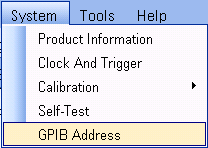
In
the PXB user interface, select System
in the menu bar.  Illustration...
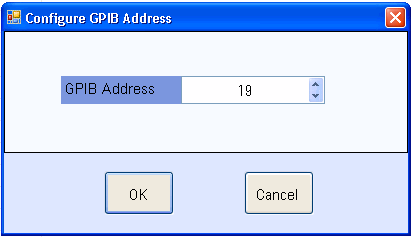
-
Select
GPIB Address to access the Configure GPIB Address dialog box.  Illustration...
-
Select the desired address using
the up or down arrow. The default GPIB
address is 19 and the range is 130.–
-
Click
OK.
Return to top
GPIB Programming Interface
Examples
Refer to the Agilent IO Libraries documentation and the Agilent IO Libraries
programming examples for information on how to open a session with an
instrument.
Before Using the GPIB Examples
The PXB is shipped
with the Agilent VISA library and SICL already installed. If the National
Instruments PCI-GPIB interface card is used, the NI-VISA library along
with the NI-488.2 library should be installed. However, if the Agilent
Connection Expert is used, the NI-VISA library does not have to be installed
if the National Instruments PCI-GPIB interface card is used. Refer to Selecting IO Libraries for GPIB and
the documentation for your GPIB interface card for details.
Troubleshooting the
GPIB Interface
Using Interactive IO
Use the Agilent Connection Expert Interactive
IO available in the Agilent IO Libraries Suite to verify instrument communication
over the GPIB interface by using standard IEEE 488.2 commands.
-
On
the PC, click the Agilent IO Control  icon
in the lower-right of the Windows desktop.
-
Select
Agilent Connection Expert from the popup menu.
-
In
the Connection Expert explorer pane, select the GPIB instrument connection
currently connected to the PXB.
-
In
the GPIB Instrument pane, note that an IDN query (identification string)
was done indicating whether or not the GPIB connection to the PXB has
been made.
-
Select
Interactive IO from the Connection
Expert tool bar. The Agilent Interactive IO dialog box will be displayed.
-
With
the *IDN? command in the Command box, click Send & Read.
The default command is the Identification (IDN) query, which outputs
an identifying string. The response will show the following information:
<company name>, <model number>, <serial number>,
<firmware revision>
-
Close
the Agilent Interactive IO dialog
box, then close the Agilent Connection Expert.
If You Have Problems
-
Verify
that the PXB’s address matches the address declared in the program.
-
Remove
all other instruments connected via GPIB and rerun the program.
-
Verify
that the GPIB card’s name or ID number matches the GPIB name or
ID number configured for your PC.
Return
to top
![]()
 icon
icon