Advanced Uplink and PRACH Waveform Data Source Selection Dialog Box
The software uses the Advanced and PRACH Data Source Selection dialog box for the following uplink channels found in the Adv W-CDMA/HSPA+ UL (Rel 8 Dec 08) carrier and the Adv W-CDMA FDD PRACH carrier:
|
DPCCH |
E-DPCCH |
|
DPDCH |
E-DPDCH |
|
PRACH |
|
Typically there are two ways to select the data type within the dialog box:
-
Place the cursor on the radio selection and left click—the only method for the DPCCH TPC pattern
-
Use key board shortcut keys (the software accepts upper or lower case characters):
-
Alt+9 = PN9
-
Alt+5 = PN15
-
Alt+D = DCH
-
Alt+E = E-DCH
-
Alt+H = HAPPY
-
Alt+N = Not Happy
-
Alt+R = RACH
-
Alt+S = STD
-
Alt+U = User Defined Bits
-
Alt+O = OK
-
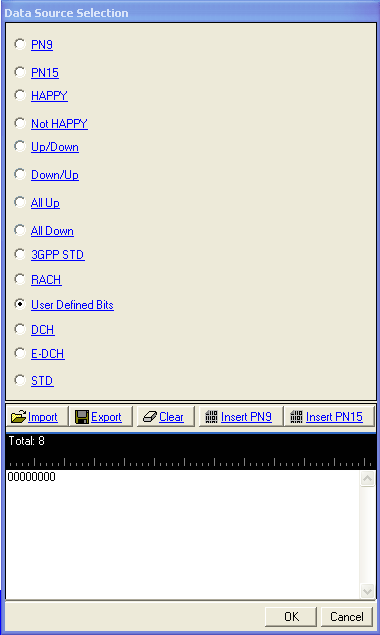
Not all channels contain all of the selections shown.
PN9
The software provides a pseudo-random bit sequence containing 511 bits (29-1) . When there are not enough bits left in the PN sequence to fill a frame, the software truncates the remaining data and repeats the data sequence.
When using the Real-time Modulation Filter, the software transmits the entire PN9 sequence.
PN15
The software provides a pseudo-random bit sequence containing 32767 bits (215-1) . The software truncates the data when there is more than what can fit into the frames.
HAPPY / Not Happy
The Happy bit is transmitted on the E-DPCCH when its data type selection is . The HAPPY bit informs the basestation as to whether the UE is happy with the current Serving Grant.
Up/Down
The software uses this selection on the DPCCH. It informs the basestation to repetitively step the power up in 1 dB steps and then down in 1 dB steps. Define the number of steps using the TPC Number of Steps cell.
Down/Up
The software uses this selection on the DPCCH. It informs the basestation to repetitively step the power down in 1 dB steps and then up in 1 dB steps. Define the number of steps using the TPC Number of Steps cell.
All Up
The software uses this selection on the DPCCH. It informs the basestation to consecutively step the power up in 1 dB steps.
All Down
The software uses this selection on the DPCCH. It informs the basestation to consecutively step the power down in 1 dB steps.
User Defined Bits
This selection opens the user  data entry
area,
which lets you customize the transmitted data. When creating a TPC pattern
for the DPCCH, 1 steps up the power and 0 steps down the power.
data entry
area,
which lets you customize the transmitted data. When creating a TPC pattern
for the DPCCH, 1 steps up the power and 0 steps down the power.
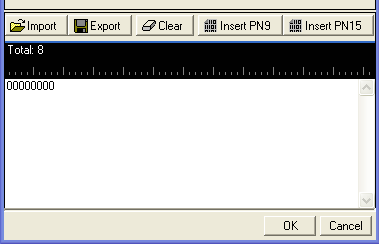
The user data area contains buttons to import, export, or clear user data along with the ability to insert PN9 or PN15 data. Optionally you can manually insert or delete data. To manually insert data, simply place the cursor within the data entry area or highlight existing bits, and insert data. There are three ways to insert data:
-
using the 1 and 0 keys on the keyboard
-
using the Insert PN9 or Insert PN15 buttons
-
pasting data from a file or from within the current view
(The key board shortcuts Cntl+C and Cntl+V work for user data entry.)
To delete data, simply place the cursor at the desired location within the data or highlight bits, and delete the data. The key board shortcut Cntl+Z also deletes highlighted data.
The maximum number of bits for the user data entry area is data type dependent:
-
PRACH data and E-DPCCH HAPPY bit—65,536 bits
-
All other data types—400,000 bits
The software lets you create a file larger than it uses. When this occurs, the software truncates the excess data. Conversely, if there are not enough bits in the file to fill a frame, the software repeats the data pattern until it is filled.
DCH
This is a data selection on the DPDCH and enables the use of two transport channels: DCH1 and DCH2. After making the data type selection of DCH, set the data type for each of the transport channels.
E-DCH
This is a data selection on the E-DPDCH and enables the use of the transport channel E-DCH. After making the data type selection of E-DCH, set the data type for the transport channel.
RACH
This is a data selection in the PRACH, Msg-Data Data cell and enables the use of the transport channel. After making the data type selection of RACH, set the data type for the transport channel.
3GPP STD
This is a data selection in the PRACH, Msg-Ctrl Data cell. It configures the data field in accordance with the 3GPP standards.
STD
This is a data selection on the DPCCH and the E-DPCCH. It configures the data field in accordance with the 3GPP standards. For the E-DPCCH, this selection enables the transmission of the HAPPY Bit.
Import
This button loads a user-defined pattern from a selected location. When you select this button, the Open user defined data dialog box appears for navigating to and selecting the desired file. An imported file automatically updates the user data entry area. The software accepts the following file types:
ASCII text
comma separated values (csv)
binary
The maximum file size is data type dependent:
E-DPCCH HAPPY bit—65,536 bits
All other data types—400,000 bits
If the imported file is larger than the maximum allowed bits, the software truncates the bits to conform to the maximum file size.
Export
This button saves the current data pattern, showing in the user data entry area, to a file. When you select this button, a Save user defined data dialog box appears for navigating to the location where you can save the file. The software saves the user data as one of the following selected file types:
ASCII text
comma separated values (csv)
binary
Clear
This button clears all data showing in the user data entry area.
Insert PN9
This button inserts a fixed pattern pseudo-random bit sequence containing 511 bits (29-1) into the user data entry area. The software generates this fixed pattern in accordance with the CCITT recommendation O.153. Repeated clicking of this button adds additional PN9 sequences until the software attains the maximum file size:
PRACH Data and HAPPY Bit—65,536 bits
all other data types—400,000 bits.
The software truncates data in excess of the maximum file size.
To edit the data pattern, insert the cursor at the desired point in the file and click or enter the information manually using the keyboard keys 1 and 0. The software inserts the data at the cursor position and truncates all data in excess of maximum number of bits.
Insert PN15
This button inserts a fixed pattern pseudo-random bit sequence containing 32767 bits (215-1) into the user data entry area. The software generates this fixed pattern in accordance with the CCITT recommendation O.153. Repeated clicking of this button adds additional PN9 sequences until the software attains the maximum file size:
PRACH Data and HAPPY Bit—65,536 bits
all other data types—400,000 bits.
The software truncates data in excess of the maximum file size.
To edit the data pattern, insert the cursor at the desired point in the file and click or enter the information manually using the keyboard keys 1 and 0. The software inserts the data at the cursor position and truncates all data in excess of maximum number of bits.