In parameter view windows, you can check
 and then click the desired parameter for a brief description.
The following example procedure shows you how to configure the equipment and Signal Studio software for a typical RDS information receiver test.
In parameter view windows, you can check
and then click the desired parameter for a brief description.
Set up the equipment as shown below.
Select the format.
Open the software and select FM Stereo/RDS from the Format menu.
Configure the carrier parameters.
Select Carrier 0 from the tree view.
This opens four tables of carrier parameters
you can set for that carrier. If your test setup requires multiple carriers,
click  to create up to 11 additional carriers.
Set up the following parameters of each carrier to the values shown below.
75.00kHz
19.000kHz
38.000kHz
57.000kHz
Click RDS in the tree view, and perform the following steps for each carrier.
Enter the, which is the 16-bits programme identification code.
Select the .

Configure the RDS Message.
Clickand configure the following parameters in the message table, as shown below.
: 0.0s
: Music
: This example shows RDS Test.
: On
: your choice
Click and configure the parameters in the message table as desired.
Click on and input a text string of your choice. This example shows Radio Text. If you would like to import a text file, do the following:
Click  , a drop-down
menu appears.
, a drop-down
menu appears.
Select . A dialog box appears.
Click to navigate to the .txt file of your choice. You can also specify the , and
Click cell, and select the . This example shows 08-08, 2008.
Click and cell, and select the time. This example shows 00:00.
Rerun this step for flexible RDS receiver tests with different configurations (tests at different levels).
Configure the signal generator settings.
Click the Signal Generator node in the tree view and set the frequency and amplitude to the values below.
Frequency: 98.000 000 000 MHz
Amplitude: -30.00 dBm
Generate and download the waveform to the signal generator.
From the tool bar, Click
 to generate the waveform .
Observe the message area of the status bar to track waveform generation progress.
If you want to generate and
download the waveform at the same time, click  to complete generating and downloading.
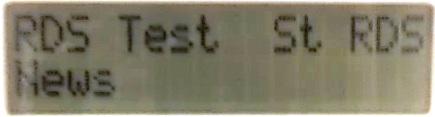
Evaluate the RDS messages on the receiver.
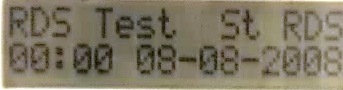
The RDS information is displayed on the RDS receiver, as shown below:
Programme Service Name: RDS Test
Radio Text: Radio Text
Programme Type (PTY) : news
Modified Julian Day: 08-08, 2008
UTC Minute: 0
UTC Hour: 0