In the UL collaborative SM mode, two subscriber stations share a common burst allocation. N7615C Signal Studio for Mobile WiMAX 2018 supports the creation of an uplink signal containing the collaborative SM burst in two different modes. When fading is not turned on, this software creates waveforms that correspond to the transmitted signals from the two subscriber stations. The master instrument will have the signal from the first subscriber with pilot pattern A, while the slave source will have the signal from the second subscriber with pilot pattern B. In the case, you can not combine regular data bursts with the collaborative SM burst.
When fading is enabled, this software generates the waveforms that would be received by the two base station antennas. In this scenario, you can include both regular bursts and the collaborative bursts. Two sets of fading channel parameters can be specified, each representing the conditions between one of the subscriber stations and the two base station antennas in a 1x2 SM configuration. The first set of channel parameters are applied to any regular bursts.
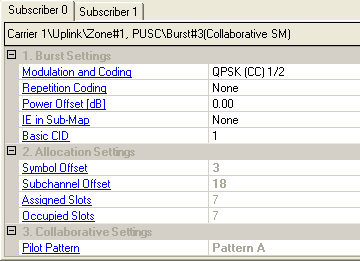
Select the modulation type, coding type, and coding rate from the drop down menu. The type of coding available depends on the burst profile.
RAW – Data is mapped to the OFDMA user carriers without any randomizing, encoding, or interleaving.
CC – Data is randomized, encoded using convolutional coding, and interleaved according to the standard specifications.
CTC – Data is randomized, encoded using convolutional turbo coding, and interleaved according to the standard specifications.
Choices: None, 2, 4, 6
Select the number of times the coded or uncoded data is repeated.
Range: –40.00 to +9.00 dB
Select the power offset of the burst, in dB.
Choices: None, Sub-DL-UL-MAP #1, Sub-DL-UL-MAP #2, Sub-DL-UL-MAP #3
Double-click or use the drop-down menu to specify which Sub-DL-UL MAP the MAP IE will be placed. None represents that the MAP IE is placed into the normal or compressed MAP message.
To assign the MAP IE to the specific Sub-DL-UL MAP, the status of the corresponding Sub-DL-UL MAP must be on.
Range: 1 to 32591
Set the Basic Connection ID that identifies a specified subscriber station where the UL MAP IE are described.
When Auto Allocation is on in the Zone editing window, an algorithm configures the bursts automatically based on the number of occupied slots and maximum number of subchannels available in the zone, avoiding any burst overlap if possible. If Auto Allocation is off, you can manually position the data region by editing the symbol and subchannel offsets.
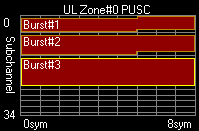
You can view the automatic or manual  burst allocation
configurations in the zone
plot view. Any bursts that overlap, exceed the number of assigned
slots, or are too small are shown in red.
burst allocation
configurations in the zone
plot view. Any bursts that overlap, exceed the number of assigned
slots, or are too small are shown in red.
If Auto Allocation is off in the Zone editing window, use this cell to manually position the burst on the horizontal axis (x), if necessary, to avoid any burst overlap.
If Auto Allocation is off in the Zone editing window, use this cell to manually position the burst on the vertical axis (y), if necessary, to avoid any burst overlap.
Displays the total available slots in the burst. If Auto Allocation is off, you can edit this cell.
Displays how many slots are needed for the burst, based on the total length in bytes of all MAC PDUs. It also depends on the rate ID and coding type selected for each burst.
When Channel State is Off, if a uplink PUSC zone has collaborative bursts, all its bursts must be collaborative bursts. The combination of the collaborative bursts and other bursts is not supported.
Choices: Normal, Pattern A, Pattern B
Double-click or use the drop-down menu to select the pilot pattern.
- For non-collaborative burst, it’s always set to Normal.
& - For collaborative burst pair, if the first subscriber (subscriber0, corresponding to the master instrument) of the burst will be with pilot pattern A, the second subscriber (subscriber1, corresponding to the slave instrument) of the burst will be with pilot pattern B.