Last updated: 2014-11-28
Press the CALL SETUP key.
Press the left More key to move to the Call Control 2 of 3 menu.
Press Cell Parameters ( F2 ).

Set BCCH Update Page to Auto, if desired, so that the UE will be notified of any changes to the BCCH information transmitted by the test set after the call is established.
Set ATT (IMSI Attach) Flag State to On, if required for your UE to register with the test set.
It is suggested that you set the Protocol Revision Control to Auto.
Select Close Menu ( F6 ).
Connect the UE to the front panel RF IN/OUT port and power it on.
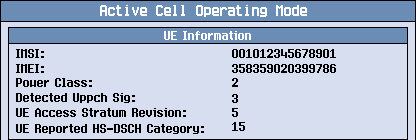
After a few seconds the UE should register with the test set. The test set then displays UE Information such as IMSI and IMEI on the Call Setup screen and the MM Status should change from None to IMSI Attached.
.
Establish the call
For the Test set originated call:
Select Paging Service ( F9 ) and set as needed.
If Paging Service is set to RB Test Mode, select Channel Type ( F8 ) and set as needed.
If Paging Service is set to AMR Voice, go to Call Control 3 of 3, Voice Call ( F3 ) and set the AMR parameters as needed.
Select Originate Call ( F3 ).
Answer the call if necessary, and verify that Connected is displayed in the Active Cell window.
For the UE initiated call:
Dial a number into the UE and press send.
Verify that Connected is displayed in the Active Cell window.
![]()
This section is only applicable to the feature-licensed test application.
To set up an HSDPA call, you need to set the following cell parameters additionally besides Set Cell Parameters described in the TD-SCDMA call section.
In the Cell Parameters menu, set the PS Domain Information to Present.
Press the CALL SETUP key.
Set Paging Service ( F9 ) to RB Test Mode.

Set Channel Type ( F8 ) to 12.2k RMC + HSDPA.
Select HSPA Parameters (F11) -> HSDPA Parameters (F7).
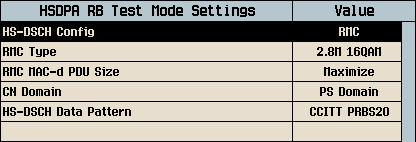
Select HSDPA RB Test Mode Setup ( F7 ).
Set the HS-DSCH Config to match your test requirements. If RMC is selected, the test set will set the downlink properties according to RMC Type, and you can use this option to test 9.3.1A to 9.3.1E; If VRC is selected, the test set will vary the downlink properties according to the UE's indication, and you can use this option to test 9.3.2A to 9.3.2E. The HSSCCH Detection option allows you to perform 9.3.4. See HS-DSCH Config.
(Optional) If RMC is selected as the HS-DSCH Config, set the RMC Type as supported by your UE. You can view the UE Reported HS-DSCH Category on the UE Information Screen.
Note that the RMC Type must be set strictly to match the UE capability, or you will see the HSDPA BLER very high after connection.
Set CN Domain as needed. The test set supports to set up an HSDPA connection over PS or CS+PS domain.
Set other HSDPA RB Test Mode Setup parameters as needed, then select Close Menu ( F6 ).

6. Set MAC-hs Parameters ( F8 ) and H-RNTI Parameters ( F9 ) as needed, then select Close Menu ( F6 ).
Connect the UE to the front panel RF IN/OUT port and power it on.
After a few seconds the UE should register with the test set.
Select Originate Call ( F3 ).
Verify that Connected is displayed in the Active Cell window and observe the HSDPA counter.

This section is only applicable to the feature-licensed test application.
To set up an HSUPA call, you need to set the following cell parameters additionally besides Set Cell Parameters described in the TD-SCDMA call section.
In the Cell Parameters menu, set the PS Domain Information to Present.
Press the CALL SETUP key.
Set Paging Service ( F9 ) to RB Test Mode.

Set Channel Type ( F8 ) to 12.2k RMC + HSPA.
Select HSPA Parameters (F11) -> HSUPA Parameters (F8).
Select HSUPA RB Test Mode Setup ( F7 ).
Set the FRC Type to meet the test requirement specified by the 3GPP TS 34.122. For example, if you want to test 3GPP TS 34.122 test case 11.1, you need to set FRC Type to FRC1a. Likewise, set FRC Type to FRC1b for 3GPP TS 34.122 test case 11.2, FRC2 for 3GPP TS 34.122 test case 5.7.1A, and FRC3 for 3GPP TS test cases 5.2A, 5.5.2.1A, and 5.5.2.2A. Note that FRC Type is set to FRC3 by default.
Set the E-HICH Behavior as needed. The test set supports the setup ALL ACKs or ALL NACKs
Set other HSUPA RB Test Mode Setup parameters as needed, then select Close Menu ( F6 ).

6. Set E-RNTI Parameters ( F9 ) as needed, then select Close Menu ( F6 ).
Connect the UE to the front panel RF IN/OUT port and power it on.
After a few seconds the UE should register with the test set.
Select Originate Call ( F3 ).
Verify that Connected is displayed in the Active Cell window and observe the HSUPA counter.
